Becoming a nurse is more than just choosing a career path; it’s embracing a calling to serve others and make a significant impact on people’s lives. Nursing is a noble profession that combines scientific knowledge, technical skills, and compassionate care. When you become a nurse, you commit to being a caregiver, advocate, educator, and lifelong learner.
Understanding the Nursing Profession
The nursing profession is multifaceted and dynamic. Nurses play a crucial role in the healthcare system, working alongside doctors and other healthcare professionals to provide comprehensive patient care. The American Nurses Association defines nursing as “the protection, promotion, and optimization of health and abilities, prevention of illness and injury, alleviation of suffering through the diagnosis and treatment of human response, and advocacy in the care of individuals, families, communities, and populations.”
Steps to Choose Nursing as a Career
Self-assessment: Evaluate your interests, strengths, and values.
Research: Learn about the various nursing roles and specialties.
Education planning: Determine the level of education you want to pursue.
Gain experience: Volunteer or work in healthcare settings.
Network: Connect with nursing professionals and join nursing organizations.
Reflect: Consider your long-term career goals in nursing.
What a Nurse Must Know
A nurse must possess a wide range of knowledge and skills:
Medical knowledge: Anatomy, physiology, pharmacology, and disease processes.
Technical skills: Administering medications, wound care, and operating medical equipment.
Communication skills: Effective interaction with patients, families, and healthcare team members.
Critical thinking: Ability to assess situations and make quick, informed decisions.
Empathy and compassion: Understanding and addressing patients’ emotional needs.
Cultural competence: Providing care that respects diverse backgrounds and beliefs.
Ethics and professionalism: Upholding the values and standards of the nursing profession.
What Are the Different Nursing Careers Available?
The nursing field offers a wide array of career opportunities, allowing nurses to specialize in various areas of healthcare.
Exploring Registered Nurse Roles
Registered Nurses (RNs) form the backbone of the healthcare system. They can work in various settings, including:
Hospitals
Clinics
Schools
Home health agencies
Nursing homes
Community health centers
RNs can specialize in areas such as:
Critical care
Emergency
Oncology
Pediatrics
Geriatrics
Mental health
What is a Nurse Practitioner?
A Nurse Practitioner (NP) is an advanced practice registered nurse who has additional responsibilities for administering patient care than RNs. NPs can:
Diagnose and treat common health conditions
Prescribe medications
Order and interpret diagnostic tests
Provide patient education and counseling
NPs often work in primary care settings but can also specialize in areas like family practice, pediatrics, or geriatrics.
Specialties in the Nursing Field
The nursing field offers numerous specialties, allowing nurses to focus on specific areas of interest:
Pediatric Nurse: Specializes in caring for children and adolescents.
Oncology Nurse: Focuses on caring for cancer patients.
Psychiatric Mental Health Nurse: Works with patients with mental health disorders.
Nurse Anesthetist: Administers anesthesia and monitors patients during surgical procedures.
Clinical Nurse Specialist: Provides expert care in specialized areas and often takes on leadership roles.
Nurse Educator: Teaches and trains future nurses in academic or clinical settings.
Nurse Researcher: Conducts studies to improve nursing practice and patient outcomes.
What Are the Educational Requirements for Nursing?
The educational requirements for nursing vary depending on the level of practice and specialization.
Degree in Nursing: What You Need to Know
Licensed Practical Nurse (LPN): Requires completion of a state-approved practical nursing program, typically lasting 12-18 months.
Associate Degree in Nursing (ADN): A two-year program that prepares students for entry-level nursing positions.
Bachelor of Science in Nursing (BSN): A four-year degree that provides a more comprehensive education in nursing theory and practice.
Master of Science in Nursing (MSN): Required for advanced practice roles like Nurse Practitioner or Clinical Nurse Specialist.
Doctor of Nursing Practice (DNP) or Ph.D. in Nursing: Highest level of nursing education, focused on advanced clinical practice or research.
Choosing the Right Nursing School
When selecting a nursing school, consider:
Accreditation status
NCLEX pass rates
Clinical experience opportunities
Faculty qualifications
Program flexibility (online vs. on-campus options)
Opportunities for career advancement and specialization
Personal satisfaction from making a positive impact on patients’ lives
Continuous learning and professional development
Global career opportunities
Long-term Career Paths in Nursing
Nursing offers diverse long-term career paths, including:
Clinical advancement (e.g., becoming a Nurse Practitioner or Clinical Nurse Specialist)
Leadership and management roles (e.g., Nurse Manager, Director of Nursing)
Education (e.g., Nurse Educator, Faculty member)
Research and innovation
Healthcare policy and advocacy
Entrepreneurship and consulting
How to Write a Compelling Nursing Essay?
Writing a strong nursing essay is crucial for nursing school applications and academic success.
Crafting a Personal Statement for Nursing
A personal statement should:
Clearly articulate your motivation for pursuing nursing
Highlight relevant experiences and skills
Demonstrate understanding of the nursing profession
Showcase your unique qualities and perspectives
Align your goals with the program or institution you’re applying to
Elements of a Strong Nursing Profession Essay
Key components of a nursing essay include:
Clear and concise writing
Well-organized structure with introduction, body, and conclusion
Evidence-based arguments supported by credible sources
Proper citation and referencing
Reflection on personal experiences and insights
Demonstration of critical thinking and analysis
Adherence to academic writing conventions and guidelines
Examples and Samples for Nursing Essays
While it’s important to write your own original essay, studying examples can help you understand the structure and content expectations. Here are some topics for nursing essays:
“Why I Want to Become a Nurse”
“The Evolution of Nursing Practice”
“Ethical Challenges in Modern Nursing”
“The Impact of Technology on Patient Care”
“Cultural Competence in Nursing”
Remember to always customize your essay to reflect your personal experiences and perspectives.
How do I write an essay on why I want to be a nurse?
Focus on your personal motivations, relevant experiences, and understanding of the nursing profession. Highlight specific aspects of nursing that appeal to you and how your skills align with the demands of the job.
What are the 6 criteria of nursing profession?
The six criteria are: 1) Specialized body of knowledge, 2) Professional autonomy, 3) Code of ethics, 4) Commitment to lifelong learning, 5) Professional organization, and 6) Service to society.
What is the definition of nursing in an essay?
Nursing can be defined as a profession focused on providing compassionate, evidence-based care to individuals, families, and communities to promote health, prevent illness, and alleviate suffering.
Why do you dream of becoming a nurse?
Common reasons include a desire to help others, interest in healthcare, opportunity for personal growth, job stability, and the ability to make a positive impact on people’s lives.
As nursing students and professionals alike strive to improve healthcare outcomes, understanding and implementing EBP projects is crucial. This comprehensive guide explores various aspects of evidence-based practice in nursing, from choosing relevant topics to implementing projects and measuring their impact on patient care.
What Are Evidence-Based Practice Project Ideas for Nurses?
Evidence-based practice project ideas for nurses are research-driven initiatives that aim to improve patient care by integrating the best available evidence with clinical expertise and patient preferences. These projects typically focus on addressing specific healthcare challenges or exploring innovative approaches to nursing interventions.
Understanding the Concept of Evidence-Based Practice in Nursing
Evidence-based practice in nursing involves the conscientious use of current best evidence in making decisions about patient care. It combines research findings, clinical expertise, and patient values to guide nursing practice. EBP is essential for improving patient outcomes, reducing healthcare costs, and enhancing the overall quality of care.
How to Choose a Relevant EBP Project Idea
Selecting an appropriate EBP project idea requires careful consideration of several factors:
Identify current issues in your clinical practice area
Assess the potential impact on patient outcomes
Consider the feasibility of implementation
Evaluate available resources and support
Align with organizational goals and priorities
When choosing a topic, nurses should focus on areas where they can make a significant difference in patient care or address pressing challenges in their healthcare setting.
Examples of Evidence-Based Practice in Nursing
Some examples of evidence-based practice in nursing include:
Implementing a nurse-led protocol for early mobilization of ICU patients to reduce the risk of complications
Developing a standardized handoff process to improve communication during shift changes
Introducing a falls prevention program based on the latest research findings
Implementing a pain management protocol that incorporates both pharmacological and non-pharmacological interventions
These examples demonstrate how EBP can be applied to various aspects of nursing care to improve patient outcomes and enhance the quality of healthcare delivery.
What Are the Latest Evidence-Based Practice Nursing Topics?
Staying current with the latest evidence-based practice nursing topics is essential for advancing the profession and improving patient care. Here are some areas of focus in contemporary nursing research:
Exploring Current Trends in Nursing Research
Telehealth and remote patient monitoring
Precision medicine and personalized care
Artificial intelligence and machine learning in healthcare
Nurse burnout prevention and well-being strategies
Patient engagement and shared decision-making
Integrating social determinants of health into nursing practice
These trends reflect the evolving nature of healthcare and the increasing importance of technology and holistic approaches to patient care.
Quality Improvement Projects in Nursing Practice
Quality improvement (QI) projects are an integral part of evidence-based practice in nursing. Some examples include:
Reducing hospital-acquired infections through improved hand hygiene protocols
Enhancing medication safety by implementing barcode scanning technology
Improving patient satisfaction scores through targeted interventions
Reducing emergency department wait times through process optimization
QI projects often involve interdisciplinary collaboration and focus on measurable outcomes to drive continuous improvement in healthcare delivery.
Evidence-Based Practice Nursing Research Topics for Capstone Projects
For nursing students working on capstone projects, here are some potential EBP research topics:
The impact of nurse-to-patient ratios on patient outcomes in critical care settings
Effectiveness of mindfulness-based interventions in managing chronic pain
Implementation of family-centered care models in pediatric nursing
The role of nurse navigators in improving cancer patient outcomes
Evaluating the effectiveness of simulation-based training in nursing education
These topics offer opportunities for in-depth exploration of evidence-based practices and their potential to improve patient care.
How to Implement an Evidence-Based Practice Project?
Implementing an evidence-based practice project requires a structured approach to ensure success and sustainability.
Steps for Implementing Evidence-Based Changes in Clinical Practice
Following these steps helps ensure that the EBP project is well-planned, evidence-driven, and effectively implemented in the clinical setting.
How to Measure Patient Outcomes in EBP Projects
Measuring patient outcomes is crucial for evaluating the success of EBP projects. Some strategies include:
Establishing clear, measurable objectives
Using validated assessment tools and scales
Collecting both quantitative and qualitative data
Implementing pre- and post-intervention assessments
Utilizing electronic health records for data collection
Conducting patient satisfaction surveys
Monitoring key performance indicators relevant to the project
By systematically measuring outcomes, nurses can demonstrate the impact of their EBP projects on patient care and justify continued support for evidence-based initiatives.
Challenges in the Implementation of Evidence-Based Practice
While implementing EBP projects, nurses may encounter several challenges:
Resistance to change from colleagues or leadership
Limited resources or time constraints
Lack of access to current research or databases
Difficulties in translating research findings into practice
Organizational culture that may not prioritize EBP
Insufficient training or support for EBP implementation
Addressing these challenges requires persistence, effective communication, and ongoing education to foster a culture that values and supports evidence-based practice in nursing.
What Are Some Examples of Evidence-Based Practice Nursing Research Topics?
Evidence-based practice nursing research topics span a wide range of areas within healthcare. Here are some examples:
Identifying Research Topics Related to Patient Care
The effectiveness of patient education programs in managing chronic diseases
Impact of nurse-led discharge planning on hospital readmission rates
Comparison of different pain assessment tools in pediatric patients
Evaluation of interventions to reduce medication errors in acute care settings
The role of culturally competent care in improving health outcomes for diverse populations
These topics focus on direct patient care interventions and their potential to improve health outcomes.
Exploring Nursing Interventions Supported by Evidence
Implementation of early warning systems to detect patient deterioration
Effectiveness of music therapy in reducing anxiety in preoperative patients
Impact of nurse-led smoking cessation programs on quit rates
Comparison of different wound care protocols in promoting healing
Evaluation of nurse-driven protocols for managing sepsis
These research areas explore specific nursing interventions that have shown promise in improving patient care based on current evidence.
EBP Topics Focused on Public Health and Community Care
Effectiveness of community-based fall prevention programs for older adults
Impact of school nurse interventions on childhood obesity rates
Evaluation of home visiting programs for high-risk pregnant women
Implementation of evidence-based strategies to increase vaccination rates
Assessment of nurse-led interventions to reduce health disparities in underserved communities
These topics highlight the important role of nursing in public health and community-based care initiatives.
How Can Nursing Education Benefit from Evidence-Based Practice?
Integrating evidence-based practice into nursing education is essential for preparing future nurses to deliver high-quality, patient-centered care.
The Role of EBP in Nursing School Curriculum
Incorporating EBP courses throughout the nursing program
Teaching critical appraisal skills for evaluating research evidence
Integrating EBP concepts into clinical simulation scenarios
Encouraging student participation in EBP projects and research
Fostering collaboration between nursing schools and healthcare institutions for EBP initiatives
By emphasizing EBP in nursing education, schools can better prepare students for the realities of modern healthcare practice.
Preparing Nursing Students for Evidence-Based Clinical Practice
Providing hands-on experience with EBP implementation during clinical rotations
Teaching strategies for accessing and utilizing current research findings
Developing skills in formulating clinical questions and conducting literature searches
Encouraging critical thinking and decision-making based on evidence
Fostering a culture of inquiry and continuous learning
These approaches help nursing students develop the skills and mindset necessary for evidence-based clinical practice.
Enhancing Nursing Leadership Through EBP Education
Developing courses focused on EBP implementation and change management
Incorporating leadership skills in EBP project planning and execution
Teaching strategies for promoting EBP adoption within healthcare organizations
Encouraging participation in interdisciplinary EBP initiatives
Fostering skills in disseminating EBP findings and influencing policy
By emphasizing leadership in EBP education, nursing programs can prepare future nurse leaders to drive positive change in healthcare settings.
What Are the Best Evidence-Based Practice Project Ideas for Nursing Students?
Nursing students can benefit from engaging in EBP projects that are both challenging and relevant to current healthcare needs.
Top EBP Project Ideas to Improve Patient Care
Implementing a standardized bedside handoff protocol to enhance patient safety
Developing a nurse-led intervention to reduce hospital-acquired pressure ulcers
Evaluating the effectiveness of a multimodal approach to pain management in postoperative patients
Implementing a protocol for early mobilization of mechanically ventilated patients
Assessing the impact of a nurse-led heart failure education program on hospital readmission rates
These project ideas offer opportunities for nursing students to make meaningful contributions to patient care improvement.
Innovative Topics for Nursing Research Papers
The role of artificial intelligence in supporting clinical decision-making for nurses
Exploring the potential of virtual reality in pain management for pediatric patients
Evaluating the effectiveness of mobile health applications in promoting medication adherence
Investigating the impact of nurse-led telemedicine interventions on rural healthcare access
Assessing the potential of blockchain technology in enhancing healthcare data security and interoperability
These innovative topics reflect emerging trends in healthcare and offer exciting avenues for nursing research.
Capstone Project Ideas Focused on EBP Implementation
Developing and implementing an evidence-based protocol for preventing catheter-associated urinary tract infections
Creating a nurse-led program to improve vaccination rates among healthcare workers
Implementing an evidence-based delirium prevention protocol in the intensive care unit
Designing and evaluating a culturally sensitive diabetes management program for minority populations
Developing and implementing an evidence-based falls prevention program in a long-term care facility
These capstone project ideas provide opportunities for nursing students to demonstrate their ability to implement evidence-based changes in clinical practice.
What is the topic of Evidence-Based Practice in nursing?
Evidence-Based Practice in nursing is an approach that integrates the best available research evidence with clinical expertise and patient preferences to guide clinical decision-making and improve patient outcomes.
How to choose an EBP topic?
To choose an EBP topic, consider current issues in your practice area, assess potential impact on patient outcomes, evaluate feasibility, and align with organizational priorities.
Which topic is best for research in nursing?
The best research topics in nursing are those that address current healthcare challenges, have potential for significant impact on patient care, and align with the nurse’s area of expertise and interest.
What are the 4 major components of evidence based nursing?
The four major components of evidence-based nursing are:
Evidence-based practice (EBP) is about using the best research, clinical skills, and patient input to improve care. For nursing students or professionals—whether you’re working on a BSN, MSN, DNP, or just staying updated—choosing the right EBP project ideas can feel overwhelming. But it doesn’t have to! This list of Examples of Evidence-Based Practice in Nursing with Research keywords, EBP nursing ideas, EBP examples, EBP nursing research topics, and best evidence-based practice examples helps you choose the right EBP project topic.
evidence-based practice project examples
You’ll find practical evidence-based research topics across every specialty: pediatric nursing, mental health, geriatrics, nursing education, informatics, and more. Want to explore how to reduce hospital infections? Or improve pain management for cancer patients? Maybe you’re interested in using apps to teach new nurses? These EBP examples are grounded in real-world problems and designed to sharpen your research skills while improving nursing care.
Best Evidence-based practice project examples for 2025
1. Central Line-Associated Bloodstream Infection (CLABSI) Prevention: Evidence-based CLABSI prevention involves implementing care bundles that include proper hand hygiene, maximal barrier precautions during insertion, chlorhexidine skin antisepsis, optimal catheter site selection, and daily review of line necessity. The Centers for Disease Control and Prevention and The Joint Commission have established guidelines that have transformed central line care. Implementation requires comprehensive staff education, standardized insertion kits, and continuous monitoring of compliance. Keywords: CLABSI bundle, catheter-related infections, insertion protocol, chlorhexidine, maintenance bundle
2. Hourly Rounding: Hourly rounding involves nurses proactively checking on patients following a structured format, addressing the “4 Ps”: pain, positioning, personal needs, and proximity of personal items. This practice originated from patient safety research and has been widely adopted by Magnet hospitals. Implementation requires consistent documentation, leadership support, and incorporation into workflow patterns. Keywords: purposeful rounding, patient satisfaction, fall prevention, call light reduction, patient-centered care
3. Early Mobility Protocols: Early mobility protocols involve progressive activity from passive range-of-motion exercises to ambulation as soon as clinically appropriate, particularly for critically ill patients. The American Association of Critical-Care Nurses and the Society of Critical Care Medicine support early mobility as a standard of care. Implementation requires interdisciplinary collaboration between nursing, physical therapy, and respiratory therapy. Keywords: progressive mobility, ICU rehabilitation, ambulation protocol, delirium prevention, ventilator weaning
4. Chlorhexidine Bathing for ICU Patients: Daily bathing with chlorhexidine gluconate cloths for ICU patients has been adopted by many healthcare systems following research demonstrating infection reduction. The practice is supported by guidelines from the Society for Healthcare Epidemiology of America. Implementation involves standardized protocols, staff education on proper technique, and monitoring for skin sensitivity. Keywords: daily CHG bathing, antiseptic bathing, healthcare-associated infections, MRSA reduction, skin colonization
5. Nurse-Led Diabetes Self-Management Education: Nurse-led diabetes education programs follow standards established by the American Diabetes Association and the Association of Diabetes Care & Education Specialists. These programs incorporate individualized goal setting, problem-solving strategies, and ongoing support. Certified diabetes educators deliver a curriculum addressing medication management, monitoring, nutrition, and complication prevention. Keywords: DSME, diabetes educator, self-care behaviors, glycemic control, patient empowerment
6. Surgical Site Infection Prevention Bundles: Evidence-based surgical site infection prevention includes interventions supported by organizations like the Association of PeriOperative Registered Nurses: appropriate antibiotic prophylaxis, proper hair removal, maintenance of normothermia, glycemic control, and adequate oxygenation. Implementation requires perioperative checklists, standardized protocols, and continuous quality monitoring. Keywords: perioperative care bundle, SSI prevention, surgical prophylaxis, normothermia, glycemic control
7. Ventilator-Associated Pneumonia Prevention: VAP prevention bundles include elevation of the head of the bed, daily sedation interruption, oral care with chlorhexidine, and assessment of extubation readiness. These practices are endorsed by the Institute for Healthcare Improvement and the American Association of Critical-Care Nurses. Implementation requires interdisciplinary protocols and regular compliance audits. Keywords: VAP bundle, oral care protocol, head-of-bed elevation, sedation vacation, aspiration prevention
8. Targeted Temperature Management Post-Cardiac Arrest: Evidence supports maintaining body temperature between specific ranges after cardiac arrest to improve neurological outcomes. The American Heart Association includes temperature management in post-cardiac arrest care guidelines. Implementation requires specialized cooling equipment, continuous temperature monitoring, and management of physiological changes associated with temperature control. Keywords: therapeutic hypothermia, cardiac arrest recovery, neurological protection, shivering prevention, post-resuscitation care
9. Nurse-Driven Catheter Removal Protocols: Nurse-driven protocols empower nurses to assess and remove urinary catheters based on specific criteria without physician orders. These protocols are supported by the Centers for Disease Control and Prevention and the American Nurses Association as part of CAUTI prevention strategies. Implementation requires staff education, assessment tools, and electronic health record reminders. Keywords: CAUTI prevention, appropriate indications, catheter discontinuation, bladder scanning, nurse protocol
10. Delirium Prevention and Management: Evidence-based delirium protocols include regular screening using validated tools, multicomponent interventions addressing risk factors, and non-pharmacological approaches. Organizations like the American Geriatrics Society and the Society of Critical Care Medicine have established guidelines for delirium management. Implementation requires interdisciplinary collaboration and environmental modifications. Keywords: CAM-ICU, ICDSC, cognitive assessment, non-pharmacological interventions, sleep promotion
11. Standardized Handoff Communication: Structured handoff tools like SBAR (Situation, Background, Assessment, Recommendation) or I-PASS improve communication during care transitions. The Joint Commission identifies handoff communication as a National Patient Safety Goal. Implementation requires staff training, customized tools integrated into documentation systems, and monitoring of communication-related events. Keywords: care transitions, communication framework, SBAR, I-PASS, patient safety
12. Nurse-Led Heart Failure Education and Management: Comprehensive heart failure management programs led by specialized nurses follow guidelines from the American Heart Association and the Heart Failure Society of America. These programs include patient education on self-monitoring, medication management, dietary guidance, and early recognition of symptoms. Implementation requires heart failure nurse specialists and structured follow-up systems. Keywords: heart failure readmissions, self-care management, fluid restriction, symptom monitoring, medication adherence
13. Sepsis Early Recognition and Treatment Protocols: Evidence-based sepsis protocols follow the Surviving Sepsis Campaign guidelines and include early screening tools, rapid laboratory testing, and bundles of care. Many healthcare systems have implemented nurse-driven sepsis screening and response protocols. Implementation requires electronic health record alerts, interdisciplinary response teams, and continuous quality monitoring. Keywords: sepsis bundle, QSOFA, lactate monitoring, fluid resuscitation, antibiotic stewardship
14. Family Presence During Resuscitation: Evidence supports offering families the option to be present during resuscitation efforts with appropriate support from designated staff. Organizations like the Emergency Nurses Association and the American Association of Critical-Care Nurses have position statements supporting this practice. Implementation requires the development of clear policies and the designation of personnel to support family members. Keywords: family-centered care, resuscitation witness, family support facilitator, grief processing, patient rights
15. Kangaroo Care for Premature Infants: Kangaroo care involves skin-to-skin contact between parents and premature infants. This practice is endorsed by the World Health Organization and the American Academy of Pediatrics for its benefits in neonatal care. Implementation requires NICU protocols, parent education, and adaptations to the care environment to facilitate early and frequent skin-to-skin contact. Keywords: skin-to-skin contact, thermoregulation, neurodevelopment, parent-infant bonding, breastfeeding promotion
Examples of Evidence-Based Practice in Nursing with Research keywords
16. Non-Pharmacological Pain Management: Evidence-based non-drug approaches to pain management include guided imagery, music therapy, positioning, and distraction techniques. These approaches align with guidelines from organizations like the American Society for Pain Management Nursing. Implementation requires staff education on techniques, documentation of interventions, and integration into pain management algorithms. Keywords: complementary therapies, alternative pain control, multimodal analgesia, opioid-sparing, comfort measures
17. Medication Reconciliation Process: Structured medication reconciliation at transitions of care is endorsed by The Joint Commission and the Institute for Safe Medication Practices. The process involves a comprehensive comparison of medication lists and resolution of discrepancies. Implementation requires standardized forms, electronic health record support, pharmacy involvement, and staff education. Keywords: medication safety, transitions of care, adverse drug events, discrepancy resolution, home medication verification
18. Peripheral IV Care and Maintenance Bundles: Evidence-based peripheral IV management follows guidelines from the Infusion Nurses Society and includes standardized insertion techniques, dressing protocols, regular site assessment, and timely removal. Implementation requires standardized protocols, regular audits, and competency validation for all staff inserting and maintaining IVs. Keywords: phlebitis prevention, catheter dwell time, site rotation, flushing protocol, infiltration assessment
19. Oral Care Protocols for Ventilated Patients: Comprehensive oral care protocols for ventilated patients have been developed based on research showing a reduction in ventilator-associated pneumonia. These protocols are endorsed by the American Association of Critical-Care Nurses and include regular oral assessment, brushing, and oral moisturizing. Implementation requires standardized kits and regular competency assessment. Keywords: oral hygiene, chlorhexidine, dental plaque, ventilator bundle, subglottic suctioning
20. Nurse-Led Smoking Cessation Interventions: Evidence-based smoking cessation interventions incorporate the framework recommended by the U.S. Public Health Service: Ask, Advise, Assess, Assist, and Arrange. The American Nurses Association supports nurse involvement in tobacco cessation counseling. Implementation requires screening tools, referral protocols, and pharmacotherapy guidance. Keywords: tobacco dependence, nicotine replacement, motivational interviewing, relapse prevention, quitline referral
21. Pressure Injury Risk Assessment and Prevention: Comprehensive pressure injury prevention follows guidelines from the National Pressure Injury Advisory Panel and includes validated risk assessment tools, repositioning schedules, support surfaces, and nutritional support. Implementation requires standardized documentation, turning schedules, skin assessment protocols, and appropriate equipment availability. Keywords: Braden Scale, offloading, microclimate management, support surfaces, nutritional assessment
22. Reducing Alarm Fatigue: Evidence-based approaches to alarm management follow recommendations from The Joint Commission’s National Patient Safety Goal on alarm management. Strategies include customizing alarm parameters, regular assessment of alarm necessity, and tiered response systems. Implementation requires interdisciplinary committees, equipment standardization, and staff education. Keywords: alarm fatigue, clinical alarm safety, customized parameters, critical alarm identification, response prioritization
23. Evidence-Based Blood Transfusion Practices: Blood conservation strategies and restrictive transfusion protocols follow guidelines from organizations like the AABB (formerly American Association of Blood Banks) and the Society of Critical Care Medicine. These practices include single-unit transfusions and specific hemoglobin triggers. Implementation requires transfusion committees, electronic ordering systems with decision support, and staff education. Keywords: restrictive transfusion strategy, blood conservation, hemoglobin trigger, single-unit transfusion, transfusion reactions
24. Structured Discharge Planning: Comprehensive discharge planning follows recommendations from organizations like the Agency for Healthcare Research and Quality. The process begins at admission and includes assessment of post-discharge needs, medication education, and follow-up communication. Implementation requires discharge planning tools, interdisciplinary collaboration, and post-discharge follow-up protocols. Keywords: transitions of care, readmission prevention, medication reconciliation, teach-back method, follow-up appointment
25. Evidence-Based Wound Care Protocols: Wound care protocols based on wound etiology and characteristics follow guidelines from organizations like the Wound, Ostomy and Continence Nurses Society. These protocols include appropriate assessment tools, cleansing methods, dressing selection, and infection management. Implementation requires wound care specialists and staff education on wound classification. Keywords: wound assessment tools, moisture balance, debridement methods, biofilm management, wound healing markers
26. Nurse-Led Transitional Care Models: Transitional care models involve specialized nurses following patients from hospital to home with structured visits and support. These models were pioneered by nurse researchers like Mary Naylor and Eric Coleman. Implementation requires advanced practice nurses, structured visit protocols, and collaboration with community resources. Keywords: care transitions, home visits, post-discharge follow-up, medication management, self-care coaching
27. Music Therapy for Symptom Management: Evidence supports using music therapy during procedures and for symptom management, as recognized by the American Music Therapy Association. Research has demonstrated effects on anxiety, pain, and physiological parameters. Implementation requires the development of music libraries and guidelines for appropriate implementation based on patient preferences. Keywords: anxiety reduction, procedural support, pain distraction, patient-selected music, headphone delivery
28. Early Warning Scoring Systems: Early warning systems use objective parameters to identify deteriorating patients before critical events. These systems are endorsed by organizations like the Institute for Healthcare Improvement and the National Institute for Health and Care Excellence. Implementation requires standardized assessment tools, response protocols, and rapid response team activation criteria. Keywords: NEWS score, MEWS, deterioration recognition, rapid response activation, vital sign trends
29. Bereavement Support Programs: Evidence-based bereavement support follows guidelines from organizations like the National Hospice and Palliative Care Organization. Support includes structured follow-up with families after patient death, memory-making activities, and referral to resources. Implementation requires bereavement coordinators and staff education on supporting grieving families. Keywords: grief support, family follow-up, legacy building, compassionate care, memory creation
30. Nurse-Led Antibiotic Stewardship: Nursing involvement in antibiotic stewardship aligns with recommendations from the Centers for Disease Control and Prevention and the American Nurses Association. Nurse responsibilities include accurate allergy documentation, timely specimen collection, monitoring for adverse effects, and promotion of appropriate therapy duration. Implementation requires education on antimicrobial resistance and collaboration with pharmacy. Keywords: antimicrobial stewardship, appropriate prescribing, culture collection, IV-to-oral conversion, resistance prevention
Easy EBP Project Ideas Nursing
Effectiveness of nurse-led transitional care models in reducing 30-day readmissions for patients with chronic heart failure
Explores how structured nurse interventions during the transition from hospital to home can improve outcomes
Impact of mandatory nurse-patient ratios on patient safety outcomes and nurse satisfaction
Investigate the relationship between staffing levels and measurable quality improvement indicators.
Comparison of various pain assessment tools for accuracy in pediatric populations with developmental disabilities
Evaluates which instruments provide the most reliable pain measurements in challenging assessment situations
Evidence-based interventions to reduce workplace violence against emergency department nurses
Examine the effectiveness of safety protocols, environmental modifications, and training programs
Effectiveness of simulation-based education versus traditional clinical teaching methods for new graduate nurses
Measures competency development and confidence between different educational approaches
Implementation science approach to improving compliance with sepsis bundles in emergency departments
Investigate barriers and facilitators to adherence to evidence-based sepsis protocols.
Nurse-led protocols for early mobilization of post-surgical patients: impact on recovery timelines and complications
Examines how structured mobility interventions affect key recovery metrics
Effectiveness of various delirium prevention strategies in hospitalized elderly patients
Compares multicomponent interventions for reducing delirium incidence and severity
Cultural adaptation of diabetes self-management education for specific ethnic populations
Explores how culturally tailored approaches improve adherence and outcomes
Impact of dedicated education units on nursing student clinical competency development
Evaluates partnership models between academic and healthcare institutions
Evidence-based approaches to reducing maternal mortality in rural healthcare settings
Examines interventions that can be implemented in resource-limited environments
Effectiveness of telehealth monitoring for patients with multiple chronic conditions: nursing implications
Investigate remote care models and the nursing role in virtual health management
Nurse-led motivational interviewing techniques for improving medication adherence in psychiatric patients
Examines communication approaches that enhance treatment compliance
Comparison of wound care protocols for pressure injury prevention in high-risk populations
Evaluates the effectiveness of different evidence-based prevention bundles
Implementation of trauma-informed care principles in emergency nursing practice
Explores how this approach affects patient experience and outcomes
Effectiveness of various hand hygiene promotion strategies on healthcare worker compliance
Compare interventions for sustaining hand hygiene behavior change
Nurse navigator programs for improving cancer patient outcomes and experience
Examines the impact of dedicated nurse coordination on the cancer care journey
Evidence-based interventions for addressing compassion fatigue and moral distress in critical care nurses
Evaluates programs designed to support nurse wellbeing and retention
Impact of standardized communication tools on reducing medication errors during transitions of care
Explores how structured information exchange affects medication safety
Cost-effectiveness analysis of nurse-led chronic disease management programs in primary care settings
Examines the economic and clinical value of expanding nursing roles in disease management
Examples of evidence-based practice nursing topics 2025 | EBP Nursing Topics
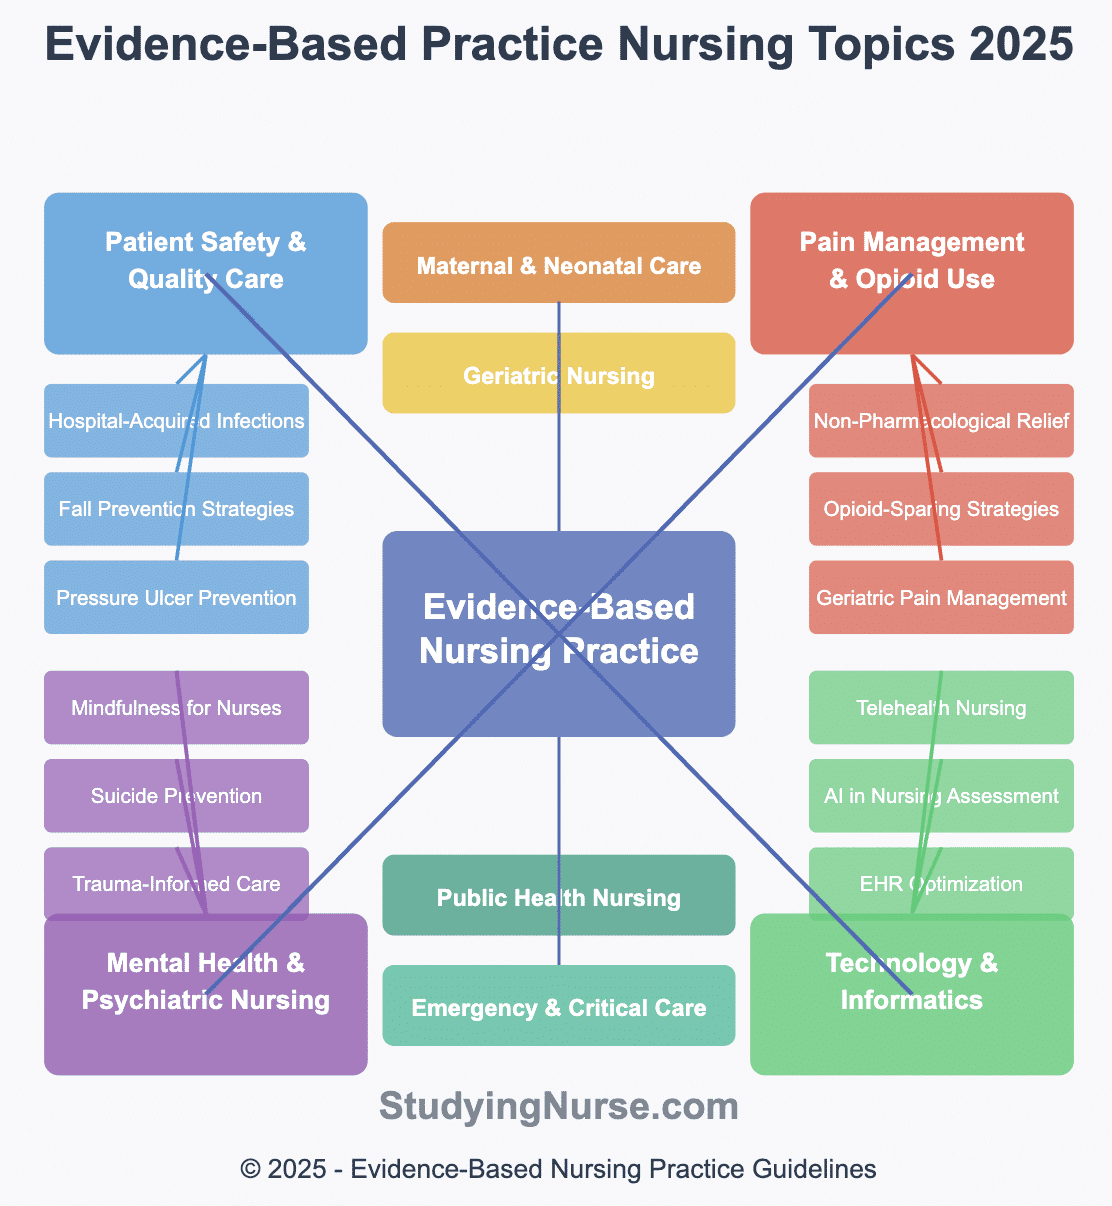
Evidence-Based Practice Nursing Topics 2025
In 2025, Evidence-Based Practice (EBP) in nursing continues to evolve, incorporating advancements in technology, patient-centered care, and new research findings. Below are key EBP nursing topics that are relevant for current practice:
1. Patient Safety and Quality Care
Reducing Hospital-Acquired Infections (HAIs) – Best practices for preventing central line-associated bloodstream infections (CLABSIs), catheter-associated urinary tract infections (CAUTIs), and ventilator-associated pneumonia (VAP).
Fall Prevention Strategies – Use of predictive tools, fall prevention bundles, and environmental modifications.
Pressure Ulcer Prevention – Skin assessment protocols, repositioning techniques, and early intervention technologies.
2. Pain Management and Opioid Use
Non-Pharmacological Pain Management – Use of music therapy, guided imagery, aromatherapy, and virtual reality in pain control.
Opioid-Sparing Strategies – Role of multimodal analgesia and alternative pain relief methods to reduce opioid dependence.
Chronic Pain Management in Elderly Patients – Effective and safe pain management options for older adults with multiple comorbidities.
3. Mental Health and Psychiatric Nursing
Suicide Prevention in Hospital Settings – Identifying high-risk patients and implementing evidence-based interventions.
Mindfulness and Stress Reduction for Nurses – Preventing burnout and improving mental well-being among healthcare providers.
Trauma-Informed Care in Nursing – Enhancing patient outcomes through a trauma-sensitive approach.
4. Maternal and Neonatal Care
Skin-to-Skin Contact and Breastfeeding Support – Benefits of early bonding and breast milk for neonatal health.
Postpartum Depression Screening – Early identification and intervention strategies for new mothers.
Delayed Cord Clamping in Newborns – Updated guidelines and benefits for neonatal health.
5. Emergency and Critical Care Nursing
Sepsis Early Recognition and Treatment – Implementation of the latest sepsis care bundles.
Rapid Response Teams (RRTs) in Hospitals – Reducing patient deterioration through early intervention.
Point-of-Care Ultrasound (POCUS) in Nursing – Enhancing bedside diagnostics in emergency settings.
6. Geriatric Nursing and Long-Term Care
Polypharmacy Management in Older Adults – Reducing medication overload and adverse drug reactions.
Dementia and Alzheimer’s Disease Care – Effective strategies for managing agitation, confusion, and behavioral issues.
End-of-Life Care and Palliative Nursing – Improving comfort and dignity in hospice settings.
7. Technology and Informatics in Nursing
Artificial Intelligence in Nursing Assessment – Use of AI to predict patient deterioration and improve workflow.
Telehealth Nursing and Remote Patient Monitoring – Expanding access to care through digital health solutions.
Electronic Health Records (EHR) Optimization – Reducing documentation burden and enhancing patient data security.
8. Public Health and Community Nursing
Vaccine Hesitancy and Public Education – Strategies to Improve Immunization Rates.
Social Determinants of Health (SDOH) in Nursing Care – Addressing disparities in healthcare access.
Community-Based Interventions for Chronic Disease Prevention – Lifestyle modifications to reduce diabetes and hypertension prevalence.
9. Ethical and Legal Issues in Nursing
Nursing and Patient Autonomy – Balancing ethical decision-making and patient rights.
Workplace Violence Prevention in Healthcare – Strategies to protect nurses from aggression and abuse.
Cultural Competency in Nursing Practice – Providing equitable care for diverse populations.
10. Nursing Education and Professional Development
Simulation-Based Training for Nursing Students – Enhancing clinical skills through virtual and mannequin simulations.
Mentorship Programs for New Nurses – Improving retention and transition to practice.
Continuing Education in Nursing Leadership – Developing strong nurse leaders through advanced training.
How do you choose the best EBP nursing topics?
How to Choose the Best EBP Nursing Topics
When choosing an Evidence-based practice (EBP) nursing topic, think about a clinical topic, problem, or question that interests you and/or from your personal, professional, or clinical experience.
As we look towards 2025, your nursing research problem/question should be related to contemporary nursing practice in some way. In other words, there needs to be nursing implications to addressing your question in the specific EBP project topic area that you select.
So, do you need ideas for a paper on evidence-based practice? This article provides a list of EBP Nursing Research Topics for 2025 that will help you address specific nursing practice problems.
Selecting an appropriate research topic is crucial for conducting meaningful, evidence-based practice in nursing. When choosing a topic, consider the following:
Relevance to current nursing practice
Potential to improve patient outcomes
Alignment with your areas of interest or expertise
Availability of research evidence
Feasibility of implementing findings in clinical settings
Remember, the goal is to find a topic that not only interests you but also has the potential to enhance nursing care and patient experiences.
Evidence-based projects in Nursing Topics
Qualitative Nursing EBP Project Ideas
Qualitative research in nursing focuses on exploring the experiences, perceptions, and behaviors of patients and healthcare providers. This approach is valuable for understanding complex phenomena in healthcare settings. Here are 10 qualitative nursing research topics:
Exploring nurses’ experiences with implementing evidence-based practice guidelines
Patient perceptions of nurse-led interventions in chronic disease management
The impact of cultural competence training on nursing care delivery
Nurses’ experiences with ethical decision-making in end-of-life care
Exploring the lived experiences of new graduate nurses transitioning to practice
Patient experiences with mindfulness-based interventions for pain management
Nurses’ perspectives on barriers to EBP implementation in clinical settings
The role of nurse leaders in promoting a culture of evidence-based practice
Exploring family experiences with pediatric palliative care services
Nurses’ experiences with using telehealth technologies in rural healthcare settings
Quantitative Nursing EBP Project Ideas
Quantitative research in nursing involves collecting and analyzing numerical data to test hypotheses and establish relationships between variables. Here are 10 quantitative research topics:
Effectiveness of nurse-led education programs on medication adherence among patients with chronic conditions
Impact of evidence-based fall prevention protocols on reducing fall rates in acute care settings
Evaluation of early mobilization interventions on length of stay for surgical patients
Comparison of different nursing handoff methods on reducing medical errors
Effects of implementing evidence-based pressure ulcer prevention strategies on incidence rates
Assessing the impact of nurse-to-patient ratios on patient outcomes and nurse burnout
Evaluating the effectiveness of evidence-based delirium prevention protocols in ICU settings
Measuring the impact of EBP implementation on hospital-acquired infection rates
Analyzing the relationship between nurses’ EBP competencies and patient satisfaction scores
Assessing the effectiveness of nurse-led smoking cessation interventions on quit rates
Good Nursing Research Topics for Evidence-based Practice
Choosing good research topics is essential for advancing nursing science and improving patient care. Working on an Evidence-based Practice project, here are good ebp project ideas areas consider:
Implementing a nurse-driven protocol for early sepsis recognition and management
Developing and evaluating a mindfulness-based stress reduction program for oncology nurses
Creating an evidence-based toolkit for managing behavioral symptoms in dementia patients
Implementing a nurse-led transitional care program to reduce hospital readmissions
Evaluating the effectiveness of a peer mentoring program for new graduate nurses
Exploring the use of artificial intelligence in nursing decision support systems
Evaluating the impact of virtual reality training on nursing skills acquisition
Investigating the role of genomics in personalized nursing care
Assessing the effectiveness of mobile health apps in promoting patient self-management
Examining the impact of climate change on population health and nursing practice
Implementing an evidence-based hand hygiene protocol to reduce healthcare-associated infections
Evaluating the effectiveness of nurse-led diabetes education programs on patient outcomes
Implementing a standardized pain assessment tool in pediatric units
Assessing the impact of bedside shift reports on patient satisfaction and safety
Evaluating the effectiveness of evidence-based interventions for preventing catheter-associated urinary tract infections
Evaluating the effectiveness of nurse residency programs on retention rates
Assessing the impact of flexible scheduling on nurse job satisfaction and burnout
Investigating the role of leadership styles in reducing nurse turnover
Evaluating the effectiveness of international nurse recruitment strategies
Assessing the impact of workplace violence prevention programs on nurse retention
Implementing shared decision-making models in clinical practice
Evaluating the effectiveness of nurse-led clinics in managing chronic conditions
Assessing the impact of evidence-based preoperative fasting guidelines on patient outcomes
Implementing evidence-based strategies for preventing central line-associated bloodstream infections
Evaluating the effectiveness of multicomponent interventions for preventing hospital-acquired pressure injuries
Exploring the use of telenursing in providing care to rural and underserved populations
Evaluating the effectiveness of nurse-led interventions in addressing social determinants of health
Assessing the impact of nurse practitioner-led primary care on patient outcomes and healthcare costs
Investigating the role of nurses in promoting vaccine acceptance and addressing vaccine hesitancy
Evaluating the effectiveness of evidence-based interventions for managing post-COVID-19 symptoms
NICU EBP Project Ideas – 15 NICU Evidence-Based Practice Project Ideas
NICU stands for Neonatal Intensive Care Unit, a specialized hospital department that provides intensive medical care for newborns who require advanced support. These units care for:
Premature infants (born before 37 weeks of gestation)
Low birth weight babies
Infants with congenital abnormalities
Newborns with respiratory distress, infections, or other medical conditions
Babies requiring surgery or specialized medical interventions
NICU teams include neonatologists, specialized nurses, respiratory therapists, nutritionists, pharmacists, and other professionals with specific training in neonatal care. The environment features sophisticated medical equipment adapted for tiny patients, including incubators, ventilators, and advanced monitoring systems.
Kangaroo Care Implementation Protocol: Develop standardized guidelines for skin-to-skin contact between parents and premature infants, including assessment criteria, duration recommendations, and monitoring parameters to improve thermoregulation, weight gain, and parent-infant bonding. Keywords: skin-to-skin contact, thermoregulation, parental involvement, attachment, physiological stability
Noise Reduction Strategy: Design and implement a comprehensive noise reduction program, including sound monitoring, staff education, equipment modification, and a designated quiet period, to reduce stress responses and improve sleep quality in premature infants. Keywords: developmental care, environmental stimuli, acoustic monitoring, sleep protection, stress reduction
Non-Pharmacological Pain Management Bundle: Create an evidence-based protocol for procedural pain management incorporating sucrose solutions, facilitated tucking, swaddling, and non-nutritive sucking to minimize physiological stress during routine painful procedures. Keywords: neonatal pain assessment, sucrose analgesia, containment, comfort measures, PIPP score
Necrotizing Enterocolitis Prevention Protocol: Implement a standardized feeding advancement protocol with human milk prioritization, probiotic administration, and standardized fortification practices to reduce NEC incidence in very low birth weight infants. Keywords: human milk feeding, gut microbiome, trophic feeding, feeding intolerance, probiotic supplementation
NICU-Specific Infection Prevention Bundle: Develop a comprehensive infection prevention program including central line care, hand hygiene compliance monitoring, antibiotic stewardship, and skin care practices tailored specifically for the neonatal population. Keywords: CLABSI prevention, skin integrity, antimicrobial stewardship, healthcare-associated infections, bundle compliance
Family-Integrated Care Model: Implement a structured program to engage parents as primary caregivers in the NICU, including education, mentorship, participation in medical rounds, and gradual assumption of care responsibilities. Keywords: parental empowerment, family-centered care, discharge readiness, caregiver confidence, parental presence
Standardized Neonatal Positioning Protocol: Develop evidence-based guidelines for developmental positioning using commercially available positioning aids and standardized assessment tools to promote optimal neurodevelopment and prevent positional deformities. Keywords: developmental positioning, postural support, physiological flexion, midline orientation, motor development
Breastfeeding Support for NICU Mothers: Create a comprehensive lactation support program including early pumping protocols, skin-to-skin care, non-nutritive sucking at the breast, and transition to direct breastfeeding with specialized support from trained staff. Keywords: human milk provision, milk expression, breastfeeding readiness, cue-based feeding, lactation support
Standardized Discharge Planning Process: Implement a structured discharge preparation pathway beginning at admission, with family education checkpoints, home care simulation, interdisciplinary coordination, and post-discharge follow-up protocol. Keywords: transition to home, discharge readiness, caregiver education, home equipment management, follow-up coordination
NICU Early Mobility Protocol: Design an age-appropriate developmental stimulation and positioning program to optimize neuromotor development in premature infants, including appropriate sensory stimulation and graded activity progression. Keywords: neurodevelopmental therapy, sensory integration, motor development, positional therapy, range of motion
Neonatal Abstinence Syndrome Non-Pharmacological Management: Implement a comprehensive approach to managing infants with prenatal substance exposure, emphasizing environment modification, consoling techniques, feeding strategies, and parental involvement to reduce pharmacological intervention. Keywords: NAS scoring, environmental modification, rooming-in, consoling techniques, eat-sleep-console method
Developmentally Supportive Care Bundle: Create a comprehensive developmental care program including protected sleep periods, cycled lighting, individualized handling, sensory input regulation, and family involvement to support neurodevelopment. Keywords: NIDCAP principles, cue-based care, state regulation, environmental adaptation, neurodevelopmental outcomes
Neonatal Palliative Care Protocol: Develop a structured approach to palliative and end-of-life care in the NICU, including family support, comfort care practices, memory-making activities, and bereavement follow-up. Keywords: perinatal palliative care, family support, symptom management, ethical decision-making, bereavement care
Extrauterine Growth Restriction Prevention: Implement a nutrition optimization program including standardized TPN formulations, human milk fortification protocols, growth monitoring parameters, and feeding advancement guidelines to improve growth outcomes. Keywords: nutritional assessment, growth velocity, protein supplementation, fortification strategies, anthropometric monitoring
NICU-Specific Delirium Recognition and Management: Develop and implement a screening and intervention protocol for neonatal delirium, including assessment tools, environmental modification, and pharmaceutical management when appropriate. Keywords: neonatal delirium assessment, sleep-wake cycle regulation, neurobehavioral assessment, environmental modification, iatrogenic withdrawal
Interesting nursing research topics for nursing research papers
Exploring the role of nurse navigators in improving cancer care coordination and patient outcomes 2. Evaluating the effectiveness of mindfulness-based interventions for reducing compassion fatigue in oncology nurses 3. Assessing the impact of nurse-led health coaching on self-management behaviors in patients with chronic conditions 4. Investigating the role of nurses in promoting advanced care planning in primary care settings 5. Evaluating the effectiveness of evidence-based interventions for preventing nurse burnout and promoting resilience
Popular nursing research topics for nursing papers
Assessing the impact of nurse-led interventions on reducing hospital-acquired infections 2. Evaluating the effectiveness of evidence-based pain management protocols in postoperative patients 3. Investigating the role of nurses in promoting breastfeeding and supporting new mothers 4. Assessing the impact of nurse-led care coordination on patient outcomes in complex chronic conditions 5. Evaluating the effectiveness of evidence-based interventions for managing behavioral symptoms in dementia patients
Topics that support evidence-based nursing practice
Implementing evidence-based protocols for early recognition and management of sepsis 2. Evaluating the effectiveness of nurse-led interventions for promoting physical activity in patients with chronic conditions 3. Assessing the impact of evidence-based skin care protocols on preventing pressure ulcers in high-risk patients 4. Implementing evidence-based strategies for reducing alarm fatigue in critical care settings 5. Evaluating the effectiveness of nurse-led interventions for managing depression in patients with chronic illnesses
Nursing Informatics Topics for EBP in nursing
Evaluating the impact of electronic health records on nursing workflow and patient outcomes 2. Assessing the effectiveness of clinical decision support systems in promoting evidence-based practice 3. Implementing and evaluating the use of mobile devices for point-of-care access to evidence-based resources 4. Investigating the role of big data analytics in improving nursing care quality and patient outcomes 5. Evaluating the effectiveness of telehealth interventions in providing nursing care to rural populations
Research articles that support evidence-based practice
Systematic reviews on the effectiveness of nurse-led interventions in chronic disease management 2. Meta-analyses of evidence-based strategies for preventing hospital-acquired infections 3. Randomized controlled trials evaluating the impact of evidence-based protocols on patient outcomes 4. Qualitative studies exploring nurses’ experiences with implementing evidence-based practice 5. Implementation science research on strategies for promoting EBP adoption in healthcare settings
Evidence-based practice nursing topics in critical care
Implementing early mobilization protocols to improve outcomes in mechanically ventilated patients 2. Evaluating the effectiveness of evidence-based interventions for preventing ventilator-associated pneumonia 3. Assessing the impact of nurse-led protocols for managing sedation and delirium in ICU patients 4. Implementing evidence-based strategies for preventing central line-associated bloodstream infections in critical care 5. Evaluating the effectiveness of nurse-led interventions for promoting family engagement in ICU care
Evidence-based practice nursing topics in medical-surgical
Implementing evidence-based protocols for postoperative pain management 2. Evaluating the effectiveness of nurse-led interventions for promoting early ambulation after surgery 3. Assessing the impact of evidence-based discharge planning on reducing hospital readmissions 4. Implementing standardized communication tools to improve handoffs and patient safety 5. Evaluating the effectiveness of nurse-led interventions for managing chronic wounds in medical-surgical patients
Evidence based practice nursing topics in oncology
Implementing evidence-based protocols for managing chemotherapy-induced nausea and vomiting 2. Evaluating the effectiveness of nurse-led interventions for managing cancer-related fatigue 3. Assessing the impact of evidence-based strategies for preventing and managing oral mucositis in cancer patients 4. Implementing nurse-led survivorship care programs for cancer patients in remission 5. Evaluating the effectiveness of evidence-based interventions for managing cancer-related pain
Easy EBP Nursing Topics
Evidence-based practice nursing topics pediatric
Implementing evidence-based protocols for managing pediatric asthma exacerbations 2. Evaluating the effectiveness of nurse-led interventions for promoting healthy weight in children and adolescents 3. Assessing the impact of family-centered care models on outcomes in pediatric intensive care units 4. Implementing evidence-based strategies for managing procedural pain in pediatric patients 5. Evaluating the effectiveness of nurse-led interventions for promoting medication adherence in children with chronic conditions
Evidence based practice nursing topics in obstetrics
Implementing evidence-based protocols for preventing postpartum hemorrhage 2. Evaluating the effectiveness of nurse-led interventions for promoting breastfeeding initiation and duration 3. Assessing the impact of evidence-based strategies for reducing cesarean section rates 4. Implementing skin-to-skin contact protocols to improve newborn outcomes 5. Evaluating the effectiveness of nurse-led interventions for managing gestational diabetes
EBP project ideas for Emergency Department
Implementing evidence-based triage protocols to improve patient flow and outcomes
Evaluating the effectiveness of nurse-led interventions for managing acute pain in the emergency department
Assessing the impact of evidence-based strategies for reducing door-to-balloon time in acute myocardial infarction
Implementing nurse-initiated protocols for early sepsis recognition and management
Evaluating the effectiveness of evidence-based interventions for preventing workplace violence in emergency departments
EBP Quality Improvement Ideas on Acute Care/Critical Care
Implementation of evidence-based delirium prevention bundles to reduce ICU delirium incidence and duration
Nurse-driven protocols for ventilator liberation to reduce mechanical ventilation days
Standardized fluid resuscitation guidelines based on the latest evidence for septic shock patients
Implementation of evidence-based feeding protocols to improve nutritional outcomes in critically ill patients
Nurse-led early warning scoring systems to identify clinical deterioration before adverse events
Development of evidence-based family presence protocols during invasive procedures and resuscitation
Implementation of up-to-date bundle approaches to prevent ventilator-associated pneumonia
Evidence-Based Practice Topics in Pediatric Nursing
Evidence-based pain assessment and management protocols for children with developmental disabilities
Implementation of distraction techniques based on research findings to reduce procedural anxiety in children
Development of evidence-based protocols for managing pediatric asthma exacerbations in school settings
Nurse-driven programs for evidence-based screening of adverse childhood experiences (ACEs)
Implementation of research-supported strategies to improve medication adherence in adolescents with chronic conditions
Evidence-based interventions to reduce needle phobia in children and adolescents
Development of standardized discharge education protocols for pediatric post-surgical patients based on current research
Nursing Capstone Research Questions and Topics on Mental Health Nursing
Implementation of evidence-based crisis de-escalation techniques to reduce restraint use
Nurse-led screening protocols for suicide risk using validated assessment tools
Evidence-based interventions to address medication non-adherence in patients with serious mental illness
Implementation of trauma-informed care principles based on current research in acute psychiatric settings
Development of evidence-based therapeutic communication guidelines for patients experiencing psychosis
Integration of evidence-based physical activity interventions to manage depression symptoms
Implementation of research-supported sleep hygiene protocols for inpatient psychiatric units
Ideas for EBP Nursing Projects in Geriatric Nursing
Evidence-based multicomponent interventions to prevent falls in community-dwelling older adults
Implementation of validated screening tools to identify elder abuse in primary care settings
Development of evidence-based protocols for managing behavioral symptoms of dementia without pharmacological restraints
Nurse-led medication reconciliation processes to reduce polypharmacy in elderly patients
Implementation of evidence-based exercise programs to improve mobility in long-term care residents
Development of standardized protocols for assessing and addressing frailty based on the latest research
Implementation of evidence-based reminiscence therapy for improving quality of life in dementia care
Latest Evidence-Based Practice in Women’s Health/Obstetric Nursing
Implementation of evidence-based delayed cord clamping protocols to improve neonatal outcomes
Development of nurse-driven postpartum hemorrhage prevention bundles based on current guidelines
Evidence-based interventions to reduce cesarean section rates in low-risk pregnancies
Implementation of research-supported breastfeeding promotion strategies to improve initiation and duration rates
Nurse-led evidence-based screening protocols for postpartum depression and anxiety
Development of standardized evidence-based preconception counseling programs in primary care
Implementation of up-to-date protocols for managing hyperemesis gravidarum based on the latest research
Topics for Nursing Education and Professional Development EBP projects
Evidence-based simulation strategies to develop clinical judgment in nursing students
Implementation of validated debriefing methodologies to maximize learning in simulation experiences
Development of evidence-based preceptor training programs to improve new graduate nurses
Implementation of research-supported strategies to address moral distress among nurses
Evidence-based approaches to cultivate resilience and prevent burnout in nursing staff
Development of standardized competency assessment tools based on current best practices
Implementation of evidence-based mentorship programs to improve nurse retention
EBP in Nursing Projects on Community/Public Health Nursing
Evidence-based community interventions to increase childhood vaccination rates
Implementation of research-supported home visiting programs for at-risk postpartum families
Development of evidence-based screening protocols for social determinants of health in primary care
Nurse-led interventions based on current research to reduce opioid overdose deaths in high-risk communities
Evaluating the effectiveness of community health worker programs in underserved areas
Implementing strategies to increase colorectal cancer screening rates
Assessing the impact of workplace wellness programs on employee health outcomes
EBP Nursing Project Ideas on Oncology Nursing
Implementing evidence-based interventions for chemotherapy-induced nausea and vomiting
Evaluating the effectiveness of exercise programs on quality of life in cancer survivors
Developing a comprehensive sexual health assessment tool for cancer patients
Implementing strategies to improve oral mucositis management in oncology patients
Assessing the impact of nurse navigation programs on patient outcomes
Evaluating the effectiveness of mindfulness-based stress reduction for cancer-related fatigue
Implementing evidence-based protocols for managing immunotherapy side effects
Assessing the impact of palliative care integration in oncology settings
EBP Nursing Project Ideas on Nursing Education and Professional Development
Implementing simulation-based training for new graduate nurses
Evaluating the effectiveness of interprofessional education programs
Developing a mentorship program for novice nurse researchers
Implementing evidence-based strategies to reduce nursing student attrition
Assessing the impact of reflective practice on critical thinking skills in nursing students
Evaluating the effectiveness of online continuing education programs for nurses
Implementing strategies to improve NCLEX pass rates
Assessing the impact of leadership development programs on nurse retention and job satisfaction
Anatomy of a Good Evidence-Based Practice Nursing Project Topic
A well-constructed EBP project topic has several key components that make it practical, impactful, and feasible to implement. Here’s a breakdown of what makes an effective EBP project topic:
1. Clinical Problem Focus
Clearly defined problem: Identifies a specific clinical issue that needs improvement
Population-specific: Targets a particular patient population or healthcare setting
Measurable concern: Addresses an issue that can be quantified through metrics
2. Intervention Clarity
Specific intervention: Clearly states what practice change is being proposed
Evidence-based foundation: Built on existing research and best practices
Implementation-ready: Describes an actionable approach, not just a concept
3. Comparison Element
Current practice reference: Establishes what is being done now as a baseline.
Alternative approaches: May compare multiple evidence-based options
Benchmark consideration: References standards of care or institutional goals
4. Outcome Focus
Clear desired results: Specifies what improvement is expected
Patient-centered: Emphasizes benefits to patient care or experience
System impact: May include organizational benefits like cost reduction
5. Feasibility Factors
Resource consideration: Realistic about required staff, time, and materials
Implementation scope: Appropriate for the setting and available resources
Sustainability potential: Can be maintained beyond the initial project period
Format Structure
A well-structured EBP topic often follows the PICOT format:
P = Population/Problem
I = Intervention
C = Comparison
O = Outcome
T = Time frame
For example: “In adult ICU patients (P), does the implementation of a nurse-led daily chlorhexidine bathing protocol (I) compared to standard bathing procedures (C) reduce the rate of central line-associated bloodstream infections (O) over 6 months (T)?”
Frequently Asked Questions
What is an example of an evidence-based practice (EBP) project?
An example of an EBP project is “Implementing a Nurse-Led Protocol to Reduce Catheter-Associated Urinary Tract Infections (CAUTIs).” This project would involve:
Developing a protocol based on the best available evidence
Implementing the protocol in a clinical setting
Measuring outcomes (e.g., CAUTI rates) before and after implementation
Analyzing results and making recommendations for practice
What is the evidence-based project for nursing?
An evidence-based project in nursing is a systematic approach to improving patient care by integrating the best available research evidence with clinical expertise and patient preferences. It typically involves:
Identifying a clinical problem or question
Searching for and critically appraising relevant research
Implementing evidence-based interventions
Evaluating outcomes
Disseminating findings to improve nursing practice
What is an example of an EBP question in nursing?
An example of an EBP question in nursing, formatted using the PICO (Population, Intervention, Comparison, Outcome) framework, could be:
“In adult patients with type 2 diabetes (P), how does a nurse-led diabetes self-management education program (I), compared to standard care (C), affect HbA1c levels and quality of life (O) in 6 months?”
How to choose an EBP topic?
To choose an EBP topic:
Identify issues in your clinical practice or area of interest
Consider the significance of the problem and its impact on patient outcomes
Assess the feasibility of addressing the issue within your timeframe and resources
Ensure there’s sufficient literature available on the topic
Consider your passion for the subject – choose something you’re genuinely interested in
Align the topic with your academic level and program requirements
Consult with your faculty advisor or clinical mentor for guidance
Which is the best example of evidence-based nursing practice?
A strong example of evidence-based nursing practice is the implementation of early mobilization protocols for ICU patients. This practice:
It is based on robust research showing improved outcomes
Integrates clinical expertise in assessing patient readiness for mobilization
Considers patient preferences and tolerances
Involves interdisciplinary collaboration
Has measurable outcomes (e.g., reduced length of stay, improved functional status)
Can be standardized yet tailored to individual patient needs
As a nursing student or professional, the ability to deliver impactful and engaging speeches is a valuable skill that can elevate your practice and contribute to the advancement of the nursing profession.
Whether you’re educating patients, collaborating with healthcare teams, or advocating for policy changes, strong communication abilities are essential.
In this blog, we will explore how to approach persuasive speech topics questions using the example below
Write an informative speech approximately 2 minutes on the effects of substance abuse on physical and psychological health
Medical Persuasive Speech Topics for Nurses
Tips for Choosing the Best Nursing Persuasive Speech Topic
Choosing the right nursing persuasive speech topic can be a crucial step in delivering an impactful and engaging presentation. As a nursing student or professional, you have a wealth of knowledge and experiences to draw from, but narrowing down your focus can be challenging. Here are some tips to help you select the best nursing persuasive speech topic:
Identify your target audience: Consider who you will be addressing – fellow nurses, hospital administrators, patients, or a mix of stakeholders. Tailor your topic to their specific needs, concerns, and interests.
Reflect on current issues and challenges: Think about the pressing problems, trends, or controversies in the nursing field that you feel passionately about. These could range from patient safety and care quality to nursing burnout and professional development. (Medical Persuasive Speech Topics for Nurses)
Leverage your expertise and experience: Draw from your nursing specialization, clinical rotations, or personal experiences to identify topics that you can speak about confidently and with authority.
Research and stay up-to-date: Continuously monitor industry publications, news, and research to identify emerging topics or areas that could benefit from persuasive advocacy.
Consider your learning objectives: Determine what you hope to achieve through your persuasive speech, such as raising awareness, inspiring change, or proposing a specific solution.
Assess the feasibility and relevance: Ensure your chosen topic is not only compelling but also practical, actionable, and relevant to your audience and the nursing profession.
Seek feedback and guidance: Consult with your instructors, mentors, or nursing peers to get their input on potential speech topics and refine your approach.
By carefully considering these factors, you can select a nursing persuasive speech topic that is both impactful and well-suited to your skills, interests, and the needs of your audience.
Nursing Informative Speech Topics: Categories and Ideas
When it comes to nursing informative speech topics, there are several key areas to consider. Let’s explore some of the most relevant categories and ideas:
Patient Care and Safety (H2) Ensuring the highest standards of patient care and safety is a fundamental responsibility of nurses. Informative speech topics in this category could include:
Improving patient outcomes through evidence-based nursing practices: Discuss how nurses can implement the latest research and clinical guidelines to enhance patient care, such as wound care protocols or medication administration best practices.
Enhancing infection control measures in healthcare settings: Educate your audience on the importance of proper hand hygiene, personal protective equipment (PPE) use, and environmental cleaning to prevent the spread of healthcare-associated infections.
Implementing effective pain management strategies: Explore how nurses can play a crucial role in assessing, managing, and advocating for comprehensive pain management plans for their patients.
Promoting fall prevention initiatives for elderly patients: Highlight the significant impact of nurse-led fall prevention programs, including risk assessment, environmental modifications, and patient education.
Advocating for patient-centered care and shared decision-making: Discuss the benefits of engaging patients as active partners in their healthcare and how nurses can facilitate this approach.
Nursing Ethics and Legal Issues
Nurses often face complex ethical dilemmas and legal considerations in their daily practice. Informative speech topics in this category could include:
Navigating ethical dilemmas in end-of-life care: Explore the ethical principles and frameworks that nurses can apply when supporting patients and families in end-of-life decision-making.
Addressing patient confidentiality and privacy concerns: Educate your audience on the legal and ethical obligations of nurses regarding patient information and the proper handling of sensitive data.
Examining the role of nurses in informed consent processes: Discuss the nurse’s responsibility in ensuring patients understand the risks, benefits, and alternatives of proposed treatments or procedures. (Medical Persuasive Speech Topics for Nurses)
Discussing the legal implications of medication errors: Raise awareness about the potential legal consequences of medication administration errors and the importance of implementing robust safety measures.
Advocating for nurse whistleblower protection: Highlight the ethical duty of nurses to report patient safety concerns and the need for policies that shield them from retaliation.
Nursing Specialties and Advanced Practice
The nursing profession encompasses a diverse range of specialties and advanced practice roles. Informative speech topics in this category could include:
Exploring the benefits of nurse-led clinics or specialty care: Showcase how nurse practitioners, clinical nurse specialists, or other advanced practice nurses can provide high-quality, cost-effective care in specialized settings.
Promoting the role of nurse practitioners in primary care: Educate your audience on the expanding scope of practice for nurse practitioners and their contributions to improving access to primary healthcare services.
Highlighting the importance of geriatric nursing or pediatric nursing: Discuss the unique knowledge and skills required to care for older adults or children, and the critical role these nursing specialties play in the healthcare system.
Advocating for increased access to mental health nursing services: Raise awareness about the growing need for specialized mental health nursing and the positive impact these professionals can have on patient outcomes.
Discussing the impact of nurse anesthetists in surgical settings: Inform your audience about the vital role of certified registered nurse anesthetists in administering anesthesia and ensuring patient safety during operations.
Mental Health and Nursing (H3) As the healthcare industry recognizes the importance of mental health, nurses have a crucial role to play in addressing these issues. Informative speech topics in this category could include:
Destigmatizing mental health issues among healthcare providers: Discuss the prevalence of mental health challenges among nurses and strategies to create a more supportive and understanding work environment.
Addressing burnout and compassion fatigue among nurses: Educate your audience on the causes and symptoms of burnout, as well as evidence-based interventions to promote nurse well-being.
Implementing effective stress management techniques for nurses: Introduce your audience to various coping strategies, such as mindfulness, exercise, or peer support programs, to help nurses manage the demands of their profession.(Medical Persuasive Speech Topics for Nurses)
Promoting mental health education and resources for patients: Highlight the nurse’s role in providing mental health education, screening, and referrals to ensure patients receive the necessary support.
Advocating for better integration of mental health services in hospitals: Discuss the benefits of embedding mental health professionals within healthcare teams to address the holistic needs of patients.
Nursing Education and Professional Development
Investing in nursing education and ongoing professional development is crucial for the advancement of the nursing profession. Informative speech topics in this category could include:
Enhancing nursing education curricula to meet evolving healthcare needs: Explore how nursing programs can adapt their curricula to prepare graduates for emerging challenges, such as telehealth, new technologies, or population health management.
Advocating for increased funding and resources for nursing programs: Highlight the importance of adequate funding and resources to support nursing education, including for simulation laboratories, faculty development, and student scholarships.
Promoting continuous professional development and lifelong learning: Educate your audience on the importance of nurses engaging in ongoing education, certification, and skills-based training to maintain competence and deliver high-quality care.
Addressing the nursing shortage and strategies to attract new talent: Discuss the factors contributing to the nursing shortage and effective recruitment and retention strategies to build a sustainable nursing workforce.
Highlighting the importance of diversity and inclusion in the nursing profession: Raise awareness about the need for a more diverse and inclusive nursing workforce that reflects the communities they serve.
Persuasive Essay Topic Examples
To further inspire your nursing persuasive speech topic selection, here are some examples:
Nursing Specialties and Roles
The crucial role of nurse practitioners in improving primary care access: Advocate for the expansion of nurse practitioner-led primary care clinics to address the growing demand for healthcare services and improve patient outcomes. (Medical Persuasive Speech Topics for Nurses)
Expanding the scope of practice for clinical nurse specialists: Argue for the recognition and utilization of clinical nurse specialists’ advanced expertise in specific patient populations or care settings.
Advocating for the recognition of certified nurse midwives in maternal care: Highlight the benefits of integrating certified nurse midwives into the healthcare system to provide high-quality, patient-centered maternity care.
Nursing Ethics and Advocacy
Ethical considerations in end-of-life decision-making for patients: Discuss the ethical principles and frameworks that nurses can use to guide end-of-life care planning and decision-making.
Promoting patient autonomy and informed consent in healthcare: Advocate for the implementation of robust informed consent processes that empower patients to make informed decisions about their care. (Medical Persuasive Speech Topics for Nurses)
Addressing the ethical dilemmas of nurse whistleblowers: Argue for the need to protect nurses who report patient safety concerns or unethical practices, and the responsibility of healthcare organizations to address such issues.
Patient Care and Nursing Skills
Improving bedside manner and patient-centered communication: Persuade your audience about the positive impact of nurses’ interpersonal skills on patient satisfaction, adherence, and overall outcomes.
Enhancing IV insertion techniques to minimize patient discomfort: Advocate for the adoption of evidence-based practices and technologies that can improve the patient experience during intravenous (IV) therapy. (Medical Persuasive Speech Topics for Nurses)
Advocating for the implementation of new technologies to enhance patient safety: Argue for the integration of innovative technologies, such as smart pumps or electronic medical records, to reduce the risk of medication errors and improve patient safety.
The Art of Informative Speaking in Nursing
Why Informative Speaking is Vital in Nursing (H3) Effective communication is a cornerstone of the nursing profession. Whether you’re educating patients, collaborating with healthcare team members, or advocating for policy changes, the ability to deliver informative and engaging speeches is crucial. Informative speaking allows nurses to:
Enhance patient understanding and adherence to treatment plans: By presenting complex medical information in a clear and accessible manner, nurses can help patients better understand their conditions and actively participate in their own care.
Collaborate more effectively with other healthcare professionals: Informative speeches enable nurses to share their expertise, contribute to inter professional decision-making, and foster a culture of mutual understanding and respect within the healthcare team. (Medical Persuasive Speech Topics for Nurses)
Advocate for important nursing-related initiatives and policies: Nurses can use informative speeches to raise awareness, garner support, and drive change on issues that impact the nursing profession and patient care.
Contribute to the ongoing education and professional development of peers: Informative speeches provide opportunities for nurses to share their knowledge, insights, and best practices with their colleagues, facilitating continuous learning and improvement.
Demonstrate their expertise and leadership within the nursing field: Effective informative speaking can position nurses as subject matter experts, thought leaders, and valuable assets within their organizations and the broader healthcare community.
Tips for Effective Informative Speaking in Nursing (H3) As a nursing student or professional, here are some tips to help you deliver impactful informative speeches:
Know your audience: Tailor your content and delivery style to the specific needs and expectations of your audience, whether they are patients, fellow nurses, hospital administrators, or other stakeholders. Consider their prior knowledge, interests, and the level of detail they require.
Organize your content logically: Structure your speech with a clear introduction, body, and conclusion to ensure your message is easily understood. Use transitions to guide your audience through the key points and maintain a coherent flow. (Medical Persuasive Speech Topics for Nurses)
Use visual aids effectively: Incorporate well-designed PowerPoint slides, handouts, or other visual aids to enhance your presentation and reinforce key points. Ensure your visuals are clear, concise, and free from clutter.
Speak with confidence and enthusiasm: Practice your speech and maintain good posture, eye contact, and a positive, engaging tone to keep your audience interested and attentive. Vary your pace, volume, and inflection to maintain their attention.
Incorporate relevant examples and anecdotes: Share personal experiences, case studies, or real-world scenarios to make your information more relatable and memorable. These can help illustrate complex concepts or bring your message to life.
Be prepared to answer questions: Anticipate potential questions from your audience and be ready to provide clear, concise, and informative responses. This demonstrates your mastery of the topic and your ability to engage in constructive dialogue. (Medical Persuasive Speech Topics for Nurses)
Seek feedback and continuously improve: Solicit feedback from your peers, instructors, or mentors, and use it to refine your informative speaking skills over time. Reflect on what worked well and identify areas for improvement to deliver even more effective speeches in the future.
By mastering the art of informative speaking, nurses can become more effective communicators, educators, and advocates within the healthcare field. These skills can open up new opportunities for professional growth, leadership, and positive impact on patient outcomes and the nursing profession as a whole.
FAQs (Medical Persuasive Speech Topics for Nurses)
How to choose a topic for informative speech?
When choosing a topic for an informative speech, consider the following:
Choose a topic you are genuinely interested in and knowledgeable about. Your passion and expertise will shine through in your delivery.
Ensure the topic is relevant and meaningful to your target audience. Think about their needs, concerns, and the information they would find most valuable. (Medical Persuasive Speech Topics for Nurses)
Select a topic that is neither too broad nor too narrow in scope. A focused, well-defined topic will allow you to provide a comprehensive yet concise informative speech.
Prioritize topics that have the potential to educate, inform, and engage your listeners. Choose subjects that are thought-provoking, practical, or that address a pressing issue or need.
Research the topic thoroughly to ensure you have a solid understanding of the subject matter and can present accurate, up-to-date information. (Medical Persuasive Speech Topics for Nurses)
Consider the resources and time you have available to prepare and deliver the speech. Choose a topic you can adequately research and present within the given constraints.
What are the 4 informative speeches?
The four main types of informative speeches are:
Descriptive: Providing detailed information about a person, place, object, or event. This type of speech aims to paint a vivid picture for the audience, using sensory details and descriptions.
Explanatory: Clarifying how or why something works or happens. Explanatory speeches focus on breaking down complex processes, concepts, or phenomena in an easy-to-understand manner.
Demonstrative: Showing how to perform a specific task or procedure. Demonstrative speeches involve step-by-step instructions and visual aids to guide the audience through a practical demonstration.
Definitional: Defining and explaining the meaning of a concept or term. Definitional speeches help the audience understand the precise definition, origin, and nuances of a particular idea or terminology.
Regardless of the specific type, the primary goal of an informative speech is to increase the audience’s knowledge, understanding, and awareness of the topic being presented.
How to start an informative speech?
An effective way to start an informative speech is to:
Grab the audience’s attention with a compelling opening. This could be a relevant quote, statistic, anecdote, or thought-provoking question that immediately piques their interest and sets the tone for the presentation.
Clearly state the purpose and main topic of your speech. Provide a clear and concise overview of what your audience can expect to learn or discover during the presentation.
Provide a brief outline or preview of the key points you will cover. This helps the audience understand the structure and flow of your speech, making it easier for them to follow along and retain the information. (Medical Persuasive Speech Topics for Nurses)
Transition smoothly into the body of your speech, using transitional phrases or statements that seamlessly connect the introduction to the main content.
Starting your informative speech with a strong, attention-grabbing introduction sets the stage for an engaging and successful presentation. Remember, the opening sets the tone and prepares your audience to actively listen and learn.
What are 3 parts of an informative speech?
The three main parts of an informative speech are:
Introduction: The introduction is the opening of your speech, where you capture the audience’s attention, establish the topic and purpose, and provide a preview of the key points you will cover. This section sets the stage for the rest of the presentation.(Medical Persuasive Speech Topics for Nurses)
Body: The body of the speech is where you present the main information, facts, and details in a clear and organized manner. Use relevant examples, supporting evidence, and logical flow to help your audience understand and retain the content.
Conclusion: The conclusion is the final part of your speech, where you summarize the key takeaways, reinforce the importance of the topic, and leave the audience with a lasting impression. This section should tie together the main points and provide a sense of closure to the presentation.
Colloid vs Crystalloid: Crystalloids and Colloids in Fluid Resuscitation, Infusion, and Fluid Therapy
Fluid therapy plays an important role in maintaining circulation, tissue perfusion, and normal organ function. When a patient develops hypovolemia, dehydration, sepsis, shock, trauma, or significant blood loss, intravenous fluid may be administered to restore or support the circulating blood volume. However, effective fluid resuscitation involves more than simply replacing the amount of fluid that has been lost. The composition of the intravenous fluid, its distribution within the body’s fluid compartments, the amount administered, and the patient’s underlying condition all influence the response to treatment. Selecting an appropriate fluid therefore requires an understanding of how different solutions behave after administration and the potential benefits and complications associated with their use.
Crystalloids and colloids are the two major categories considered in intravenous fluid therapy. Crystalloid solutions contain water and relatively small dissolved particles that can move through semipermeable membranes and distribute primarily throughout the extracellular fluid compartment. Common examples include normal saline and balanced crystalloid solutions. Depending on their electrolyte composition and concentration, crystalloids can be classified as isotonic, hypotonic, or hypertonic, with each type producing different effects on fluid distribution and electrolyte balance. Their widespread availability, relatively low cost, and established role in fluid resuscitation have made crystalloids an important component of clinical practice.
Colloid solutions differ because they contain larger molecules that exert colloid osmotic pressure within the circulation. This property can promote retention of fluid in the intravascular space and produce intravascular volume expansion. Colloids include naturally occurring preparations such as albumin as well as synthetic products such as hydroxyethyl starch. Although the physiological behavior of colloids can make them useful in particular circumstances, their clinical use must be considered carefully because different colloid preparations have different safety profiles. The distinction between the colloid and crystalloid groups is therefore based not only on their composition but also on their effects on fluid movement, circulation, organ function, and clinical outcomes.
The question of Crystalloid Solution vs Colloid becomes especially relevant when fluid resuscitation is required. During resuscitation, the immediate objective is generally to improve effective circulating volume and tissue perfusion while avoiding unnecessary fluid administration. Crystalloids can provide substantial fluid replacement but distribute beyond the intravascular space, whereas colloids may produce more sustained intravascular expansion because of their larger molecules and oncotic effects. These differences can influence the volume of fluid required and the physiological response to treatment, but they do not mean that one category is universally superior. The appropriate choice depends on the clinical situation, the specific fluid preparation, and the potential risks and benefits for the individual patient.
Fluid selection is particularly important in critically ill patients because fluid administration often occurs alongside other interventions such as vasopressor therapy, blood transfusion, mechanical ventilation, and renal support. Patients with sepsis, shock, trauma, or major blood loss may require rapid assessment and carefully controlled administration of a resuscitation fluid. At the same time, excessive fluid administration can produce complications. Accumulation of excess crystalloid fluid may contribute to tissue and pulmonary edema, while some synthetic colloids have been associated with renal and coagulation complications. Significant blood loss may also require a blood product rather than continued administration of crystalloid or colloid alone because intravenous fluids do not replace the oxygen-carrying capacity of lost red blood cells.
An appropriate approach to fluid therapy therefore requires consideration of several interconnected factors:
The cause of fluid loss: Dehydration, hemorrhage, sepsis, burns, and other conditions produce different physiological disturbances and may require different treatment strategies.
The patient’s hemodynamic condition: Blood pressure, heart rate, peripheral perfusion, urine output, mental status, and other indicators help determine whether additional fluid may be beneficial.
The type and composition of the fluid: Electrolyte content, tonicity, buffering agents, and the presence or absence of large molecules can affect how the solution behaves after infusion.
The risks associated with administration: Fluid overload, electrolyte abnormalities, edema, renal complications, and coagulation disturbances must be considered alongside the potential benefit of volume expansion.
The patient’s response to treatment: Fluid therapy should be reassessed continuously rather than administered according to a fixed volume without considering the clinical response.
Understanding Crystalloid Solution vs Colloid therefore requires more than memorizing the names of individual fluids. It involves understanding how crystalloids and colloids differ in composition, distribution, intravascular volume expansion, duration of effect, clinical applications, and safety. It also requires recognizing that the choice of fluid is influenced by the patient’s condition and that fluid resuscitation is only one component of managing circulatory compromise.
This guide examines Crystalloid Solution vs Colloid by first exploring crystalloid solutions, including their major types and clinical uses, followed by the composition, types, and mechanism of colloid fluids. It then examines the physiological and clinical differences between the two groups, including fluid distribution, intravascular volume expansion, duration of action, and volume requirements. The discussion proceeds to the role of crystalloids and colloids in critically ill patients, with attention to evidence from fluid resuscitation studies and their use in conditions such as sepsis, shock, and major blood loss. Important complications, including renal and bleeding risks, fluid overload, electrolyte disturbances, and blood product considerations, are also addressed. Finally, the guide considers the practical factors that influence intravenous fluid selection, infusion, monitoring, reassessment, and safe nursing care.
Crystalloid Solution: Definition, Types, and Clinical Uses
A crystalloid solution is an intravenous fluid containing water and relatively small, water-soluble particles such as electrolytes and, in some formulations, glucose or other small molecules. Because these particles can move relatively freely across capillary membranes, crystalloid fluid distributes between the intravascular and interstitial spaces after administration. This distribution is important clinically because only a portion of an administered crystalloid remains within the circulation after equilibration. Consequently, the amount and composition of crystalloid administered must be considered in relation to the patient’s hemodynamic condition, ongoing losses, renal function, electrolyte status, and risk of fluid overload.
Crystalloids are among the most commonly used intravenous fluids for fluid resuscitation and other forms of fluid therapy. They can be used to restore circulating volume, replace extracellular fluid losses, correct selected electrolyte abnormalities, and provide maintenance fluid when an appropriate formulation is selected. Their clinical effects depend largely on their electrolyte concentration and tonicity. For practical purposes, crystalloid solutions are commonly grouped into isotonic, hypotonic, and hypertonic crystalloids.
The distinction is based on how the solution’s effective osmotic concentration compares with plasma and, consequently, how it influences the movement of water between body fluid compartments. Understanding this classification is essential because a crystalloid appropriate for rapid volume replacement may not be appropriate for routine maintenance or for correcting a specific sodium abnormality.
Isotonic, Hypotonic, and Hypertonic Crystalloid Solutions
The terms isotonic, hypotonic, and hypertonic describe the relationship between a crystalloid solution and plasma in terms of effective osmotic concentration. They help predict how administration of a particular fluid will affect the distribution of water throughout the body.
Isotonic Crystalloid Solutions
An isotonic crystalloid has an effective osmotic concentration that is broadly similar to plasma. When administered intravenously, it expands the extracellular compartment without causing a major immediate shift of water into or out of cells. This makes isotonic crystalloid solutions particularly important when the clinical objective is to increase extracellular and intravascular volume.
Common examples include:
0.9% sodium chloride (normal saline)
Lactated Ringer’s solution
Ringer’s solution
Plasma-Lyte and other balanced crystalloid solutions
An isotonic crystalloid is frequently selected when a patient has intravascular volume depletion. For example, a patient who becomes hypotensive after significant gastrointestinal fluid losses may require an intravenous fluid bolus to restore circulating volume. Similarly, isotonic crystalloids are commonly used during the initial management of patients with sepsis or other forms of distributive shock.
However, isotonic does not mean that the fluid is identical to plasma. Different isotonic solutions have substantially different concentrations of sodium, chloride, potassium, calcium, magnesium, lactate, acetate, or other components. These differences can influence acid-base balance and electrolyte concentrations, particularly when relatively large volumes are administered.
NICE recommends using crystalloids containing sodium in the range of 130–154 mmol/L for adult intravenous fluid resuscitation and emphasizes that fluid prescriptions should specify the type, volume, and rate of administration.
Hypotonic Crystalloid Solutions
A hypotonic crystalloid has a lower effective osmotic concentration than plasma. After administration, water tends to move from the extracellular compartment toward the intracellular compartment, so hypotonic fluids are less effective for rapidly expanding the intravascular space.
Examples include:
0.45% sodium chloride, commonly called half-normal saline
Some dextrose-containing solutions after glucose is metabolized
Because a hypotonic solution does not remain predominantly within the intravascular compartment, it is generally not the preferred crystalloid fluid for rapid fluid resuscitation. Merck Manual specifically notes that hypotonic fluids such as 0.45% saline and D5W should not be used for resuscitation because an even smaller proportion remains intravascularly.
Instead, hypotonic solutions may have roles in carefully selected situations involving free-water replacement or hypernatremia, depending on the patient’s overall fluid and electrolyte status. Their use requires careful monitoring because excessive administration can lower serum sodium and, when severe or rapidly developing, produce neurological complications.
For example, consider a patient with significant hypernatremia caused by inadequate free-water intake. Giving repeated boluses of isotonic saline may not address the underlying free-water deficit once intravascular stability has been achieved. A more hypotonic solution may be considered as part of a controlled correction strategy, with the rate and composition determined by the patient’s sodium level, volume status, renal function, and ongoing losses.
Hypertonic Crystalloid Solutions
A hypertonic crystalloid has a greater effective osmotic concentration than plasma. It draws water from the intracellular and interstitial compartments into the intravascular space, thereby increasing plasma volume while administering a relatively small volume of solution.
Examples include:
3% sodium chloride
Higher-concentration hypertonic saline preparations used in specialized settings
Hypertonic crystalloid solutions have specific clinical applications rather than being routine choices for general volume replacement. One important application is the management of selected patients with severe symptomatic hyponatremia, where controlled administration of hypertonic saline can increase serum sodium and reduce cerebral edema. Hypertonic saline may also be used in selected neurological conditions to reduce intracranial pressure.
It is important to distinguish this specialized use from routine fluid resuscitation. Merck Manual notes that hypertonic saline is not generally recommended for resuscitation in critically ill patients but has a role in selected patients with neurologic injury to help reduce intracranial pressure.
Because hypertonic solutions can produce rapid changes in serum sodium and fluid distribution, administration requires close clinical and laboratory monitoring. Rapid correction of chronic hyponatremia, for example, can cause serious neurological injury. Thus, the concentration of a crystalloid fluid alone does not determine whether it is appropriate; the patient’s underlying physiological problem and the intended therapeutic objective are equally important.
Balanced Crystalloids vs Normal Saline
One of the most important clinical comparisons within the crystalloid group is balanced crystalloids versus normal saline. Both are commonly used isotonic fluids, but their electrolyte compositions are different.
Normal saline contains 0.9% sodium chloride, providing approximately 154 mmol/L of sodium and 154 mmol/L of chloride. This chloride concentration is substantially higher than the chloride concentration of normal plasma. When relatively large volumes are administered, saline can therefore increase serum chloride and contribute to hyperchloremic metabolic acidosis. NICE recommends monitoring serum chloride in patients receiving intravenous fluids with chloride concentrations above 120 mmol/L and reassessing the fluid prescription if hyperchloremia or acidemia develops.
Balanced crystalloids, such as Lactated Ringer’s solution and Plasma-Lyte, are formulated with electrolyte concentrations intended to more closely approximate the composition of extracellular fluid. They replace some of the chloride found in saline with other anions, such as lactate or acetate, and may also contain potassium, calcium, or magnesium depending on the preparation.
The difference can become clinically relevant when substantial volumes are administered. For example, a patient receiving several liters of 0.9% saline during resuscitation may develop a noticeable increase in serum chloride and a reduction in bicarbonate concentration. Balanced crystalloid solutions are designed to reduce this chloride load.
Clinical evidence comparing these fluids has produced important but nuanced findings. In the SMART trial, 15,802 critically ill adults were assigned to receive either saline or balanced crystalloids. The balanced-crystalloid group had a lower incidence of the composite outcome of death, new renal-replacement therapy, or persistent renal dysfunction: 14.3% compared with 15.4% in the saline group. The difference in 30-day in-hospital mortality alone was not statistically significant.
However, the evidence does not establish that balanced crystalloids are superior to saline for every patient or every clinical circumstance. The later PLUS trial, which included 5,037 critically ill adults, found no significant difference in 90-day mortality between Plasma-Lyte 148 and saline, and there was also no significant difference in new renal-replacement therapy.
These findings illustrate an important principle: fluid selection should be individualized rather than based on the assumption that one crystalloid is universally better than another. The patient’s diagnosis, electrolyte abnormalities, acid-base status, neurological condition, renal function, and anticipated volume of administration all matter.
For example:
A patient requiring substantial-volume resuscitation may benefit from a balanced crystalloid to limit exposure to a high chloride load.
A patient with certain neurological conditions may require careful consideration of sodium concentration and osmotic effects, and saline may be preferred in particular circumstances.
A patient with hyperkalemia requires attention to the potassium content of balanced solutions.
A patient with severe fluid overload may require a completely different strategy rather than continued administration of either crystalloid solution.
Thus, balanced crystalloids and normal saline should be viewed as different tools within the crystalloid group rather than interchangeable fluids with identical physiological effects.
Common Crystalloids Used for Fluid Resuscitation
Several crystalloids are used in clinical practice, but their purposes and compositions differ. The major examples include normal saline, Lactated Ringer’s solution, Plasma-Lyte, and hypertonic saline.
0.9% sodium chloride remains an extensively used crystalloid fluid. It provides sodium and chloride and can expand extracellular and intravascular volume. It may be selected for volume replacement, certain electrolyte disturbances, and situations in which a higher sodium or chloride concentration is specifically desirable. Its major limitation during large-volume administration is the potential for hyperchloremia and acid-base disturbances.
Lactated Ringer’s solution is a balanced crystalloid containing sodium, chloride, potassium, calcium, and lactate. The lactate is metabolized and contributes to bicarbonate generation under appropriate physiological conditions. It is widely used for volume replacement and resuscitation, including perioperative care, trauma, burns, and other settings involving extracellular fluid loss. It should nevertheless be selected with attention to the patient’s electrolyte and metabolic status.
Plasma-Lyte is another balanced crystalloid containing sodium, chloride, potassium, magnesium, and metabolizable buffer anions such as acetate and gluconate. Its electrolyte composition is designed to more closely resemble plasma than 0.9% saline. It has been extensively studied in critically ill patients, including in the SMART and PLUS trials.
Hypertonic saline, such as 3% sodium chloride, is a specialized crystalloid rather than a routine first-line resuscitation fluid. Its high sodium concentration creates an osmotic gradient that draws water into the intravascular compartment. It may be used in carefully selected neurological or severe hyponatremic conditions, with close monitoring of serum sodium and neurological status.
When a crystalloid is being considered for fluid resuscitation, the decision should be based on the clinical problem rather than simply on the availability of a particular bag of fluid. Important considerations include:
Reason for fluid administration: Resuscitation, maintenance, replacement of ongoing losses, and correction of specific electrolyte abnormalities are different indications.
Hemodynamic status: Hypotension, tachycardia, poor peripheral perfusion, altered mental status, and other findings may indicate a need for volume replacement, but they must be interpreted in the clinical context.
Electrolyte and acid-base status: Sodium, chloride, potassium, bicarbonate, and other laboratory findings can influence the choice of crystalloid.
Renal and cardiac function: Reduced ability to excrete water or electrolytes increases the risk of fluid accumulation.
Neurological status: The tonicity and sodium concentration of the fluid can be particularly important in patients with cerebral edema, traumatic brain injury, or significant sodium abnormalities.
Amount of fluid likely to be administered: The physiological consequences of the fluid’s composition become increasingly relevant as larger volumes are given.
Response to previous administration: Fluid therapy should be reassessed rather than continued automatically when the desired hemodynamic response has not occurred.
NICE emphasizes that intravenous fluid management should incorporate assessment, resuscitation, routine maintenance, replacement, redistribution, and reassessment rather than treating all IV fluid administration as the same clinical process.
For example, a patient with suspected hypovolemia and poor perfusion may receive an appropriate isotonic crystalloid bolus followed by reassessment of blood pressure, heart rate, capillary refill, urine output, respiratory status, and other indicators of response. If the patient improves, further fluid may not be necessary. If there is no improvement, simply administering increasingly large volumes of crystalloid may be inappropriate; the clinician must reconsider the cause of the instability, including ongoing blood loss, sepsis, cardiac dysfunction, obstructive shock, or another condition requiring a different intervention.
This distinction is central to safe crystalloid use. A crystalloid fluid is not merely a means of increasing the number on an intravenous fluid balance chart. Its composition, tonicity, dose, rate of infusion, and clinical indication determine whether its administration is likely to restore physiological stability or contribute to complications. In fluid resuscitation, the objective is therefore not to administer the greatest possible volume, but to provide an appropriate type of fluid in an appropriate amount while continuously evaluating the patient’s response.
Colloid Fluid: Definition, Types, and Mechanism
A colloid fluid is an intravenous fluid that contains relatively large molecules suspended or dissolved in a carrier solution. Unlike the small electrolytes found in most crystalloids, these larger molecules have a greater tendency to remain within the intravascular space and contribute to colloid osmotic pressure. This property can promote movement of water into the circulation and help maintain intravascular volume. The physiological effect, however, depends on the specific colloid solution, the size and characteristics of its molecules, the integrity of the capillary barrier, and the patient’s underlying condition.
The major types of colloids can be divided into natural and synthetic preparations. Albumin is the principal natural colloid used clinically, while synthetic colloids include hydroxyethyl starch, gelatin, and dextran preparations. These products are not interchangeable. Differences in molecular size, concentration, duration of intravascular retention, effects on coagulation, renal effects, and cost have important implications for clinical practice.
The theoretical advantage of colloid use is that larger molecules can exert an oncotic effect without requiring administration of as much fluid as might be necessary with a crystalloid to achieve a comparable initial expansion of the intravascular compartment. This concept is particularly relevant when considering patients who have already received substantial volumes of crystalloid. However, a larger molecule and greater oncotic effect do not automatically translate into improved clinical outcomes. Modern fluid therapy therefore considers both the desired physiological effect and the potential harms associated with individual colloid preparations.
Current critical-care guidance reflects this distinction. The 2026 Surviving Sepsis Campaign recommends crystalloids as the first-line fluid for resuscitation in adults with sepsis or septic shock. It suggests crystalloids alone rather than routine supplemental albumin, although albumin may be appropriate in selected patients who have already received large crystalloid volumes or have cirrhosis. The guideline recommends against starches for resuscitation.
Natural and Synthetic Colloids
Colloids can broadly be divided into natural colloids and synthetic colloids. This distinction is clinically important because the different products have substantially different safety profiles and indications.
Natural colloids are derived from substances that occur naturally in the body or from human plasma. The principal clinically relevant example is albumin. Albumin is a plasma protein synthesized primarily by the liver and is responsible for a large proportion of normal plasma oncotic pressure. Commercial albumin preparations are produced from human plasma and are available at different concentrations, most commonly 5% and 20–25% depending on the clinical application and formulation.
Albumin has several physiological functions beyond maintaining oncotic pressure. It contributes to the transport of various endogenous and exogenous substances, including hormones, fatty acids, bilirubin, and some medications. When administered intravenously, albumin can increase plasma oncotic pressure and influence the distribution of water between the intravascular and interstitial compartments.
The clinical role of albumin is more selective than simply treating it as a more powerful alternative to crystalloids. In sepsis, for example, current guidance recommends crystalloids as first-line resuscitation fluid and suggests crystalloids alone over routine addition of albumin. Supplemental albumin can be considered in selected adults who have already received large volumes of crystalloids or in certain patients with cirrhosis.
The synthetic colloid group includes several manufactured products:
Hydroxyethyl starch (HES)
Gelatin-based solutions
Dextran solutions
These products were developed because their large molecules can remain within the vascular compartment and produce volume expansion. Historically, synthetic colloids were used extensively in perioperative and critical-care settings because clinicians hoped they would provide more efficient volume expansion than crystalloids.
However, evidence accumulated showing that the risks differ substantially among synthetic colloids. Hydroxyethyl starch has been associated with acute kidney injury, increased need for renal replacement therapy, bleeding concerns, and potentially increased mortality in critically ill populations. A systematic review and meta-analysis of randomized trials found that, after exclusion of retracted trials, HES was associated with increased mortality, renal failure, and use of renal replacement therapy compared with other resuscitation solutions.
For this reason, the term colloid should not be interpreted as meaning that every colloid solution has the same clinical value. Albumin, hydroxyethyl starch, gelatin, and dextran differ in composition, mechanism, pharmacokinetics, and adverse-effect profile.
For example, consider two patients who both require volume support. A patient with sepsis who has already received substantial crystalloid may be evaluated for whether albumin offers a useful additional option. A different patient with sepsis and evolving kidney injury would not be an appropriate candidate for hydroxyethyl starch simply because a colloid can produce intravascular volume expansion. The type of colloid matters as much as the general category.
Another important distinction is between colloid osmotic pressure and the actual clinical ability of a product to remain within the circulation. Theoretically, a larger molecule should exert a stronger oncotic effect, but capillary permeability changes substantially during inflammation, trauma, and critical illness. When the endothelial barrier becomes more permeable, colloid molecules may escape into the interstitial space, reducing their intended intravascular effect and potentially contributing to tissue edema.
Colloid Osmotic Pressure and Intravascular Fluid Retention
The primary physiological principle underlying colloid use is colloid osmotic pressure, also called oncotic pressure. This is the osmotic pressure generated by large molecules, particularly plasma proteins, that are relatively restricted from crossing the vascular barrier. In plasma, albumin is the major contributor.
To understand this concept, it helps to consider what happens after intravenous administration.
When a crystalloid solution is infused, its small dissolved particles can move relatively readily across capillary membranes. As a result, a substantial portion of the administered fluid eventually distributes into the extracellular interstitial space. A colloid, by contrast, contains larger molecules that normally cross the capillary wall less readily. These molecules exert an osmotic pull that favors retention of water within the vascular compartment.
A simplified example illustrates the principle. Suppose two patients receive intravenous solutions with the same initial volume. If one receives a crystalloid and the other receives a colloid, the colloid may produce greater initial intravascular volume expansion per unit of infused fluid because its larger molecules exert an oncotic effect. This does not mean that every colloid will always provide a superior clinical result. The effect depends on the patient’s vascular permeability, the specific product, the dose, and the underlying disease.
The relationship between colloid osmotic pressure and fluid movement can be understood through the forces governing movement of water across capillary walls. These include:
Hydrostatic pressure, which tends to push water out of the vascular space.
Colloid osmotic pressure, which tends to draw or retain water within the vascular compartment.
Capillary permeability, which determines how readily water and larger molecules can cross the vascular barrier.
Interstitial fluid pressure and protein concentration, which also influence movement between compartments.
In a healthy vascular system, albumin contributes substantially to plasma oncotic pressure. When albumin concentration falls substantially, the reduction in oncotic pressure can favor movement of water into the interstitial compartment. This is one reason hypoalbuminemia can be associated with edema, although edema formation is multifactorial and also depends on hydrostatic pressure, endothelial permeability, lymphatic drainage, and sodium and water balance.
The behavior of a colloid can change considerably in critically ill patients. Conditions such as sepsis and severe inflammation can alter endothelial integrity and increase capillary permeability. In such circumstances, the assumption that a colloid will remain confined to the intravascular space becomes less reliable. If large colloid molecules escape into the interstitial compartment, their oncotic effect may contribute to interstitial fluid retention rather than providing the desired sustained intravascular expansion.
This is an important reason why the physiological concept of colloid osmotic pressure should not be interpreted in isolation. A fluid may have a strong theoretical oncotic effect, yet the clinical benefit can be limited if the patient’s vascular barrier is severely disrupted.
Albumin illustrates this principle particularly well. Because albumin is a natural plasma protein, administering concentrated albumin can increase plasma oncotic pressure and expand intravascular volume. However, its clinical use must still be matched to the underlying condition. Current sepsis guidance does not recommend routine albumin in place of crystalloids for initial resuscitation; instead, it allows consideration of albumin in selected patients who have already received large crystalloid volumes or have cirrhosis.
The concentration of a colloid solution also matters. A 5% albumin solution has a different physiological effect from a 20% or 25% albumin preparation. More concentrated albumin solutions can exert a stronger oncotic effect and draw water into the intravascular space. Therefore, administration requires attention to the patient’s current fluid status and the possibility of intravascular volume overload.
The same principle helps explain why colloid administration should not be evaluated simply by asking whether the fluid “stays in the blood.” The clinically relevant questions include whether the patient is fluid responsive, whether increased intravascular volume improves perfusion, whether the vascular barrier is intact enough to retain the molecules, and whether the intervention produces more benefit than harm.
Hydroxyethyl Starch and Other Colloid Solutions
Hydroxyethyl starch is a synthetic colloid made by modifying starch molecules to produce a solution with volume-expanding properties. Different HES preparations have historically been described according to molecular weight, concentration, and degree of molar substitution. These characteristics influence how the molecules behave within the circulation and how quickly they are metabolized or eliminated.
Hydroxyethyl starch became widely used because it could produce substantial intravascular volume expansion while requiring less infused volume than might be needed with some crystalloid strategies. However, concerns about its safety became increasingly important as clinical trials evaluated outcomes in critically ill patients.
The major concerns surrounding HES include:
Acute kidney injury
Increased need for renal replacement therapy
Coagulation abnormalities and bleeding
Potential accumulation in tissues
Potential increase in mortality in some critically ill populations
A major systematic review published in JAMA evaluated randomized trials involving critically ill patients receiving HES for acute volume resuscitation. After excluding trials affected by scientific misconduct concerns, HES was associated with increased mortality, renal failure, and renal replacement therapy compared with other resuscitation fluids. The investigators concluded that its use for acute volume resuscitation was not warranted because of serious safety concerns.
These findings have had a major influence on contemporary fluid practice. The Surviving Sepsis Campaign specifically recommends against starches for resuscitation in adults with sepsis or septic shock, with high certainty of evidence. It also suggests against gelatin for resuscitation.
The renal concern is particularly important. Hydroxyethyl starch can accumulate in the kidney and has been associated with kidney injury in critically ill populations. An increase in acute kidney injury is clinically significant because deterioration of renal function can lead to electrolyte disturbances, impaired fluid balance, accumulation of medications and metabolic waste products, and the eventual need for renal replacement therapy in severe cases. The concern is therefore not simply a laboratory abnormality; it can influence the entire course of critical illness.
Synthetic colloids can also interfere with coagulation. Some preparations may affect platelet function, coagulation factors, or clot formation, making their use particularly concerning when bleeding is already present or when a patient is at high risk of hemorrhage. This is especially relevant in trauma and major surgery, where maintaining effective hemostasis is essential.
Gelatin solutions are another type of synthetic colloid. They contain modified gelatin molecules and have been used as plasma-volume substitutes in some healthcare systems. Their ability to expand intravascular volume is accompanied by potential adverse reactions, including hypersensitivity and effects on coagulation. Current sepsis guidance suggests against gelatin for resuscitation.
Dextrans are polysaccharide-based colloids that can produce intravascular volume expansion. Their use has declined substantially because of concerns involving bleeding, renal effects, and hypersensitivity reactions. They are therefore not considered routine first-line fluids for modern critical-care resuscitation.
Albumin remains the most clinically important natural colloid. Unlike synthetic colloids, it is a naturally occurring human plasma protein and has a well-established physiological role in maintaining oncotic pressure. Nevertheless, albumin is not simply a universal replacement for crystalloids. The current evidence-based approach is selective use based on clinical circumstances rather than routine administration to every patient requiring volume resuscitation. In sepsis and septic shock, current guidance favors crystalloids initially, with albumin considered in selected circumstances such as after large crystalloid volumes or in some patients with cirrhosis.
The differences among the major colloid groups can therefore be summarized conceptually:
Colloid group
Main characteristic
Important clinical consideration
Albumin
Natural plasma protein with oncotic activity
Selective use; may be considered after large crystalloid volumes or in selected conditions
Hydroxyethyl starch
Synthetic starch-derived volume expander
Significant renal and safety concerns; not recommended for sepsis resuscitation
Gelatin
Synthetic protein-derived colloid
Limited role and potential adverse effects; not recommended for sepsis resuscitation
Dextran
Synthetic polysaccharide colloid
Limited modern use because of bleeding, renal, and hypersensitivity concerns
The key clinical principle is that colloid use should be based on the specific preparation rather than on the assumption that all colloids behave in the same way. The theoretical ability of a colloid to retain fluid intravascularly does not by itself establish a clinical advantage over crystalloids. In contemporary practice, the decision must incorporate the patient’s underlying disease, vascular permeability, renal function, bleeding risk, previous fluid administration, and evidence supporting the particular product.
For critically ill patients, this distinction is especially important. Modern guidelines place crystalloids at the center of initial resuscitation, while reserving albumin for selected situations and discouraging synthetic starches and other colloids with unfavorable safety profiles.
Differences among the major colloid groups
Crystalloid Versus Colloid: Physiological and Clinical Differences
The distinction between crystalloid versus colloid is based largely on how each type of fluid behaves after intravenous administration. Although both can increase circulating volume and support tissue perfusion, they differ in molecular composition, distribution across the vascular and interstitial compartments, intravascular persistence, and the amount of fluid required to achieve a desired hemodynamic response.
A crystalloid solution contains water and relatively small electrolytes or other small solutes that readily distribute throughout the extracellular fluid compartment. A colloid contains larger molecules, such as albumin or certain synthetic polymers, that can exert colloid osmotic pressure and may remain within the vascular space longer when the capillary barrier is relatively intact.
These physiological differences explain why crystalloid and colloid solutions have historically been viewed as having different volume-expanding properties. However, the practical difference should not be reduced to the idea that one fluid is always superior. Modern fluid therapy emphasizes the patient’s clinical condition, the reason for volume loss, the type of fluid, the amount administered, and the patient’s response.
Fluid Distribution and Intravascular Volume Expansion
After an intravenous fluid is administered, its ultimate distribution depends on its composition and the permeability of the vascular endothelium. This is one of the most important physiological distinctions when considering crystalloid versus colloid.
Crystalloids contain relatively small dissolved particles that can cross the capillary endothelium more readily than the larger molecules found in colloids. Consequently, an isotonic crystalloid does not remain entirely inside the blood vessels. A substantial proportion moves from the intravascular compartment into the interstitial space, while the water and electrolytes remain within the extracellular fluid compartment.
This means that a crystalloid infusion can increase blood volume and improve venous return, cardiac output, and tissue perfusion, but the intravascular effect may diminish as fluid redistributes. The process is especially important when large quantities of crystalloid are administered. Excessive administration can increase interstitial fluid and contribute to edema.
For example, a patient with acute hypovolemia may receive an isotonic crystalloid such as a balanced crystalloid solution. The immediate goal is not to permanently keep the entire infused volume inside the bloodstream. Rather, the goal is to provide enough fluid to increase effective circulating volume and improve perfusion while the underlying cause of the fluid loss is addressed.
Colloids behave differently because they contain larger molecules. Albumin, for example, contributes to plasma oncotic pressure and can help retain water within the vascular compartment. Synthetic colloids were developed partly because their larger molecular structures were expected to provide prolonged intravascular volume expansion.
This is the physiological basis for the traditional argument that colloids have larger volume-expanding effects than crystalloids. In an intact vascular barrier, a colloid molecule is less able to cross the capillary wall than the small electrolytes contained in a crystalloid. Consequently, colloid administration can produce relatively greater intravascular expansion per unit volume.
However, this effect is highly dependent on the patient’s condition. In critically ill patients, inflammation can increase endothelial permeability. When the vascular barrier becomes more permeable, even molecules that would normally be retained intravascularly can move into the interstitial space. Therefore, the theoretical advantage of a colloid may become less pronounced during severe systemic inflammation, sepsis, trauma, or other conditions associated with capillary leak.
The comparison can therefore be summarized as follows:
Feature
Crystalloid
Colloid
Main components
Water and small dissolved particles
Water containing larger molecules
Initial distribution
Mainly extracellular space
Greater intravascular retention when the vascular barrier is intact
Intravascular persistence
Generally shorter
Generally longer, depending on the colloid and clinical condition
Typical volume requirement
May require greater volume
May require less volume for similar hemodynamic targets
Edema potential
Increases with excessive administration
Not eliminated; can also contribute to edema, especially with capillary leak
Examples
0.9% saline, Lactated Ringer’s, Plasma-Lyte
Albumin, hydroxyethyl starch, gelatin, dextran
Current general role in resuscitation
Major first-line category
Selective use; depends on the specific colloid and clinical situation
Importantly, the frequently quoted idea that approximately three times as much crystalloid is needed compared with colloid should not be treated as a fixed clinical rule. Research has found substantial variation in the crystalloid-to-colloid volume ratio, with a systematic review estimating an overall ratio of about 1.5:1 and considerable heterogeneity between studies.
Duration of Action and Volume Requirements
The duration of intravascular effect is another important consideration in crystalloid versus colloid comparisons.
Because crystalloid particles distribute relatively readily within the extracellular compartment, the increase in intravascular volume produced by a crystalloid infusion may decline as fluid leaves the vascular space. This does not mean that the crystalloid has stopped having physiological effects. Instead, its distribution has changed. Some of the administered fluid remains in the intravascular compartment, while much of it becomes part of the interstitial extracellular fluid.
Consequently, achieving and maintaining a particular hemodynamic response may require repeated crystalloid administration. However, giving additional fluid should never be based simply on the amount already administered. The patient should be reassessed after a fluid challenge or bolus to determine whether additional fluid resuscitation is likely to improve circulation.
For example, consider a patient with vomiting, diarrhea, tachycardia, hypotension, and clinical evidence of volume depletion. An isotonic crystalloid may be administered and the patient’s blood pressure, heart rate, capillary refill, urine output, mental status, respiratory status, and other relevant indicators reassessed. If perfusion improves, additional fluid may not be necessary. If the patient remains unstable, the clinician must determine whether further fluid, a different intervention, treatment of the underlying cause, or vasopressor support is appropriate.
Colloids can remain intravascular for longer than many crystalloid solutions because their larger molecules exert oncotic effects and may be retained within the vascular space. Historically, this led to the concept that smaller quantities of colloid could produce an equivalent degree of intravascular expansion.
The distinction becomes particularly relevant when excessive fluid administration itself is a concern. A patient who requires substantial volume replacement may develop pulmonary or peripheral edema if large quantities of crystalloid are administered. In theory, a colloid could achieve a similar intravascular effect with a smaller infused volume.
However, volume requirements cannot be separated from fluid safety. A smaller infusion volume does not automatically mean a better clinical outcome. For example, hydroxyethyl starch may provide substantial volume expansion but has been associated with important adverse effects, including kidney injury and increased need for renal replacement therapy. Therefore, its volume-sparing property does not make it preferable to safer alternatives.
The duration of action also varies substantially within the colloid group. Albumin and synthetic colloids do not behave identically. Albumin is a naturally occurring plasma protein, whereas synthetic colloids such as hydroxyethyl starch have different molecular structures, metabolism, and elimination characteristics. Therefore, it is more accurate to discuss the behavior of a specific type of colloid rather than assuming that every colloid produces the same intravascular effect.
Another important consideration is the patient’s vascular integrity. In a patient with severe systemic inflammation and capillary leakage, a colloid may escape from the vascular compartment. Once a colloid moves into the interstitial space, its presence may contribute to interstitial fluid accumulation rather than providing the intended sustained intravascular expansion. This is one reason why physiological predictions about colloid vs crystalloid do not always translate directly into better clinical outcomes.
Modern evidence reinforces this point. The 2024 European Society of Intensive Care Medicine guideline conditionally favors crystalloids over albumin for volume expansion in critically ill adults generally and in patients with sepsis, although specific circumstances such as cirrhosis may alter the choice.
Advantages and Limitations of Crystalloids and Colloids
Both fluid categories have advantages and limitations, and the appropriate choice depends on the clinical purpose of the infusion.
Advantages of crystalloids
Crystalloids are widely available, relatively inexpensive, and familiar across a broad range of clinical settings. Their composition can be selected according to the patient’s physiological needs. For example, balanced crystalloids can provide sodium and other electrolytes with a composition designed to reduce the chloride load associated with large amounts of 0.9% saline.
Crystalloids are also versatile. An isotonic crystalloid can be used for many forms of volume replacement and fluid resuscitation, whereas specific hypotonic or hypertonic solutions may be selected for different indications. This flexibility makes the crystalloid group a major component of modern intravenous fluid therapy.
Their limitations primarily relate to distribution and the consequences of administering excessive amounts. Because crystalloid fluid distributes beyond the vascular compartment, repeated or large-volume administration can increase interstitial fluid and produce edema. This can be particularly problematic when the patient has impaired cardiac function, kidney dysfunction, increased vascular permeability, or established pulmonary edema.
The composition of the crystalloid also matters. Large amounts of chloride-rich 0.9% saline can contribute to hyperchloremia and metabolic acidosis, which is one reason balanced crystalloid solutions are often preferred when clinically appropriate. The 2024 ESICM guideline conditionally recommends balanced crystalloids over isotonic saline in critically ill patients generally and in patients with sepsis.
Advantages of colloids
The principal theoretical advantage of a colloid is its ability to increase intravascular volume with relatively greater vascular retention than a crystalloid under appropriate physiological conditions. Albumin can also contribute directly to plasma oncotic pressure.
This characteristic can make colloid administration attractive in situations where maintaining intravascular volume while limiting the volume of infused fluid is an important consideration. However, the clinical benefit depends on the particular colloid and the patient’s underlying condition.
Albumin is especially important because it is a natural colloid rather than a synthetic polymer. Its use may be considered in selected circumstances, although current evidence does not support routine substitution of albumin for crystalloids in most critically ill patients. The ESICM guideline recommends crystalloids rather than albumin for volume expansion in critically ill patients in general and in sepsis, while recognizing circumstances such as cirrhosis in which albumin may have a role.
Limitations of colloids
The main limitation is that greater intravascular persistence does not necessarily translate into better survival or fewer complications. The choice of colloid fluid therefore requires consideration of both its desired physiological effect and its safety profile.
Synthetic colloids illustrate this distinction particularly well. Hydroxyethyl starch can produce effective intravascular expansion, but concerns regarding renal injury and other adverse outcomes have substantially restricted its role. A major review of resuscitation fluids also found that semisynthetic colloids have safety concerns despite their greater intravascular persistence.
Cost and availability can also influence the choice. Albumin is generally more expensive than commonly used crystalloids, which can be particularly relevant when large-scale fluid resuscitation is required or resources are limited.
The most important clinical principle is therefore that crystalloids and colloids should not be selected solely according to how long they remain intravascularly. The fluid should be considered in relation to the patient’s hemodynamic state, cause of fluid loss, organ function, risk of fluid overload, and response to treatment.
For example, a patient with uncomplicated hypovolemia may respond appropriately to an isotonic crystalloid. Another patient with a specialized indication may be considered for albumin after careful assessment. A third patient may require a blood product rather than either crystalloid or colloid because the primary problem is substantial blood loss and loss of oxygen-carrying capacity. In that situation, replacing volume alone does not replace red blood cells or correct the underlying deficit.
Thus, when comparing colloids versus crystalloids, the practical question is not simply which fluid produces the greatest increase in intravascular volume. The more clinically useful question is which type of fluid can achieve the therapeutic objective with the lowest overall risk for that particular patient. Current critical-care guidance generally places crystalloids at the center of initial volume resuscitation, while reserving selected colloid solutions for specific circumstances rather than treating colloids as universally superior volume expanders.
Colloids Versus Crystalloids in Critically Ill Patients
Fluid selection becomes particularly important in critically ill patients because the physiological consequences of both inadequate and excessive fluid administration can be serious. A patient in shock may require rapid fluid resuscitation to restore effective circulating volume and tissue perfusion, but excessive administration can contribute to pulmonary edema, tissue edema, impaired gas exchange, and organ dysfunction.
The debate surrounding colloids versus crystalloids has therefore focused not only on which solution produces greater intravascular volume expansion, but also on whether that physiological difference translates into better survival, kidney outcomes, or other clinically meaningful benefits.
Current evidence has shifted substantially toward crystalloids as the routine resuscitation fluid for most critically ill adults. Colloids, particularly synthetic colloids such as hydroxyethyl starch, have a much more restricted role because their theoretical volume-expanding advantages have not consistently translated into improved patient outcomes and some have been associated with important harm. Current 2026 Surviving Sepsis Campaign guidance recommends crystalloids as the first-line fluid for adults with sepsis or septic shock and suggests balanced crystalloids rather than 0.9% saline for initial resuscitation.
Evidence From Fluid Resuscitation Studies
The comparison between crystalloid and colloid has been investigated in numerous randomized trials and systematic reviews. These studies have examined mortality, kidney injury, need for renal replacement therapy, hemodynamic response, and other outcomes.
One of the most influential studies was the SAFE trial, which compared 4% albumin with 0.9% saline in nearly 7,000 ICU patients requiring fluid resuscitation. The study found similar outcomes at 28 days between the two groups. This was important because albumin is a natural colloid solution, while saline is a crystalloid. The findings demonstrated that the theoretical ability of albumin to remain within the vascular space did not produce a general survival advantage over saline in an unselected ICU population.
The results also illustrate an important principle in crystalloid versus colloid research: a physiological difference does not automatically translate into a clinically important outcome difference. A fluid can produce a particular change in blood volume or oncotic pressure without necessarily reducing mortality or preventing organ dysfunction.
The CRISTAL trial examined colloids versus crystalloids in patients with hypovolemic shock. It found no significant difference in 28-day mortality, although a lower 90-day mortality was observed with colloids and required cautious interpretation. The investigators therefore did not establish a universal mortality advantage for colloid resuscitation.
The evidence becomes more concerning when synthetic colloids are considered. The 6S trial compared hydroxyethyl starch with Ringer’s acetate in patients with severe sepsis. Patients receiving hydroxyethyl starch had a higher risk of death at 90 days and were more likely to require renal replacement therapy.
Similarly, the CHEST trial compared 6% hydroxyethyl starch with saline in ICU patients. Although there was no significant difference in 90-day mortality, more patients receiving hydroxyethyl starch required renal replacement therapy.
These findings helped change the way colloid fluid is viewed in critical care. The question is no longer simply whether a colloid expands the intravascular compartment efficiently. The more important question is whether that expansion occurs without causing clinically important kidney, coagulation, or other complications.
Research has also examined the choice among different crystalloid solutions. The SMART trial included 15,802 critically ill adults and compared balanced crystalloids with saline. Major adverse kidney events within 30 days occurred in 14.3% of patients receiving balanced crystalloids compared with 15.4% receiving saline. Thirty-day in-hospital mortality was 10.3% versus 11.1%, respectively, although the mortality difference alone did not reach conventional statistical significance.
This evidence is relevant because crystalloids versus crystalloids is now an important part of fluid selection. The debate is not simply colloids and crystalloids. Clinicians must also consider whether a balanced crystalloid or 0.9% saline is most appropriate.
The 2024 European Society of Intensive Care Medicine guideline evaluated the evidence on resuscitation fluid selection in critically ill adults and provides recommendations addressing albumin versus crystalloids, balanced crystalloids versus saline, and hypertonic solutions.
Taken together, the evidence suggests several important points:
Crystalloids remain the principal fluid resuscitation option for most critically ill patients.
Albumin does not provide a universal mortality advantage over crystalloids.
Synthetic colloids, particularly hydroxyethyl starch, have important safety concerns.
Balanced crystalloids may have advantages over saline for some critically ill populations.
Fluid choice should be individualized rather than based solely on the theoretical volume-expanding capacity of a solution.
Use in Sepsis, Shock, and Major Blood Loss
Sepsis and septic shock
Sepsis creates a particularly challenging environment for intravenous fluid therapy. Systemic inflammation can cause vasodilation, altered vascular permeability, and loss of effective circulating volume. The patient may therefore develop hypotension and impaired tissue perfusion even when total body water is not necessarily severely depleted.
For adults with sepsis or septic shock, current Surviving Sepsis Campaign guidance recommends crystalloids as the first-line fluid for resuscitation. The 2026 guideline also suggests balanced crystalloids over 0.9% saline during initial resuscitation.
This means that a balanced crystalloid such as Lactated Ringer’s or another balanced solution may be selected when there is a need for intravenous volume replacement. If balanced crystalloids are unavailable or inappropriate, 0.9% saline remains an accepted option.
The choice should not be interpreted as permission to administer unlimited fluid. Sepsis management increasingly emphasizes reassessment and avoidance of unnecessary fluid accumulation. A patient who remains hypotensive after an appropriate initial fluid challenge may require vasopressor therapy rather than repeated fluid boluses.
Albumin occupies a more selective position. Earlier Surviving Sepsis Campaign guidance suggested considering albumin in patients who had already received large volumes of crystalloids. The 2026 guidance is more conservative, recommending crystalloids alone over routine supplemental albumin while acknowledging circumstances in which albumin may be appropriate, such as selected patients who have received substantial crystalloid volumes or patients with cirrhosis.
Therefore, albumin and saline for fluid replacement should not be regarded as interchangeable treatments in every septic patient. The patient’s volume status, disease process, prior fluid administration, and risk of fluid accumulation all influence the decision.
Shock
Shock represents inadequate tissue perfusion and can arise from several mechanisms, including hypovolemia, distributive shock, cardiogenic shock, and obstructive shock. The role of crystalloid or colloid therefore depends partly on the cause of the shock.
In hypovolemic shock caused by fluid loss, an isotonic crystalloid may be appropriate for initial volume replacement. The response should then be assessed using clinical and hemodynamic indicators rather than assuming that a predetermined volume must be administered.
In distributive shock such as septic shock, crystalloids are generally used initially because the problem includes vasodilation and relative intravascular volume depletion. However, fluids alone do not correct the underlying vasoplegia. Vasopressors may become necessary when hypotension persists despite appropriate resuscitation.
In cardiogenic shock, indiscriminate fluid administration can be harmful because the heart may be unable to accommodate additional volume. In this setting, giving repeated crystalloid or colloid boluses simply because blood pressure is low may worsen pulmonary congestion. The underlying cardiac problem must be addressed.
This demonstrates why resuscitation in critically ill patients should be guided by the patient’s response rather than by a rigid crystalloid-to-colloid ratio.
Major blood loss
Major hemorrhage requires a different approach because the patient loses not only water and electrolytes but also red blood cells, coagulation factors, and platelets.
A crystalloid fluid can temporarily increase circulating volume, but it does not replace the oxygen-carrying capacity of a red blood cell or the hemostatic components of a blood product. Similarly, a colloid cannot substitute for blood when substantial hemorrhage has resulted in clinically significant loss of blood components.
For example, imagine a patient with severe traumatic blood loss who is hypotensive and tachycardic. Administering crystalloid may provide temporary volume support while hemorrhage control and blood-product resuscitation are initiated. However, progressively replacing large quantities of lost blood with crystalloid alone would dilute circulating red blood cells and coagulation factors.
The same principle applies to colloid administration. A colloid may expand plasma volume but does not restore the patient’s lost red blood cells or provide a complete replacement for the components of blood.
Therefore, blood loss changes the clinical question. Instead of asking only whether the patient needs a crystalloid or colloid, the team must determine whether the patient requires blood transfusion and a broader hemorrhage-control strategy.
Current Role of Crystalloids and Colloids in Critical Care
The modern role of crystalloids and colloids is best understood as selective rather than competitive. Crystalloids have become the foundation of initial volume resuscitation for most critically ill adults, while colloids are no longer routinely selected simply because they can produce greater intravascular volume expansion.
Current Surviving Sepsis Campaign recommendations strongly favor crystalloids as first-line resuscitation fluids in adults with sepsis or septic shock. Balanced crystalloids are suggested over 0.9% saline in the initial resuscitation of these patients.
The 2024 ESICM guideline similarly provides evidence-based recommendations for fluid selection in critically ill adults and generally favors crystalloids over albumin for volume expansion, while recognizing that specific clinical circumstances may warrant a different approach.
Albumin therefore retains a role, but it is a targeted role rather than routine replacement of crystalloids. Certain patients may benefit from albumin depending on the underlying disease and previous fluid exposure. For example, albumin has specific applications in selected patients with cirrhosis, and clinical guidelines may recommend it for particular complications of advanced liver disease.
Synthetic colloids have a substantially more restricted position. Hydroxyethyl starch is the clearest example. Although HES can expand intravascular volume, trials in severe sepsis and ICU populations raised significant concerns regarding mortality and kidney injury. Current sepsis guidance therefore recommends against starches for resuscitation.
The current approach can be summarized as follows:
Clinical situation
General fluid approach
Initial volume resuscitation in sepsis
Crystalloid, preferably balanced crystalloid when appropriate
Large-volume crystalloid exposure in selected patients
Consideration of albumin may be appropriate in specific circumstances
Routine resuscitation with hydroxyethyl starch
Generally avoided
Major hemorrhage
Blood products and hemorrhage control are central; crystalloid may have a limited supportive role
Cardiogenic shock
Avoid indiscriminate fluid loading; assess cardiac function and fluid responsiveness
Risk of fluid overload
Use smaller, reassessed fluid challenges and consider non-fluid interventions when appropriate
Traumatic brain injury
Fluid selection requires special consideration; current sepsis guidance favors 0.9% saline when sepsis coexists with TBI
The final point is especially important: fluid therapy is not simply about choosing between crystalloid versus colloid. The clinician must determine whether the patient needs fluid at all, whether the patient is likely to respond to fluid, which type of fluid is appropriate, how much should be administered, and when further administration should stop.
For example, a patient with septic shock and poor perfusion may initially receive a balanced crystalloid. If perfusion improves, additional fluid may not be required. If hypotension persists despite appropriate volume assessment, vasopressor therapy may be more appropriate than repeatedly administering intravenous fluid. Conversely, a patient with ongoing hemorrhage needs definitive bleeding control and appropriate blood-product replacement rather than progressively larger volumes of crystalloid.
This approach also explains why colloids versus crystalloids remains a clinically relevant distinction even though crystalloids are generally preferred. Understanding the physiological differences helps clinicians anticipate how a fluid will distribute, while understanding the evidence helps determine whether those theoretical advantages translate into better patient outcomes.
In current critical care, the goal is therefore not to maximize the intravascular volume expansion produced by an individual colloid solution or crystalloid solution. The goal is to restore adequate tissue perfusion while minimizing complications from both inadequate and excessive fluid administration. For most critically ill adults, that strategy places crystalloids—particularly balanced crystalloids—at the center of initial resuscitation, with albumin and other specialized fluids reserved for carefully selected circumstances.
Risks and Complications of Crystalloids and Colloids
Although intravenous fluids are essential in many clinical situations, neither crystalloids nor colloids are physiologically neutral. The same fluid that improves circulating volume and tissue perfusion can cause harm when the wrong type of fluid, excessive volume, or inappropriate infusion rate is used. The risks become particularly important in critically ill patients, who may have sepsis, acute kidney injury, cardiac dysfunction, endothelial injury, impaired coagulation, or other conditions that reduce their ability to tolerate additional fluid.
The complications associated with crystalloids and colloids differ according to their composition and physiological behavior. Crystalloids can contribute to fluid accumulation, edema, electrolyte abnormalities, and acid-base disturbances when administered in excessive amounts or when an inappropriate formulation is selected. Colloids can produce similar volume-related complications while also having additional risks that depend on the specific colloid solution.
Hydroxyethyl starch is an important example. Although it was developed to provide effective intravascular volume expansion, evidence has linked its use in certain critically ill and surgical populations with acute kidney injury, increased need for renal replacement therapy, bleeding, and mortality. The U.S. FDA added boxed warnings concerning mortality, kidney injury, and excess bleeding to HES products.
Renal and Bleeding Risks of Hydroxyethyl Starch
Hydroxyethyl starch (HES) is a synthetic colloid that was historically used for fluid resuscitation because its large molecules can produce substantial intravascular volume expansion. Different HES preparations vary in molecular weight, substitution characteristics, concentration, and carrier solution. Despite these differences, safety concerns have significantly reduced the role of HES in modern critical care.
The principal concerns are kidney injury, renal replacement therapy, bleeding, and mortality in particular patient populations.
Hydroxyethyl starch and kidney injury
The kidneys are particularly important when evaluating the safety of intravenous fluids because many fluid components and their metabolites must be handled by renal processes. Critically ill patients may already have reduced renal perfusion or evolving acute kidney injury, making them more vulnerable to additional renal stress.
Clinical studies have associated HES administration with increased risk of acute kidney injury and increased use of renal replacement therapy. The FDA’s review of randomized trials, meta-analyses, and observational data found evidence of increased mortality and acute kidney injury associated with HES in surgical patients, including increased need for renal replacement therapy. It also identified increased mortality and acute kidney injury in patients with blunt trauma.
The concern is particularly important because a patient requiring fluid resuscitation may already have several risk factors for kidney dysfunction. For example, a patient with septic shock may have hypotension, systemic inflammation, altered renal perfusion, and exposure to nephrotoxic medications. Adding a fluid associated with renal harm can make the overall clinical situation more complicated.
A simplified clinical example illustrates the issue:
A patient with severe sepsis develops hypotension and oliguria. An isotonic crystalloid is used for initial volume resuscitation, and the patient’s perfusion is reassessed. If HES were substituted simply because it provides greater intravascular volume expansion per unit volume, the theoretical volume advantage would need to be weighed against its potential renal toxicity. Current evidence and guidelines favor avoiding starches for resuscitation rather than accepting this risk for a presumed volume-sparing benefit.
The presence of acute kidney injury also changes how fluid administration should be approached. Reduced kidney function can decrease the patient’s ability to excrete sodium and water, increasing the likelihood that repeated intravenous fluid administration will produce positive fluid balance and edema.
Hydroxyethyl starch and bleeding
Bleeding is another major concern associated with HES. Synthetic colloids can interfere with hemostasis through effects on coagulation factors, platelet function, and dilution of circulating coagulation components. The degree of effect varies according to the specific product, dose, and clinical circumstances.
This becomes particularly concerning in patients who are already bleeding or who have undergone major surgery. A patient with trauma, gastrointestinal hemorrhage, or postoperative bleeding cannot be managed simply by increasing plasma volume. The underlying loss of red blood cells and coagulation components must also be addressed.
The FDA’s safety review specifically identified excess bleeding as an important risk associated with HES in surgical patients. Its labeling changes warn about mortality, kidney injury, and excess bleeding.
This illustrates an important distinction between a colloid fluid and a blood product. A colloid may expand plasma volume, but it does not replace the oxygen-carrying capacity of red blood cells or provide the full range of hemostatic components contained in blood products.
Because of these concerns, current Surviving Sepsis Campaign guidance recommends against starches for resuscitation in adults with sepsis or septic shock. The recommendation is based on high-certainty evidence.
Therefore, hydroxyethyl starch should not be viewed as simply another alternative in the routine choice between colloids and crystalloids. Its safety profile substantially limits its role in contemporary fluid therapy.
Fluid Overload, Edema, and Electrolyte Disturbances
Fluid overload is one of the most important complications of intravenous fluid administration. It can occur with either crystalloid or colloid fluid when the amount administered exceeds the patient’s ability to accommodate, distribute, or eliminate the fluid.
Fluid overload occurs when there is excessive accumulation of fluid in the body, often reflected by a persistently positive fluid balance, weight gain, peripheral edema, pulmonary edema, or worsening organ function.
The risk is especially important in patients with:
Heart failure
Acute or chronic kidney dysfunction
Liver disease
Sepsis
Capillary leak
Mechanical ventilation
Reduced cardiac reserve
Prolonged intensive care treatment
How crystalloid fluids can cause fluid overload
Because crystalloid solutions distribute throughout the extracellular compartment, large volumes can increase both intravascular and interstitial fluid. If administration continues after adequate circulating volume has been restored, additional fluid may no longer provide meaningful hemodynamic benefit.
For example, consider a patient who initially presents with severe hypovolemia and hypotension. An isotonic crystalloid improves blood pressure and peripheral perfusion. If additional fluid is repeatedly administered despite normalization of these indicators, the patient may develop peripheral edema or pulmonary congestion.
This is why fluid balance must be monitored rather than focusing only on the amount of fluid prescribed.
A patient may receive several liters of crystalloid fluid during the initial phase of treatment, but the clinical team must subsequently determine whether additional fluid is still needed. Current sepsis guidance specifically emphasizes frequent reassessment to avoid both under-resuscitation and over-resuscitation. After the acute resuscitation phase, active fluid removal may be considered when clinically appropriate, including diuretics or extracorporeal fluid removal in selected patients.
Pulmonary edema
Pulmonary edema is a particularly serious consequence of excessive fluid administration because excess fluid can interfere with pulmonary gas exchange.
A patient who receives excessive intravenous fluid may develop increasing oxygen requirements, crackles on auscultation, worsening respiratory distress, or radiographic evidence of pulmonary edema. The risk is particularly important in patients with left ventricular dysfunction or acute respiratory distress.
For example, if a patient with cardiogenic shock receives repeated crystalloid boluses despite poor cardiac pumping capacity, the additional fluid may increase pulmonary vascular pressures without producing an appropriate improvement in systemic perfusion.
This demonstrates why hypotension does not automatically mean that more fluid is required. The underlying cause of the hypotension and the patient’s likelihood of responding to additional fluid must be assessed.
Peripheral and tissue edema
Excess extracellular fluid can accumulate in dependent tissues, producing peripheral edema. In critically ill patients, generalized tissue edema can become extensive.
Edema can interfere with tissue oxygenation and wound healing and may complicate mobility, skin integrity, and vascular access. In severe cases, tissue swelling can contribute to impaired organ function.
Colloids are not exempt from this problem. Although colloid molecules may remain intravascularly longer than many crystalloid particles under normal conditions, patients with severe inflammation and increased capillary permeability may experience movement of colloid molecules into the interstitial space. Consequently, using a colloid does not guarantee protection against edema.
Electrolyte disturbances
Another major risk of crystalloid administration is electrolyte imbalance. Different crystalloid formulations contain different concentrations of sodium, chloride, potassium, calcium, lactate, acetate, or other components.
For example, large-volume administration of 0.9% saline can produce hyperchloremia. The resulting chloride load can contribute to metabolic acidosis and may influence renal physiology.
Balanced crystalloid solutions contain a more physiologically distributed electrolyte composition and generally have a lower chloride concentration than 0.9% saline. This is one reason current critical-care guidance often favors balanced crystalloids when appropriate. The 2026 Surviving Sepsis Campaign recommends balanced crystalloids over 0.9% saline for initial resuscitation in adults with sepsis or septic shock, while noting 0.9% saline as the preferred option in patients with sepsis and traumatic brain injury.
Electrolyte problems can also occur when a specialized fluid is administered without considering the patient’s existing laboratory values.
For instance, administering a sodium-containing solution to a patient who already has significant hypernatremia may worsen the sodium abnormality. Conversely, administering a hypotonic solution to a patient in whom hypotonic fluid is inappropriate can contribute to worsening hyponatremia.
Therefore, administration of fluids should be guided by both the clinical condition and laboratory findings when relevant.
Acid-base disturbances
The composition of the fluid can also affect acid-base balance. Large amounts of chloride-rich crystalloid can contribute to hyperchloremic metabolic acidosis. Balanced crystalloid solutions replace some of the chloride with other anions, such as lactate or acetate, which are metabolized or otherwise handled differently by the body.
This does not mean that balanced crystalloids are free of risks. They still contain substantial sodium and other electrolytes and can contribute to fluid overload when excessive quantities are administered.
The key principle is therefore that crystalloids contain different electrolyte compositions, and the choice between them should account for the patient’s existing electrolyte and acid-base status.
Preventing fluid-related complications
Safe fluid therapy involves repeated assessment rather than simply completing a prescribed volume. Important observations may include:
Blood pressure and heart rate
Respiratory rate and oxygen requirements
Lung examination
Peripheral edema
Urine output
Daily weight when appropriate
Serum electrolytes
Renal function
Acid-base status
Cumulative fluid balance
Signs of improving or worsening tissue perfusion
For critically ill patients, the response to each fluid intervention is particularly important. If perfusion has improved and additional fluid no longer provides a meaningful benefit, continued administration may expose the patient to unnecessary risk.
Blood Product and Transfusion Considerations
One of the most important limitations of both crystalloid and colloid solutions is that they cannot replace every component lost during major hemorrhage.
A crystalloid can increase extracellular and intravascular volume, while a colloid can provide intravascular volume expansion through its larger molecules and oncotic properties. Neither, however, replaces the oxygen-carrying capacity of a red blood cell.
This distinction is critical when managing major blood loss.
Crystalloid and colloid are not substitutes for blood
Imagine a patient involved in a major motor vehicle collision who loses a large amount of blood. The patient may develop hypotension because circulating blood volume has fallen. Administering crystalloid can temporarily increase circulating volume, but the patient’s red blood cell mass remains reduced.
As hemorrhage continues, the patient may therefore require blood products to restore oxygen-carrying capacity and support hemostasis. Depending on the clinical circumstances, transfusion may involve red blood cells, plasma, platelets, or other components.
The same principle applies to colloid administration. A colloid can expand the plasma component of the circulation but does not restore lost red blood cells.
This is why blood product administration should be considered according to the type and severity of blood loss rather than treating colloid or crystalloid infusion as a complete replacement strategy.
Red blood cell transfusion
A red blood cell transfusion is intended primarily to increase oxygen-carrying capacity rather than simply increase fluid volume.
Current AABB international guidelines recommend a restrictive transfusion strategy for most hemodynamically stable hospitalized adults, with transfusion generally considered when hemoglobin is below 7 g/dL. Higher thresholds may be selected in certain populations, such as patients undergoing cardiac or orthopedic surgery or those with preexisting cardiovascular disease. Importantly, transfusion decisions should also incorporate the patient’s overall clinical context rather than relying on hemoglobin alone.
These thresholds should not be interpreted as applying mechanically to a patient with active massive hemorrhage. A patient who is actively losing blood may require urgent blood-product resuscitation before laboratory hemoglobin values fully reflect the extent of acute blood loss.
For example, a patient with rapidly ongoing hemorrhage and signs of shock should not be managed by waiting for a laboratory value to fall to a particular threshold before initiating appropriate emergency treatment.
Risks associated with transfusion
Although blood transfusion can be lifesaving, it also carries potential complications. These can include:
Acute hemolytic transfusion reactions
Febrile nonhemolytic reactions
Allergic reactions
Transfusion-associated circulatory overload
Transfusion-related acute lung injury
Electrolyte and metabolic abnormalities in particular circumstances
Infectious risks, although modern screening substantially reduces transfusion-transmitted infections
Transfusion-associated circulatory overload is particularly relevant to the broader discussion of fluid overload. Blood products are themselves administered as fluid and can contribute to excessive intravascular volume, especially in patients with heart failure, kidney dysfunction, or limited cardiovascular reserve.
Therefore, switching from crystalloid administration to blood product administration does not eliminate the need to monitor volume status.
Fluid resuscitation and blood transfusion may occur together
In major hemorrhage, crystalloid and blood products are not necessarily mutually exclusive. A patient may initially require crystalloid while blood products are being prepared, while definitive hemorrhage control is pursued.
However, prolonged reliance on large volumes of crystalloid in severe hemorrhage can dilute red blood cells and coagulation components. Consequently, management of major bleeding requires attention to hemorrhage control and appropriate blood-component replacement rather than treating the problem solely as a deficit of circulating fluid.
This distinction is particularly important when comparing crystalloid versus colloid with blood products. Crystalloids and colloids are primarily volume-expanding fluids; blood products replace specific components of blood and therefore serve a fundamentally different purpose.
Albumin and blood products
Albumin deserves separate consideration because it is a natural colloid solution and is also a normal plasma protein. Albumin can increase oncotic pressure and contribute to intravascular volume expansion, but it should not be considered a substitute for red blood cells, plasma, or platelets when those components have been lost.
Current 2026 Surviving Sepsis Campaign guidance recommends crystalloids alone over routine addition of albumin for fluid resuscitation in adults with sepsis or septic shock. Supplemental albumin may be appropriate in selected circumstances, including some patients who have already received large crystalloid volumes or patients with cirrhosis; the guideline advises avoiding supplemental albumin in patients with traumatic brain injury.
Nursing considerations during fluid and transfusion therapy
Safe fluid therapy requires continuous assessment. The nurse should monitor the patient’s response to the prescribed iv fluid, recognize evidence of fluid overload or inadequate perfusion, and promptly communicate clinically significant changes.
When a patient is receiving crystalloid or colloid infusion, relevant observations include:
Vital signs and trends
Respiratory status and oxygen saturation
Lung sounds
Urine output
Peripheral and dependent edema
Level of consciousness
Skin perfusion and capillary refill
Intake and output
Cumulative fluid balance
Serum electrolytes and renal function when ordered
Signs of an adverse reaction
When a blood transfusion is prescribed, additional attention is required for patient identification, compatibility checks, baseline assessment, monitoring during administration, and recognition of transfusion reactions according to institutional protocol.
A useful clinical example is a patient with septic shock who initially receives crystalloid resuscitation. If blood pressure and perfusion improve, continued fluid administration should be reassessed rather than automatically continued. If the patient subsequently develops increasing oxygen requirements, pulmonary crackles, worsening edema, and a markedly positive fluid balance, the healthcare team must consider fluid overload rather than interpreting the findings as evidence that more fluid is needed.
The 2026 Surviving Sepsis Campaign specifically emphasizes frequent reassessment during fluid resuscitation and recommends consideration of active fluid removal after the acute resuscitation phase when clinically appropriate.
The central principle is therefore appropriate fluid for the appropriate indication, with repeated reassessment. Crystalloids remain the principal resuscitation fluids for many critically ill patients, while colloids have more selective indications. Hydroxyethyl starch is particularly restricted because of its renal, bleeding, and mortality concerns. Meanwhile, major hemorrhage requires recognition that neither crystalloid nor colloid can replace the oxygen-carrying and hemostatic functions of appropriate blood products.
Advantages and Limitations of Crystalloids and Colloids
Choosing an Intravenous Fluid in Clinical Practice
Choosing an intravenous fluid is a clinical decision rather than a simple choice between crystalloid versus colloid. The appropriate fluid depends on why the patient needs fluid, what has been lost, the patient’s cardiovascular and renal function, electrolyte and acid-base status, and how the patient responds to the initial infusion.
A useful framework is to distinguish five purposes of fluid therapy: resuscitation, routine maintenance, replacement of abnormal losses, redistribution of fluid, and reassessment. NICE specifically recommends considering these five principles—the “5 Rs”—when prescribing IV fluids.
For fluid resuscitation, the immediate objective is to restore adequate circulation and tissue perfusion without causing unnecessary fluid accumulation. For maintenance therapy, the objective is different: the patient needs enough water and electrolytes to meet normal physiological requirements when oral or enteral intake is inadequate. A patient losing fluid through vomiting, diarrhea, drains, burns, or other processes may require a replacement strategy that reflects the composition of those losses.
Consequently, there is no single “best” type of fluid for every patient. Even among crystalloids, the choice may be between a balanced crystalloid, 0.9% saline, or another formulation. Colloids, particularly albumin, may have selective applications, while synthetic colloids such as hydroxyethyl starch have a very limited role because of their safety concerns.
Factors Influencing Resuscitation Fluid Selection
The first question should be whether the patient actually needs fluid resuscitation. Hypotension alone does not establish that additional fluid is appropriate. A low blood pressure may result from hypovolemia, vasodilation, cardiac dysfunction, obstruction, or other causes that require different treatments.
Assessment should therefore combine the patient’s history, physical examination, laboratory findings, and clinical trends. Useful indicators include blood pressure, heart rate, capillary refill, peripheral temperature, urine output, mental status, respiratory status, and evidence of pulmonary or peripheral edema. NICE also identifies passive leg raising as a bedside method that can help assess fluid responsiveness in appropriate patients.
The underlying cause of the volume deficit is particularly important.
For example:
A patient with uncomplicated dehydration from gastrointestinal losses may require an isotonic crystalloid for volume replacement.
A patient with septic shock may require crystalloid resuscitation together with treatment of infection and, if hypotension persists, vasopressor support.
A patient with major hemorrhage requires consideration of blood product replacement rather than relying on crystalloid alone.
A patient with cardiogenic shock may deteriorate with excessive fluid because the failing heart cannot effectively accommodate additional volume.
A patient with severe kidney dysfunction may be particularly vulnerable to fluid accumulation.
A patient with significant electrolyte abnormalities may require a fluid whose composition does not worsen the existing disturbance.
The current 2026 Surviving Sepsis Campaign recommends crystalloids as the first-line fluid for adults with sepsis or septic shock. For initial resuscitation, balanced crystalloids are suggested over 0.9% saline, although 0.9% saline is suggested when sepsis occurs with traumatic brain injury. The guideline also recommends against starches and suggests against gelatin for resuscitation.
Balanced crystalloids versus saline
The choice within the crystalloid group also matters. Balanced crystalloid solutions contain electrolytes in proportions designed to reduce the chloride load compared with 0.9% saline. Lactated Ringer’s and other balanced solutions are common examples.
0.9% saline remains an important resuscitation fluid, but large-volume administration can produce hyperchloremia and acid-base disturbances. NICE recommends monitoring serum chloride in patients receiving IV fluids containing more than 120 mmol/L of chloride, such as 0.9% saline, and reassessing the prescription if hyperchloremia or acidemia develops.
This does not mean that balanced crystalloids are appropriate for every clinical situation. Fluid selection should account for the patient’s electrolyte abnormalities, neurological condition, renal function, acid-base status, and other circumstances.
For example, the 2026 sepsis guideline specifically recommends 0.9% saline rather than balanced crystalloid in patients with sepsis and traumatic brain injury.
Crystalloids versus colloids
The choice between colloid and crystalloid should also consider safety, not merely intravascular volume expansion.
Albumin is the principal natural colloid used clinically. Current sepsis guidance favors crystalloids alone over routine supplemental albumin but recognizes that albumin may be appropriate in selected patients who have already received large crystalloid volumes or who have cirrhosis.
Synthetic colloids require much greater caution. Hydroxyethyl starch, for example, is not simply an alternative to a balanced crystalloid. Its association with kidney injury and other adverse outcomes has substantially restricted its use, and current sepsis guidance recommends against starches for resuscitation.
Patient-specific factors
The same fluid can be appropriate for one patient and inappropriate for another. Important factors include:
Cardiac function: heart failure can make excessive volume particularly dangerous.
Renal function: impaired renal excretion increases the risk of fluid accumulation.
Liver disease: cirrhosis and hypoalbuminemia may influence the choice of fluid in selected situations.
Neurological status: patients with traumatic brain injury may require different fluid considerations.
Cause and severity of fluid loss: gastrointestinal losses, hemorrhage, burns, sepsis, and third-spacing do not have identical fluid requirements.
Current fluid balance: previous IV fluids, oral intake, enteral nutrition, medications, and blood products all contribute to total fluid exposure.
Response to previous fluid: improvement after a bolus supports the possibility that additional fluid may be beneficial; deterioration or absence of meaningful response should prompt reassessment.
NICE emphasizes that prescriptions should account for all sources of fluid and electrolyte intake, including oral or enteral intake, medications, IV nutrition, blood, and blood products.
Infusion, Monitoring, and Fluid Reassessment
The first question should be whether the patient actually needs fluid resuscitation. Hypotension alone does not establish that additional fluid is appropriate. A low blood pressure may result from hypovolemia, vasodilation, cardiac dysfunction, obstruction, or other causes that require different treatments.
Assessment should therefore combine the patient’s history, physical examination, laboratory findings, and clinical trends. Useful indicators include blood pressure, heart rate, capillary refill, peripheral temperature, urine output, mental status, respiratory status, and evidence of pulmonary or peripheral edema. NICE also identifies passive leg raising as a bedside method that can help assess fluid responsiveness in appropriate patients.
The underlying cause of the volume deficit is particularly important.
For example:
A patient with uncomplicated dehydration from gastrointestinal losses may require an isotonic crystalloid for volume replacement.
A patient with septic shock may require crystalloid resuscitation together with treatment of infection and, if hypotension persists, vasopressor support.
A patient with major hemorrhage requires consideration of blood product replacement rather than relying on crystalloid alone.
A patient with cardiogenic shock may deteriorate with excessive fluid because the failing heart cannot effectively accommodate additional volume.
A patient with severe kidney dysfunction may be particularly vulnerable to fluid accumulation.
A patient with significant electrolyte abnormalities may require a fluid whose composition does not worsen the existing disturbance.
The current 2026 Surviving Sepsis Campaign recommends crystalloids as the first-line fluid for adults with sepsis or septic shock. For initial resuscitation, balanced crystalloids are suggested over 0.9% saline, although 0.9% saline is suggested when sepsis occurs with traumatic brain injury. The guideline also recommends against starches and suggests against gelatin for resuscitation.
Balanced crystalloids versus saline
The choice within the crystalloid group also matters. Balanced crystalloid solutions contain electrolytes in proportions designed to reduce the chloride load compared with 0.9% saline. Lactated Ringer’s and other balanced solutions are common examples.
0.9% saline remains an important resuscitation fluid, but large-volume administration can produce hyperchloremia and acid-base disturbances. NICE recommends monitoring serum chloride in patients receiving IV fluids containing more than 120 mmol/L of chloride, such as 0.9% saline, and reassessing the prescription if hyperchloremia or acidemia develops.
This does not mean that balanced crystalloids are appropriate for every clinical situation. Fluid selection should account for the patient’s electrolyte abnormalities, neurological condition, renal function, acid-base status, and other circumstances.
For example, the 2026 sepsis guideline specifically recommends 0.9% saline rather than balanced crystalloid in patients with sepsis and traumatic brain injury.
Crystalloids versus colloids
The choice between colloid and crystalloid should also consider safety, not merely intravascular volume expansion.
Albumin is the principal natural colloid used clinically. Current sepsis guidance favors crystalloids alone over routine supplemental albumin but recognizes that albumin may be appropriate in selected patients who have already received large crystalloid volumes or who have cirrhosis.
Synthetic colloids require much greater caution. Hydroxyethyl starch, for example, is not simply an alternative to a balanced crystalloid. Its association with kidney injury and other adverse outcomes has substantially restricted its use, and current sepsis guidance recommends against starches for resuscitation.
Patient-specific factors
The same fluid can be appropriate for one patient and inappropriate for another. Important factors include:
Cardiac function: heart failure can make excessive volume particularly dangerous.
Renal function: impaired renal excretion increases the risk of fluid accumulation.
Liver disease: cirrhosis and hypoalbuminemia may influence the choice of fluid in selected situations.
Neurological status: patients with traumatic brain injury may require different fluid considerations.
Cause and severity of fluid loss: gastrointestinal losses, hemorrhage, burns, sepsis, and third-spacing do not have identical fluid requirements.
Current fluid balance: previous IV fluids, oral intake, enteral nutrition, medications, and blood products all contribute to total fluid exposure.
Response to previous fluid: improvement after a bolus supports the possibility that additional fluid may be beneficial; deterioration or absence of meaningful response should prompt reassessment.
NICE emphasizes that prescriptions should account for all sources of fluid and electrolyte intake, including oral or enteral intake, medications, IV nutrition, blood, and blood products.
Nursing Considerations for Safe Fluid Therapy
Nursing care is central to safe IV fluid administration because nurses frequently administer the infusion, monitor the patient continuously, identify changes in clinical status, document intake and output, and communicate deterioration to the healthcare team.
Safe nursing management begins before the fluid is connected.
Verify the prescription and the patient
Before starting an intravenous fluid, verify:
Correct patient
Correct type of fluid
Correct concentration
Correct route
Correct volume
Correct infusion rate
Appropriate IV access
Expiration and integrity of the fluid container
Relevant allergies or contraindications
Compatibility with concurrently administered medications
The nurse should also determine why the fluid was prescribed. A bag of crystalloid intended for rapid resuscitation should not be treated in the same way as a maintenance fluid intended to run slowly over many hours.
NICE emphasizes that IV fluids should be prescribed and administered by appropriately skilled healthcare professionals and that the prescription should clearly identify the type, rate, and volume.
Assess the patient before and during infusion
Baseline assessment provides a point of comparison for determining whether the infusion is producing the intended effect.
Assessment may include:
Blood pressure
Heart rate
Respiratory rate
Oxygen saturation
Temperature
Mental status
Capillary refill
Peripheral temperature
Lung sounds
Peripheral edema
Jugular venous pressure when clinically appropriate
Urine output
Existing fluid balance
Recent laboratory results
During administration, the nurse should watch for both therapeutic response and adverse effects.
For example, if a patient receiving crystalloid for hypovolemia develops improved blood pressure and peripheral perfusion without respiratory deterioration, the treatment may be achieving its intended objective. If the same patient develops new crackles, increasing dyspnea, and declining oxygen saturation, the nurse should recognize possible fluid intolerance and promptly communicate the change.
Monitor the IV site
The IV access itself requires regular assessment. Depending on the type of access and institutional policy, the nurse should monitor for:
Pain
Redness
Swelling
Leakage
Coolness around the insertion site
Resistance to infusion
Signs of phlebitis
Infiltration or extravasation where relevant
Local infection
An infusion that is technically running does not necessarily mean that fluid is being delivered safely into the intended vascular compartment.
Maintain accurate intake and output
Accurate intake and output measurement is one of the most important aspects of fluid balance assessment.
The total intake should account for more than the primary IV bag. It may include:
Maintenance IV fluids
Fluid boluses
Medication diluents
Blood products
Enteral feeds and free water
Oral intake when applicable
Other prescribed infusions
Output may include:
Urine
Vomiting
Diarrhea
Surgical drains
Nasogastric drainage
Other measurable losses
NICE specifically recommends accounting for all sources of fluid and electrolyte intake and maintaining fluid balance monitoring during IV fluid therapy.
This becomes especially important when several infusions are running simultaneously. A patient may receive a seemingly modest amount from each individual source but accumulate a substantial total volume over 24 hours.
Recognize fluid overload early
A nurse should recognize early signs that the patient may no longer tolerate additional fluid. These can include increasing peripheral edema, rising respiratory rate, new crackles, worsening oxygen requirements, increasing weight, and deteriorating respiratory status.
For example, consider an older patient with reduced cardiac and renal reserve who receives IV crystalloid for poor oral intake. If the patient’s blood pressure improves but the patient subsequently develops increasing dyspnea and bilateral crackles, the priority is not simply to continue the maintenance fluid because it was originally prescribed. The patient requires reassessment of the indication, current fluid status, and overall treatment plan.
Monitor for inadequate resuscitation
The opposite problem is failure to provide sufficient resuscitation fluid when true hypovolemia is present. Signs may include persistent hypotension, tachycardia, delayed capillary refill, cold extremities, altered mental status, oliguria, and other evidence of poor tissue perfusion.
The nurse should communicate persistent abnormalities rather than assuming that the prescribed fluid volume will automatically correct the problem.
In sepsis, for example, persistent hypotension after appropriate crystalloid administration may indicate the need for vasopressor therapy rather than an instruction to continue giving increasingly large amounts of fluid. The current Surviving Sepsis Campaign specifically supports vasopressor initiation when hypotension persists after initial crystalloid resuscitation.
Special considerations for colloids
When a colloid solution is prescribed, nursing monitoring remains similar in principle but should also reflect the specific risks associated with that product.
Albumin, for example, can expand intravascular volume and should be administered with attention to the patient’s cardiovascular and pulmonary status. Synthetic colloids such as hydroxyethyl starch require particular caution because of their safety profile and restricted clinical role.
A nurse should therefore understand that “colloid” is not a single homogeneous fluid category. Different types of colloids have different compositions, indications, and risks.
Special considerations for blood products
When fluid administration involves a blood product, additional safety procedures apply. Patient identification, compatibility verification, baseline assessment, appropriate monitoring, and recognition of transfusion reactions are essential.
Blood products also contribute to total fluid exposure. Therefore, a patient receiving red blood cells, plasma, platelets, crystalloid, and medication infusions may accumulate a substantial amount of fluid even though no single infusion appears excessive.
For hemodynamically stable adults, transfusion decisions should be based on hemoglobin together with the overall clinical context rather than an isolated laboratory number. The 2023 AABB international guideline recommends considering transfusion at a hemoglobin concentration below 7 g/dL for most hospitalized, hemodynamically stable adults, with different thresholds potentially appropriate for selected surgical or cardiovascular populations.
This threshold does not replace clinical judgment in active hemorrhage, where ongoing blood loss and hemodynamic instability require a different approach.
Patient education and documentation
Patients receiving IV fluids should understand, where appropriate, why the infusion is being given and what symptoms should be reported. NICE recommends involving patients in fluid management and explaining signs and symptoms that may indicate a need to adjust therapy.
Documentation should accurately record the type and amount of fluid administered, infusion rate, relevant assessments, intake and output, patient response, and any complications or interventions.
A complete record allows the healthcare team to determine whether the patient is receiving an appropriate amount of fluid rather than repeatedly making decisions without knowing the cumulative exposure.
Putting the Decision Into Practice
A practical approach to choosing an intravenous fluid can be summarized as:
Identify the purpose. Determine whether the patient needs resuscitation, maintenance, replacement, or another form of fluid therapy.
Assess the patient. Evaluate circulation, respiratory status, renal function, electrolytes, fluid balance, and the underlying cause of the problem.
Select the appropriate fluid. Consider the difference between a balanced crystalloid, saline, albumin, another specialized fluid, or a blood product.
Determine the volume and rate. Avoid treating fluid prescriptions as fixed quantities that should continue regardless of patient response.
Administer safely. Verify the prescription, IV access, fluid, concentration, and infusion rate.
Reassess. Look for improved perfusion as well as evidence of fluid intolerance.
Stop, modify, or escalate treatment when necessary. Persistent shock may require vasopressors or another intervention rather than additional fluid.
Continue monitoring. Follow fluid balance, renal function, electrolytes, respiratory status, and other clinically relevant indicators.
For example, a patient with septic shock may receive an initial balanced crystalloid fluid bolus. The healthcare team then evaluates blood pressure, capillary refill, mental status, urine output, lactate trends, respiratory status, and other measures of perfusion. If the patient remains hypotensive but shows evidence that additional fluid is unlikely to help, vasopressor therapy may become more appropriate. Current guidelines emphasize dynamic assessment and individualized fluid administration rather than indiscriminate continuation of fluids.
The central principle in crystalloid versus colloid selection is therefore not simply which fluid produces the greatest intravascular expansion. Safe fluid therapy requires matching the fluid to the patient’s physiological problem, administering an appropriate amount at an appropriate rate, and repeatedly reassessing whether the intervention is helping or causing harm. This approach allows crystalloids, colloids, blood products, and other therapies to be used according to their distinct clinical purposes rather than treating them as interchangeable forms of volume replacement.
Conclusion
Understanding Crystalloid Solution vs Colloid requires more than comparing how much fluid remains within the intravascular space. Crystalloids and colloids differ in composition, distribution, oncotic effects, duration of intravascular expansion, and potential complications, making fluid selection an important part of safe and effective fluid therapy. Crystalloids, particularly balanced crystalloid solutions, remain the foundation of fluid resuscitation for most critically ill patients because they are widely available, versatile, and supported by substantial clinical evidence.
Colloids, especially albumin, have more selective applications. Their ability to influence colloid osmotic pressure can be useful in specific clinical circumstances, but greater intravascular volume expansion does not necessarily produce better patient outcomes. Synthetic colloids such as hydroxyethyl starch have a much more limited role because of concerns involving kidney injury, renal replacement therapy, bleeding, and mortality.
The distinction between crystalloids and colloids is also important when managing sepsis, shock, dehydration, and major blood loss. Neither fluid category should be viewed as a substitute for a blood product when red blood cells or coagulation components have been lost. Similarly, administering additional fluid is not always the appropriate response to persistent hypotension. The patient’s underlying condition, fluid responsiveness, cardiovascular function, renal status, electrolyte balance, and cumulative fluid balance must all be considered.
Ultimately, effective fluid therapy depends on choosing the appropriate type of fluid, administering it at an appropriate volume and rate, and continually reassessing the patient’s response. A well-chosen crystalloid solution, carefully selected colloid, or appropriate blood product can support circulation and tissue perfusion when used for the right indication. At the same time, careful monitoring is essential to prevent fluid overload, edema, electrolyte disturbances, renal complications, and other adverse effects. The goal of Crystalloid Solution vs Colloid decision-making is therefore not simply to expand blood volume, but to restore adequate perfusion while minimizing avoidable harm.
Frequently Asked Questions
What are examples of crystalloids? Common examples of crystalloids include 0.9% normal saline, Lactated Ringer’s solution, Ringer’s solution, Plasma-Lyte, 0.45% saline, and 3% hypertonic saline.
Is dextrose a colloid or crystalloid? Dextrose is a crystalloid. Solutions such as D5W contain small, dissolved molecules that can cross capillary membranes and distribute throughout body water.
What is the difference between crystalloid and colloid solutions? Crystalloid solutions contain small dissolved particles, such as electrolytes or glucose, and distribute between the intravascular and interstitial spaces. Colloid solutions contain larger molecules, such as albumin or synthetic starches, that exert colloid osmotic pressure and can remain in the intravascular space longer when the capillary barrier is intact.
What are 5 examples of colloids? Five examples of colloids are albumin, hydroxyethyl starch (HES), gelatin solutions, dextran, and plasma. Albumin is a natural colloid, while HES, gelatin, and dextran are synthetic colloids. Plasma is a blood product containing proteins and other components.
Semi-Recumbent Position Versus Supine Position: Complete Guide to Positioning Adults Requiring Mechanical Ventilation
Patient positioning is an essential component of clinical care, particularly for critically ill patients whose respiratory function, mobility, consciousness, and ability to protect the airway may be compromised. In intensive care, the position of the body can influence ventilation, oxygenation, airway protection, secretion movement, and the risk of complications associated with prolonged immobility. These considerations become especially important when patients require mechanical ventilation, because an endotracheal tube, reduced cough reflex, sedation, enteral feeding, and limited mobility can alter normal protective mechanisms.
The Semi-Recumbent Position is commonly used in the care of patients receiving mechanical ventilation because it elevates the upper body rather than keeping the patient completely horizontal. In contrast, the supine position places the patient flat on the back, generally with the trunk close to 0° relative to the horizontal surface. Semi-recumbent positioning therefore represents a meaningful change in body position rather than simply a variation in patient comfort. The degree of elevation can be adjusted according to the patient’s condition, clinical objectives, tolerance, and institutional practice.
The clinical importance of the Semi-Recumbent Position is closely related to the interaction between body position and respiratory complications. Patients receiving invasive mechanical ventilation are vulnerable to aspiration because airway protective reflexes may be impaired, while the presence of an endotracheal tube can interfere with normal clearance mechanisms. Gastric contents may also reflux into the esophagus and potentially reach the respiratory tract. Positioning the upper body at an appropriate elevation can help reduce conditions that promote reflux and aspiration, which is one reason head-of-bed elevation is incorporated into many approaches to preventing ventilator-associated pneumonia.
The relationship between positioning and ventilator-associated pneumonia is particularly important in intensive care. Ventilator-associated pneumonia is a significant complication associated with mechanical ventilation, and aspiration of contaminated oropharyngeal or gastric secretions is one pathway through which microorganisms can enter the lower respiratory tract. Evidence has generally favored an elevated position over a low-angle or completely supine position for reducing clinically suspected VAP, although the strength and certainty of evidence differ among individual outcomes. A Cochrane review found that semi-recumbent positioning at approximately 30° or more may reduce clinically suspected VAP compared with 0° to 10° positioning, while evidence concerning mortality and other major outcomes remains less certain.
The effects of positioning extend beyond pneumonia prevention. Changing from a supine body position to an elevated position can alter several physiological processes, including:
Respiratory mechanics: Elevating the upper body can influence diaphragmatic movement, lung volumes, and the distribution of ventilation.
Airway protection: An elevated trunk may affect the movement of gastric and oropharyngeal contents and their potential access to the airway.
Gastrointestinal function: Body position can influence gastroesophageal reflux and the likelihood that gastric contents will move toward the pharynx.
Circulation: Changes in posture can affect venous return, cardiac loading conditions, and blood pressure, particularly in patients with limited cardiovascular reserve.
Skin and tissue integrity: Critically ill patients who remain in one position for prolonged periods are vulnerable to pressure-related injury, making appropriate positioning and repositioning important aspects of care.
The Semi-Recumbent Position should therefore not be viewed as a universally fixed angle that can be applied identically to every patient. Clinical positioning requires consideration of the patient’s overall condition and the competing risks and benefits associated with different positions. For example, an elevation that supports respiratory care may also contribute to sliding and shear, while a position that is tolerated well by one patient may produce hemodynamic or respiratory changes in another. The presence of invasive devices, enteral feeding, pressure injury risk, abdominal conditions, neurological status, and the patient’s ability to tolerate movement may all influence positioning decisions.
The distinction between the Semi-Recumbent Position and the supine position is consequently important when caring for adults requiring mechanical ventilation. The choice of position forms part of a broader approach to safe critical care rather than functioning as an isolated intervention. Appropriate positioning must be combined with airway management, ventilator care, aspiration precautions, infection-prevention practices, skin protection, clinical monitoring, and individualized nursing judgment.
Understanding the Semi-Recumbent Position requires attention to both its potential benefits and its limitations. The position may contribute to reducing aspiration-related complications and ventilator-associated pneumonia while also influencing respiratory function and patient comfort. At the same time, maintaining an elevated position requires careful attention to alignment, pressure distribution, airway security, and physiological tolerance. The clinical objective is therefore not simply to elevate the head of the bed, but to establish and maintain an appropriate body position that supports the patient’s overall condition and treatment goals.
What Is the Semi-Recumbent Position?
The Semi-Recumbent Position is a patient position in which the individual lies on the back with the upper portion of the body elevated above the level of the lower body. The patient remains in a recumbent or lying posture, but the head and trunk are raised by elevating the backrest or head of the bed. This creates an inclined body position rather than a completely flat horizontal position.
The Semi-Recumbent Position is widely used in hospital care, particularly in intensive care, critical care, and other settings where patients have limited mobility or require close physiological monitoring. It is especially relevant for adults requiring mechanical ventilation because body position can influence several aspects of patient care. However, the Semi-Recumbent Position should first be understood as a specific form of recumbent positioning defined primarily by the degree to which the upper body is elevated.
A simple way to understand the position is to compare the orientation of the body:
Flat position: The patient lies horizontally with little or no elevation of the head and trunk.
Semi-recumbent position: The patient remains lying on the back, but the head and upper torso are raised to an inclined angle.
More upright position: The head and trunk are elevated further, moving the patient closer to a sitting posture while still supported by the bed.
Thus, the term “semi-recumbent” describes an intermediate body position. The patient is neither completely flat nor fully upright. The lower body generally remains supported by the bed while the backrest elevates the upper body.
The Semi-Recumbent Position is sometimes written as semirecumbent position or semi recumbent position. Although the spelling may differ, these terms generally refer to the same clinical concept: an elevated recumbent position in which the patient’s trunk and head are raised above the horizontal plane.
Definition and Characteristics
The defining characteristic of the Semi-Recumbent Position is elevation of the head and upper torso while the patient remains lying in bed. In clinical practice, this is usually achieved by raising the head of the bed and backrest. The exact appearance of the patient position may vary depending on the bed design, the selected angle, the patient’s anatomy, and the need for additional support.
Several characteristics distinguish the Semi-Recumbent Position from other different positions.
1. The patient remains in a recumbent posture
The word recumbent refers broadly to a lying or reclining position. A patient in the Semi-Recumbent Position is still supported by the bed and is not sitting independently in a chair. The hips and lower extremities generally remain on the mattress, while the trunk is elevated.
This is an important distinction because the Semi-Recumbent Position is not simply another term for “sitting up.” The patient remains partially reclined, which allows the position to be maintained for patients who are weak, sedated, critically ill, or dependent on mechanical support.
For example, a mechanically ventilated patient may be unable to sit independently because of sedation, weakness, invasive mechanical ventilation, or the presence of multiple lines and devices. Elevating the backrest allows the patient to assume a more upright body position while remaining fully supported by the bed.
2. The head and upper torso are elevated together
In the Semi-Recumbent Position, the elevation involves more than simply placing pillows beneath the patient’s head. The bed’s backrest is raised so that the head, neck, shoulders, and upper trunk are supported in an inclined position.
This distinction matters clinically. Raising only the head with pillows while leaving the trunk flat does not produce the same overall patient position as elevating the head of bed. The Semi-Recumbent Position changes the orientation of a substantial portion of the upper body relative to the lower body and to gravity.
3. The degree of elevation is measured in angles
The position is commonly described using degrees of elevation. These angles indicate the approximate relationship between the patient’s upper body or backrest and the horizontal surface of the bed.
For instance:
A patient lying nearly flat may be described as having a 0° to 10° supine position.
A patient with the backrest raised to approximately 30° is commonly considered to be in a Semi-Recumbent Position.
Greater elevations, such as 45 degree positioning, create a more upright form of the same general semi-recumbent posture.
The exact terminology used for different angles may vary among clinical references and institutions. For this reason, the actual angle of the head of the bed is often more informative than relying on the name of the position alone.
4. The position is usually created by adjusting the bed
Modern hospital beds allow controlled elevation of the backrest, making it possible to establish and adjust the Semi-Recumbent Position without requiring the patient to actively support their own body weight.
The patient’s position may therefore be changed by:
Raising the head of the bed
Elevating the backrest
Adjusting the knee section when appropriate to support the patient’s posture and reduce downward sliding
Using pillows or positioning aids to maintain alignment where necessary
These adjustments help create a supported inclined position. The exact configuration may differ between patients, but the central characteristic remains elevation of the upper body while maintaining a recumbent posture.
5. The position represents a continuum rather than one identical posture
A common misconception is that every patient in the Semi-Recumbent Position must be placed at precisely the same angle. In reality, semi-recumbent positioning encompasses a range of elevated positions.
A patient at 30° and another at 45° are not positioned identically. Nevertheless, both may be described broadly as semi-recumbent because each patient remains partially reclined with the upper body elevated. Research involving patients requiring mechanical ventilation has also examined Semi-Recumbent Position ranges rather than treating every elevated position as exactly the same. A Cochrane review, for example, compared semi-recumbent positioning at 30° to 60° with a 0° to 10° supine position.
Understanding this characteristic is important because the term Semi-Recumbent Position identifies the general orientation of the patient, whereas the stated angle provides more precise information about the actual patient position.
Common Degrees of Elevation
The degree of elevation is one of the most important features used to describe the Semi-Recumbent Position. In clinical practice and research, angles are used to distinguish a relatively flat supine body position from progressively more elevated positions.
Although definitions may vary slightly, several ranges are commonly discussed.
0° to 10°: Near-flat or low-angle supine position
A 0° to 10° supine position describes a patient lying essentially flat or with only minimal elevation. The backrest may be completely flat or raised slightly, but the patient remains predominantly horizontal.
This position serves as an important comparison in research involving adults requiring mechanical ventilation. For example, studies evaluating the effect of body position have compared a semi-recumbent range of 30° to 60° with a 0° to 10° supine position. The Cochrane review of randomized controlled trials found that the elevated group had a lower risk of clinically suspected ventilator-associated pneumonia, although evidence for several other outcomes was limited and many included studies had a high risk of bias.
For the purpose of defining positions, however, the main point is straightforward: 0° to 10° represents a substantially flatter orientation than the Semi-Recumbent Position.
Approximately 20° to 30°: Lower semi-recumbent elevation
An elevation approaching 30° begins to place the upper body in a clearly inclined position. Some evidence-based recommendations and expert guidance have considered head-of-bed elevation within a range beginning at approximately 20°, with a preference for at least 30° when clinically appropriate for mechanically ventilated patients.
The 30° angle is particularly important in critical care literature. It is frequently used as a practical reference point when discussing the Semi-Recumbent Position, especially for patients receiving mechanical ventilation.
For example, imagine an adult patient lying in an intensive care unit bed. When the backrest is gradually raised from flat to approximately 30°, the patient’s shoulders and upper torso move into an inclined position while the hips and lower body remain supported on the mattress. The patient is no longer in a fully supine position but remains recumbent.
Approximately 30° to 45°: Common clinical range
The range of 30° to 45° is commonly associated with the Semi-Recumbent Position in clinical practice. Historical CDC guidance described semirecumbent positioning for patients receiving mechanical ventilation as approximately 30° to 45° head elevation, and evidence summaries have similarly identified this range in recommendations intended to reduce aspiration-related complications and ventilator-associated pneumonia risk.
Within this range, the patient remains partially reclined rather than fully upright.
A 30° position is less upright, whereas a 45° position creates greater trunk elevation. The difference can be clinically relevant because changing the angle changes the patient’s relationship to gravity and may affect tolerance of the position. Therefore, documenting or communicating only that a patient is “semi-recumbent” may be less precise than identifying the approximate angle when the exact position is clinically important.
Approximately 45°: More upright semi-recumbent positioning
A 45 degree position represents greater elevation of the head and trunk. The patient remains supported by the bed but assumes a more upright posture than at 30°.
Research has compared 45° positioning versus 25° to 30° positioning in mechanically ventilated patients. However, the available evidence has been limited, and systematic review findings have not established a statistically significant difference between these alternative angles for several major outcomes. This means that the evidence does not support assuming that a higher angle is always superior for every patient or outcome.
This is an important principle when discussing common degrees of elevation: the name of the position alone does not establish that one exact angle is universally appropriate. The selected angle must be understood in relation to the patient’s clinical condition and the purpose of positioning.
30° to 60°: Research definition used in some comparisons
Some randomized study evidence and systematic reviews have used a broader range of 30° to 60° to define the Semi-Recumbent Position. In the Cochrane comparison of semi-recumbent versus low-angle supine positioning, patients in the semi-recumbent groups were positioned within this broader elevated range.
This variation demonstrates why readers should pay close attention to how a research study defines its intervention. One study’s semirecumbent position may involve a target of 30°, while another may permit 30° to 45° or use an even broader range. Therefore, when interpreting evidence about the effects of the semirecumbent position, the specific angle and comparison group should always be considered.
In summary, the common angle ranges can be understood as follows:
0° to 10°: Predominantly flat or low-angle supine position
Around 20° to 30°: Transition toward a clearly elevated recumbent position
30°: A frequently used reference point for the Semi-Recumbent Position
30° to 45°: A commonly cited clinical range
45°: A more upright semi-recumbent posture
30° to 60°: A broader elevated range used in some research comparisons
These ranges should not be interpreted as rigid categories that replace clinical judgment. Instead, they provide a standardized way to describe how far the patient’s upper body is elevated.
Semi-Recumbent Position Versus Supine and Recumbent Position
Understanding the Semi-Recumbent Position is easier when it is compared directly with the broader recumbent position and the more specific supine position. These terms are related, but they are not interchangeable.
Semi-Recumbent Position and Recumbent Position
A recumbent positionis a broad term describing a position in which the patient is lying down or reclining. It does not automatically specify whether the patient is flat, elevated, on the back, or on the side.
Different positions may therefore fall under the broader concept of recumbency, including:
A supine position
A semi-recumbent position
Some lateral or side-lying positions
Other supported reclining positions
The Semi-Recumbent Position is therefore a type of recumbent position, not the opposite of one.
The key difference is specificity. Saying that a patient is “recumbent” tells us that the patient is lying or reclining, but it does not provide enough information to determine the precise body position. Saying that the patient is in the Semi-Recumbent Position provides additional information: the patient is recumbent, generally on the back, with the upper body elevated.
Consider the following example:
Patient A is described as recumbent. This description tells the healthcare team that the patient is lying or reclining but does not specify the angle or orientation.
Patient B is described as being in the Semi-Recumbent Position with the head of bed elevated to approximately 30°. This description provides much more precise information about the patient’s body position.
For clinical communication, the second description is therefore more specific.
Semi-Recumbent Position and Supine Position
The supine position refers specifically to lying on the back with the face upward. In its traditional form, the body is positioned horizontally or close to horizontal.
The principal difference between the Semi-Recumbent Position and the supine position is the degree of trunk elevation.
In a typical supine position:
The patient lies on the back.
The anterior surface of the body faces upward.
The head, shoulders, and trunk are generally close to the horizontal plane.
The head of bed may be flat or minimally elevated.
In the Semi-Recumbent Position:
The patient also generally lies on the back.
The face and anterior surface remain oriented upward.
The head, shoulders, and trunk are elevated.
The backrest and head of bed create an inclined posture.
Therefore, the Semi-Recumbent Position versus supine position is not primarily a comparison of “back versus side.” In both positions, the patient is commonly on the back. Instead, it is primarily a comparison of an elevated upper-body posture versus a flat or near-flat upper-body posture.
This distinction becomes particularly important for patients requiring mechanical ventilation. Research evaluating position versus supine position has commonly defined the comparison as an elevated semi-recumbent range, such as 30° to 60°, versus a 0° to 10° supine position. The available evidence suggests that the elevated position may reduce clinically suspected ventilator-associated pneumonia, but uncertainty remains regarding microbiologically confirmed VAP, mortality, length of ICU stay, length of hospital stay, and several other outcomes.
It is also important not to assume that every patient lying on the back is in exactly the same position. A patient at 0°, 10°, 30°, and 45° may all technically remain on the back, yet the orientation of the trunk differs substantially. For this reason, the actual angle of elevation provides valuable information when describing patient position.
The relationship can be summarized as follows:
Position
Basic Body Orientation
Upper-Body Elevation
Recumbent position
Broad term for lying or reclining
May vary
Supine position
Lying on the back, face upward
Usually flat or minimally elevated
Semi-Recumbent Position
Reclining, generally on the back
Upper body elevated, commonly around 30° to 45°
The most important point is that these terms describe positions at different levels of specificity. Recumbent position is the broadest term. Supine position identifies a patient lying on the back, usually in a flat or near-flat orientation. The Semi-Recumbent Position describes a supported, partially elevated form of recumbent positioning in which the upper body is raised above the horizontal plane.
This distinction provides the foundation for understanding the clinical role of the Semi-Recumbent Position. Before considering its effects on respiratory function, aspiration, reflux, or ventilator-associated pneumonia, it is necessary to recognize exactly how the position differs physically from supine and other recumbent positions and how the degree of elevation changes the orientation of the patient in bed.
Clinical Benefits of the Semi-Recumbent Position
The Semi-Recumbent Position has an important role in the care of critically ill patients, particularly those receiving mechanical ventilation. Its clinical value comes from the way elevation of the upper body changes the patient’s relationship with gravity and can influence respiratory mechanics, airway protection, gastric reflux, aspiration, and the risk of ventilator-associated pneumonia. For this reason, head-of-bed elevation is incorporated into critical care practice and VAP-prevention strategies when it is not medically contraindicated.
The benefits should, however, be interpreted carefully. The Semi-Recumbent Position is not a treatment that independently prevents every complication associated with mechanical ventilation. Rather, it is one component of a broader approach to patient positioning and critical care. Current CDC guidance recommends elevating the head of the bed to 30–45° for mechanically ventilated patients, while grading the quality of evidence as low. The same guidance notes that randomized evidence supports a reduction in VAP but has not demonstrated a clear reduction in duration of mechanical ventilation or mortality.
The main clinical benefits associated with the Semi-Recumbent Position include:
supporting an appropriate body position for patients receiving mechanical ventilation;
potentially improving aspects of respiratory function and lung expansion;
reducing exposure to pulmonary aspiration of gastric contents;
reducing gastroesophageal reflux under some circumstances;
lowering the risk of clinically suspected ventilator-associated pneumonia compared with a low-angle supine position;
providing an elevated patient position that is compatible with other critical care interventions, including enteral feeding and respiratory support.
The magnitude of these benefits varies according to the patient’s underlying illness, the degree of elevation, duration of positioning, and the clinical circumstances in which the position is maintained.
Effects on Respiratory Function
Body position has a direct relationship with respiratory physiology because changing posture changes the mechanical relationship between the lungs, diaphragm, chest wall, abdominal contents, and surrounding structures. In patients receiving mechanical ventilation, these relationships are particularly important because the patient’s spontaneous respiratory effort may be reduced or absent, and ventilation is being provided through an artificial airway.
When a patient changes from a flat supine body position to a Semi-Recumbent Position, the upper torso is elevated and the diaphragm assumes a somewhat different mechanical relationship with the abdominal contents. This can influence lung volumes, chest-wall mechanics, and the distribution of ventilation. The effect is not identical in every patient because respiratory physiology depends on factors such as obesity, abdominal pressure, lung disease, chest-wall compliance, diaphragmatic function, sedation, and the severity of respiratory failure.
One potential benefit is improved functional positioning of the diaphragm. In a completely flat position, abdominal contents can exert greater upward pressure against the diaphragm, particularly in patients with obesity, abdominal distension, ascites, or increased intra-abdominal pressure. Elevating the upper body can alter this relationship and may provide a more favorable mechanical environment for diaphragmatic movement.
This does not mean that every patient will demonstrate a dramatic improvement in oxygenation simply by moving from supine to semi-recumbent. Evidence in mechanically ventilated patients has shown that changes in respiratory and hemodynamic parameters can be modest or clinically insignificant in some populations. For example, a randomized crossover study of intubated, ventilated patients found no clinically important changes in arterial blood gases, respiratory mechanics, or hemodynamics after movement from supine to a semi-recumbent position greater than 45°.
Therefore, the respiratory benefit of the Semi-Recumbent Position should be understood as a physiological advantage that may support respiratory care, rather than as a guaranteed improvement in every measurable ventilator parameter.
Several mechanisms may contribute to the respiratory effects of positioning:
Changes in lung volume: Elevating the trunk can modify resting lung volumes and may reduce some of the restrictive effects associated with a completely flat position.
Changes in diaphragmatic mechanics: The diaphragm’s position and movement can change as the relationship between the thorax and abdomen changes.
Changes in ventilation distribution: Different positions can alter how ventilation is distributed throughout the lungs.
Changes in secretion movement: Gravity can influence the movement of respiratory secretions, although positioning alone does not replace suctioning, coughing, airway clearance techniques, or other indicated interventions.
Changes in chest-wall mechanics: The relationship between the thoracic cage and abdominal contents changes as the patient moves from supine toward a more upright posture.
These effects can be particularly relevant in critically ill patients with impaired respiratory reserve. A patient with severe obesity, abdominal distension, or reduced diaphragmatic excursion may respond differently to elevation than a patient with relatively normal respiratory mechanics.
For example, consider an adult receiving invasive mechanical ventilation who has been lying nearly flat. The patient has reduced spontaneous respiratory effort and substantial abdominal distension. Raising the head of the bed into an appropriate semi-recumbent position changes the orientation of the trunk and abdomen. The nurse can then reassess oxygen saturation, respiratory mechanics, ventilator waveforms, respiratory rate if spontaneous breathing is present, and the patient’s overall tolerance. The important clinical principle is not that elevation automatically improves all these measurements, but that positioning is a modifiable factor that can be assessed as part of respiratory care.
The Semi-Recumbent Position may also be useful during periods of ventilator weaning. A more upright posture can resemble the body orientation used during sitting and mobilization while allowing the patient to remain supported in bed. Research examining seated and semi-recumbent positions in ventilated patients found that neither position produced clinically important changes in respiratory or hemodynamic parameters in the study population, supporting the feasibility of these positions in selected patients during weaning.
It is therefore more accurate to say that the effect of body position on respiratory function is patient-specific. The Semi-Recumbent Position may facilitate favorable respiratory mechanics in some patients, while others may show little measurable change. Continuous clinical assessment remains important rather than assuming that a particular position will produce the same response in every patient
Effects on Aspiration and Gastroesophageal Reflux
One of the most important clinical reasons for using the Semi-Recumbent Position in patients receiving mechanical ventilation is its relationship to gastroesophageal reflux and pulmonary aspiration.
Critically ill patients may have several factors that increase aspiration risk, including:
reduced level of consciousness;
impaired swallowing and cough reflexes;
endotracheal intubation;
gastric distension;
enteral feeding;
delayed gastric emptying;
medications that alter gastrointestinal motility;
prolonged immobility; and
gastroesophageal reflux.
When gastric contents move upward from the stomach into the esophagus, gastroesophageal reflux occurs. If refluxed material reaches the pharynx and subsequently enters the lower respiratory tract, pulmonary aspiration can occur. In a patient receiving mechanical ventilation, aspiration is clinically important because aspirated material can introduce microorganisms, gastric contents, or other substances into the lungs.
The Semi-Recumbent Position can modify this process by using gravity to maintain the upper body in an elevated orientation. This can make it less likely that refluxed material will readily travel toward the upper airway compared with a completely flat supine position. The effect is particularly relevant during enteral feeding, when patients may have gastric contents present in the stomach.
Older clinical research demonstrated this relationship directly. In a randomized trial involving intubated, mechanically ventilated patients, the frequency of nosocomial pneumonia was substantially lower in the semirecumbent group than in the supine group. The study also identified supine positioning and enteral nutrition as independent risk factors for nosocomial pneumonia.
Importantly, Semi-Recumbent Positioning does not completely eliminate gastroesophageal reflux. A study of mechanically ventilated patients with nasogastric tubes found that reflux occurred in both supine and semirecumbent positions. However, bronchial secretion radioactivity was higher in the supine group at the end of the study, supporting the possibility that semirecumbency reduces pulmonary exposure to refluxed material even though reflux itself may still occur.
This distinction is clinically important:
Reducing reflux is not the same as eliminating reflux, and reducing aspiration risk is not the same as eliminating aspiration.
The Semi-Recumbent Position should therefore be regarded as a risk-reduction strategy rather than complete protection against aspiration.
The degree of elevation may also influence this relationship. Evidence comparing different elevations suggests that greater elevation can sometimes provide additional protection against gastric reflux. A meta-analysis of seven randomized studies involving 740 mechanically ventilated patients reported lower rates of gastric reflux and VAP with a 45° position compared with a 30° position. However, the 45° group also had a higher incidence of pressure sores, illustrating that a higher angle is not automatically preferable for every patient.
This creates an important clinical balance. Increasing elevation may theoretically improve protection against reflux and aspiration, but positioning must also take into account the patient’s overall tolerance and other clinical priorities. Therefore, the choice between approximately 30°, 45°, or another appropriate elevation should be individualized rather than based on the assumption that the highest possible angle is always best.
For example, consider a mechanically ventilated patient receiving continuous enteral nutrition who has a high risk of regurgitation. Maintaining an appropriate Semi-Recumbent Position can reduce the patient’s exposure to a flat posture during feeding. If the patient subsequently develops signs suggesting intolerance, reflux, respiratory deterioration, or sliding toward the foot of the bed, the nurse must reassess the overall positioning strategy rather than simply increasing the angle without considering other factors.
The relationship can therefore be summarized as:
Semi-recumbent elevation → greater upper-body elevation → potentially less favorable conditions for refluxed gastric material to reach the airway → reduced opportunity for pulmonary aspiration.
This pathway is one of the major reasons why head-of-bed elevation is incorporated into aspiration-prevention practices for appropriate critically ill patients. CDC guidance has recommended 30–45° head-of-bed elevation for patients at high risk for aspiration pneumonia, including patients receiving mechanically assisted ventilation or enteral feeding, when there is no medical contraindication.
Role in Ventilator-Associated Pneumonia Prevention
The relationship between the Semi-Recumbent Position and ventilator-associated pneumonia is one of the most extensively studied aspects of this patient position. VAP is a serious complication associated with mechanical ventilation, and its development involves multiple interacting factors rather than a single cause. Positioning is therefore one element of prevention rather than a stand-alone intervention.
The rationale for using an elevated position is closely linked to the aspiration pathway. Mechanically ventilated patients may develop colonization of secretions around the airway, experience reflux of gastric contents, and have impaired clearance of material from the respiratory tract. When contaminated secretions or gastric material enter the lower respiratory tract, they may contribute to pulmonary infection.
The Semi-Recumbent Position may interrupt part of this pathway by reducing the amount of reflux and aspiration associated with a completely flat position.
Evidence comparing semi-recumbent positioning with low-angle supine positioning supports this approach. A Cochrane review included 10 trials involving 878 participants and found that a Semi-Recumbent Position of 30° to 60° significantly reduced clinically suspected VAP compared with a 0° to 10° supine position. Clinically suspected VAP occurred in 14.3% of patients in the semi-recumbent groups compared with 40.2% in the low-angle supine groups, with a risk ratio of 0.36. However, the review judged all included trials to have a high risk of bias, and evidence for several other outcomes was less certain.
This evidence illustrates an important distinction between reducing the risk of clinically suspected VAP and proving an improvement in every clinically important outcome.
The same review did not find statistically significant differences between the positions for:
microbiologically confirmed VAP;
ICU mortality;
hospital mortality;
length of ICU stay;
length of hospital stay;
duration of mechanical ventilation; or
antibiotic use.
For microbiologically confirmed VAP specifically, the evidence was considered very low quality.
Consequently, it would be inaccurate to state that the Semi-Recumbent Position definitively prevents VAP or guarantees shorter ventilation or lower mortality. The more defensible conclusion is that semi-recumbent positioning appears to reduce the risk of clinically suspected VAP compared with a nearly flat supine position, while evidence for several other outcomes remains uncertain.
A broader systematic review and network meta-analysis reached a similar conclusion. Compared with supine positioning, semi-recumbent positioning was associated with a lower incidence of VAP, with a reported risk ratio of 0.38. The analysis also suggested favorable ranking for semi-recumbent positioning regarding VAP incidence, hospital length of stay, and duration of mechanical ventilation, although the authors emphasized caution when interpreting the findings.
The evidence concerning 30° versus 45° is more nuanced. A meta-analysis of seven studies involving 740 patients found that 45° semi-recumbent positioning was associated with lower VAP incidence than 30° positioning and lower gastric reflux, but it was also associated with more pressure sores. Other evidence has not established that 45° is definitively superior to 25°–30° for all clinical outcomes.
This explains why current clinical guidance generally emphasizes an appropriate range rather than requiring every patient to remain at one exact angle. The CDC’s 2022 prevention guidance recommends 30–45° head-of-bed elevation, while assigning a low quality of evidence to this specific intervention. It also emphasizes that head-of-bed elevation is part of a broader VAP-prevention approach.
The role of the Semi-Recumbent Position in preventing ventilator-associated pneumonia can therefore be understood through several connected mechanisms:
Reduced exposure to a flat supine position: Elevation changes the patient’s relationship with gravity.
Potential reduction in aspiration: An elevated upper body can reduce the likelihood that refluxed or regurgitated material will enter the airway.
Reduced pulmonary exposure to gastric material: Although reflux may still occur, elevation can reduce movement of refluxed material toward the lower respiratory tract.
Support for broader critical care practices: Positioning can be combined with oral care, appropriate airway management, enteral-feeding precautions, secretion management, and other evidence-based interventions.
Potential reduction in clinically suspected VAP: Research consistently provides more support for this outcome than for mortality, duration of ventilation, or hospital stay.
It is also important to distinguish ventilator-associated pneumonia in adults from all forms of pneumonia occurring in the hospital. The evidence discussed here specifically concerns patients receiving mechanical ventilation and the relationship between their body position and VAP risk. A patient who is not mechanically ventilated may have different risk factors and positioning considerations.
The Semi-Recumbent Position should therefore be incorporated into clinical practice as part of a comprehensive prevention strategy. It does not replace oral hygiene, appropriate airway care, aspiration precautions, ventilator management, secretion clearance, early mobility when appropriate, or other components of critical care.
For example, an ICU patient receiving invasive mechanical ventilation and enteral nutrition may have several simultaneous risk factors for VAP. Maintaining an appropriate head-of-bed elevation can address one modifiable component of that risk, while other interventions address oral microbial burden, secretion accumulation, airway management, and duration of ventilation. The effectiveness of the overall strategy depends on consistent implementation of multiple appropriate practices rather than on positioning alone.
The available evidence therefore supports a balanced conclusion: the Semi-Recumbent Position is an important component of VAP prevention for appropriate mechanically ventilated patients, particularly when compared with a nearly flat supine position. Its strongest evidence relates to reducing clinically suspected VAP and potentially limiting aspiration-related exposure, while evidence for effects on mortality, duration of ventilation, ICU stay, and other major outcomes remains less definitive. This distinction is essential when interpreting the research and applying positioning principles in clinical practice.
Semi-Recumbent Position for Mechanically Ventilated Patients
The Semi-Recumbent Position is commonly used when positioning adults receiving invasive mechanical ventilation because it allows the patient to remain supported in bed while the head and upper torso are elevated. In mechanically ventilated patients, positioning is not simply a matter of comfort. The position of the body can affect the security of the airway, access to ventilator tubing, enteral feeding equipment, pressure distribution, secretion management, and the ability of the healthcare team to provide bedside care.
For adults requiring mechanical ventilation, a typical semi-recumbent position involves elevating the head of the bed to approximately 30° to 45°, although the precise angle should be individualized according to the patient’s condition and the clinical objective. The Agency for Healthcare Research and Quality (AHRQ) identifies elevation of the head of the bed to at least 30° as an important daily care process for mechanically ventilated patients.
The Semi-Recumbent Position should therefore be understood as an active component of patient care rather than merely a particular bed setting. The nurse must consider the patient’s airway, ventilator connection, hemodynamic status, level of consciousness, skin integrity, body habitus, lines and drains, and current treatment plan before and after positioning.
For example, consider an intubated adult receiving invasive mechanical ventilation after acute respiratory failure. The patient may initially be lying close to the supine position while undergoing procedures or during transfer. Once the procedure is completed and there is no contraindication to elevation, the head of the bed can be raised to a semi-recumbent angle. The nurse then reassesses the patient’s oxygen saturation, respiratory pattern, ventilator interaction, blood pressure, airway security, and overall tolerance.
The goal is not simply to achieve a particular number on the bed’s angle indicator. Positioning patients safely means achieving an appropriate body position while preserving the integrity of the airway and all connected equipment. A patient who is technically at 30° but has slid substantially down the bed, developed excessive hip flexion, or has tension on the endotracheal tube is not necessarily positioned optimally.
The Semi-Recumbent Position may also need to be adjusted during different phases of care. A stable patient may tolerate approximately 30° to 45°, whereas another patient may require a lower elevation temporarily because of hypotension, a procedure, or another clinical concern. Conversely, a patient who is receiving enteral nutrition or has a particularly high aspiration risk may require careful attention to maintaining an appropriate degree of head-of-bed elevation when medically feasible. CDC guidance has recommended a 30°–45° head-of-bed elevation for patients at high risk for aspiration, including those receiving mechanically assisted ventilation or enteral feeding.
Positioning must also be coordinated with other aspects of mechanical ventilation. A patient’s body position should not be changed in isolation from the ventilator plan. When a patient is moved, the nurse and other members of the critical care team should observe whether the patient remains synchronized with the ventilator and whether the change produces alterations in respiratory or hemodynamic status.
This is particularly important for patients who are deeply sedated, receiving neuromuscular blockade, or unable to communicate discomfort. Such patients cannot reliably report that the tube is pulling, that a line has become uncomfortable, or that their body has shifted into an unsafe posture. Continuous observation and systematic assessment are therefore essential.
Maintaining Airway and Ventilator Safety
Airway safety is one of the most important considerations when placing an intubated patient in the Semi-Recumbent Position. An endotracheal tube provides the connection between the patient’s airway and the mechanical ventilator, so unnecessary movement, traction, compression, or displacement of the tube can have serious consequences.
Before repositioning an adult on invasive mechanical ventilation, the nurse should first identify the location and security of the endotracheal tube and inspect the fixation system. Ventilator tubing should be arranged so that its weight does not pull downward or sideways on the tube. The ventilator circuit should also have enough slack to permit the intended movement without becoming disconnected.
A practical principle is to move the patient and equipment together rather than allowing the equipment to dictate the patient’s movement. When the head of the bed is raised or lowered, the ventilator circuit may change position. If the tubing becomes taut, the force can be transmitted to the endotracheal tube. A second clinician may therefore be needed to manage the airway and tubing while another clinician adjusts the patient’s body position, particularly when the patient is unstable or has multiple invasive devices.
Changes in body position can also alter endotracheal tube cuff pressure. Research in mechanically ventilated adults has demonstrated that repositioning can produce clinically meaningful changes in cuff pressure, reinforcing the importance of checking airway-related parameters after significant positional changes according to local policy and clinical indication.
The nurse should pay attention to several indicators of airway and ventilator stability after positioning:
Endotracheal tube depth and external marking compared with the documented baseline
Security of the tube fixation device
Ventilator circuit connections
Sudden changes in airway pressure or ventilator alarms
Oxygen saturation and other available oxygenation measures
Respiratory pattern and chest movement
Patient-ventilator synchrony
Evidence of increased work of breathing
Secretions or obstruction of the airway
Cuff-related concerns when assessment is indicated
Position and integrity of other airway devices
A sudden change in ventilator pressure, oxygen saturation, respiratory mechanics, or patient appearance after repositioning should not automatically be attributed to the new body position. It may indicate a displaced endotracheal tube, circuit disconnection, airway obstruction, pneumothorax, secretion accumulation, or another acute complication requiring prompt assessment.
Airway security is particularly important when turning or moving a patient. Even a small amount of movement can become significant when an endotracheal tube, central venous catheter, arterial line, urinary catheter, feeding tube, chest tube, or other device is connected to the patient. The more devices a patient has, the greater the need for coordinated positioning.
Mechanical ventilation also requires attention to the ventilator circuit itself. The circuit should remain connected and should not be placed in a position where condensate can drain toward the patient’s airway. The tubing should be supported appropriately without creating excessive tension. If the circuit must be temporarily disconnected for a clinically necessary procedure, the action should follow institutional infection-control and ventilator-management protocols.
Another important consideration is the patient’s head and neck position. Excessive flexion, extension, or rotation can interfere with airway management and may alter the relationship between the endotracheal tube and surrounding structures. The head should generally be maintained in a clinically appropriate neutral or slightly supported position unless a specific therapeutic or procedural requirement dictates otherwise.
Airway-device pressure injuries must also be considered. Mechanically ventilated ICU patients can develop pressure injuries involving the lips, mouth, tongue, nose, or surrounding tissues because of prolonged contact with airway devices. A systematic review found that endotracheal tube stabilization is an important intervention for reducing airway device-related pressure injury, although evidence for some individual preventive strategies remains limited.
For this reason, maintaining airway safety does not mean merely checking whether the tube is still present. It involves assessing the tube, fixation system, surrounding tissue, ventilator circuit, patient response, and associated equipment as an integrated system.
Enteral feeding equipment also deserves attention. A mechanically ventilated patient may have a nasogastric or orogastric tube in addition to the endotracheal tube. When the patient is repositioned, the feeding tube and its fixation should be protected from traction or displacement. Head-of-bed elevation is generally maintained when medically feasible in patients at high risk for aspiration, including many patients receiving enteral nutrition.
For example, a patient receiving continuous enteral feeding may be moved from a nearly flat position to 30°–45°. Before the movement, the nurse checks the patient’s airway and feeding tube. During the movement, the ventilator tubing and feeding line are kept free of tension. Afterward, the nurse reassesses the patient and confirms that the tubes remain appropriately positioned and that there are no unexpected changes in respiratory or hemodynamic status.
Positioning Considerations for Critically Ill Patients
The Semi-Recumbent Position is frequently useful in intensive care, but it is not appropriate to assume that the same angle is suitable for every critically ill patient. Critical care patients can have rapidly changing physiology, multiple invasive devices, limited mobility, altered consciousness, and a high risk of complications associated with prolonged positioning.
Individualization is therefore central to safe positioning. Before selecting or maintaining a particular position, the healthcare professional should consider why the patient is receiving mechanical ventilation, current respiratory and hemodynamic stability, neurological status, recent procedures, surgical restrictions, presence of fractures or spinal precautions, abdominal conditions, pressure-injury risk, and the location of invasive devices.
A patient with stable vital signs may tolerate a 30°–45° elevation without difficulty. Another patient with severe hemodynamic instability may require a temporary modification while the underlying problem is addressed. Similarly, a patient with specific postoperative restrictions may have limitations on how the head, trunk, hips, or lower extremities can be positioned.
The phrase critically ill patients encompasses a highly diverse group. A patient receiving mechanical ventilation after pneumonia, for example, may have very different positioning requirements from a patient after major abdominal surgery, traumatic injury, cardiac surgery, or neurological injury. Clinical judgment must therefore take precedence over treating the Semi-Recumbent Position as a rigid one-size-fits-all intervention.
Hemodynamic tolerance
Raising the head of the bed changes the distribution of blood within the body and may influence venous return and blood pressure in some patients. Most stable adults tolerate moderate head-of-bed elevation, but patients with significant cardiovascular instability require closer observation.
After changing the position, the nurse should look for changes in blood pressure, heart rate, peripheral perfusion, mental status, and other relevant indicators. If a patient becomes hypotensive or otherwise unstable after positioning, the position may need to be modified while the cause is investigated.
The patient’s baseline condition matters. A modest positional change that is well tolerated by one ICU patient may produce a clinically important response in another.
Respiratory tolerance
Although the Semi-Recumbent Position is commonly incorporated into the care of patients on invasive mechanical ventilation, respiratory tolerance should still be reassessed after positioning. Observe oxygen saturation, respiratory pattern, chest movement, ventilator pressures, alarms, synchrony, and other available clinical indicators.
Patients with complex respiratory failure may have individualized positioning plans. For example, patients with severe acute respiratory distress syndrome may require prone positioning as part of evidence-based management rather than relying exclusively on a semi-recumbent or supine body position. Current ATS/ESICM/SCCM guidance strongly recommends prone positioning for more than 12 hours per day in adults with severe ARDS.
This illustrates an important distinction: semi-recumbent positioning is one component of critical care, not a replacement for other therapeutic positions when those positions are specifically indicated.
Multiple lines, drains, and devices
Critically ill patients often have more than an endotracheal tube and ventilator circuit. They may have arterial lines, central venous catheters, peripheral IV lines, chest tubes, urinary catheters, feeding tubes, surgical drains, monitoring leads, and other equipment.
Before changing the patient position, the nurse should identify each device and determine whether the planned movement could cause tension, kinking, compression, dislodgement, or interruption of therapy.
A useful approach is to mentally trace each line from the patient to its destination before moving the patient. Lines should have sufficient slack for the planned movement but should not be left tangled underneath the patient. After positioning, each line should be reassessed rather than assuming that it remained unchanged.
For example, a patient in the ICU may have a central venous catheter entering the neck, an arterial line, an endotracheal tube, a feeding tube, and a chest tube. Raising the head of the bed may appear simple, but the nurse must consider the position of the ventilator circuit, neck alignment, chest-tube tubing, monitoring cables, and infusion lines simultaneously.
Body habitus and mobility
Body size and mobility can significantly influence safe positioning. Patients with obesity may require additional personnel, appropriate lifting equipment, wider support surfaces, and careful attention to skin folds and device pressure. Frail older adults may have fragile skin and reduced tolerance for prolonged pressure or shear.
Patients who are unable to reposition themselves are particularly dependent on the healthcare team for regular assessment and adjustment. The objective is not simply to place the patient at a specified angle but to maintain a stable and supported body position without unnecessary pressure, sliding, or device tension.
AHRQ recommends maintaining head-of-bed elevation at least 30° when clinically appropriate and describes practical strategies such as bed-angle indicators or other methods that allow staff to verify elevation consistently.
Pressure injury prevention
Prolonged immobilization is a major concern in critical care. The Semi-Recumbent Position can increase pressure and shear at certain body areas, particularly when the patient slides downward in the bed. The sacrum, coccyx, heels, elbows, occiput, and areas affected by medical devices require regular assessment.
Pressure injury prevention should include risk assessment, appropriate support surfaces, skin inspection, moisture management, repositioning or micropositioning as clinically appropriate, and attention to nutrition and mobility. Best-practice literature emphasizes that prevention in critically ill patients requires ongoing assessment rather than a single positioning intervention.
Sliding is particularly relevant when the head of the bed is elevated. If the trunk moves upward with the backrest but the pelvis remains low, the patient’s body may slide toward the foot of the bed. This can create shear and place the patient in an uncomfortable or mechanically disadvantageous posture.
Appropriate bed configuration and repositioning techniques can help reduce this problem. When necessary, the patient should be repositioned with adequate assistance rather than being repeatedly pulled across the bed, which can increase friction and shear.
Sedation, neurological status, and ability to communicate
The patient’s level of consciousness also affects positioning safety. A conscious patient may report pain, shortness of breath, tube discomfort, dizziness, or excessive pressure. A sedated or neurologically impaired patient cannot reliably provide these warnings.
Consequently, critically ill patients with impaired communication require greater reliance on objective assessment. Facial expression, agitation, ventilator synchrony, changes in vital signs, oxygen saturation, ventilator alarms, and physical examination findings may provide important clues.
When feasible, positioning should also support participation in care. A patient who is awake and clinically stable may be able to communicate discomfort and assist with small movements, whereas a deeply sedated patient may require a coordinated team approach.
Procedures and temporary position changes
The head of the bed may need to be lowered temporarily for procedures, transfers, emergency interventions, or specific diagnostic or therapeutic activities. Such interruptions should be as brief as clinically appropriate, and the Semi-Recumbent Position should be restored when the clinical situation permits.
AHRQ emphasizes maintaining head-of-bed elevation of at least 30° as a standardized daily care practice while recognizing that clinical circumstances may require temporary changes.
For example, an ICU patient may need to be placed closer to a supine position during a resuscitation procedure. Once the immediate intervention is completed and there is no contraindication, the patient can be returned to an appropriate semi-recumbent angle. The nurse should then reassess airway security, ventilator function, vital signs, lines, tubes, skin, and overall tolerance.
The central principle is that positioning should remain dynamic. In critical care medicine, the safest position is the one that supports the current therapeutic goal while minimizing avoidable complications. The Semi-Recumbent Position is commonly incorporated into the care of adults receiving invasive mechanical ventilation, but its implementation requires continuous assessment, careful equipment management, and adaptation to the patient’s changing condition.
How to Position a Patient in the Semi-Recumbent Position
Patient and Equipment Preparation
Safe positioning begins before the backrest is raised. The nurse should first assess the patient’s current condition, confirm the prescribed or clinically appropriate position, and determine whether there are any restrictions or contraindications to elevating the head of the bed. For adults receiving invasive mechanical ventilation, head-of-bed elevation of at least 30° is commonly incorporated into daily care, with 30°–45° frequently used when clinically appropriate. AHRQ specifically recommends evaluating whether mechanically ventilated patients are maintained at or above 30° and documenting circumstances when this cannot be achieved.
The nurse should explain the procedure to an awake patient. Even a simple explanation such as, “I am going to raise the head of the bed and support your body so you remain in a safe position,” can reduce anxiety and encourage cooperation. A patient who understands the movement may also be able to report pain, dizziness, shortness of breath, or discomfort associated with the new body position.
Before beginning, perform an assessment appropriate to the patient’s condition. This may include checking:
Current vital signs and oxygen saturation
Respiratory status and work of breathing
Level of consciousness and ability to cooperate
Current supine position or other starting position
Airway security and endotracheal tube position in mechanically ventilated patients
Ventilator tubing and circuit connections
Presence and location of feeding tubes
IV lines, central venous catheters, arterial lines, drains, and urinary catheters
Existing pressure injuries or areas of vulnerable skin
Pain, musculoskeletal limitations, or movement restrictions
Surgical, spinal, neurological, or orthopedic precautions
The patient’s ability to tolerate the planned elevation
For a patient receiving mechanical ventilation, airway assessment deserves particular attention. The nurse should verify that the endotracheal tube is secured and note its documented external marking before movement. Ventilator tubing should have enough slack to allow the patient to be repositioned without pulling on the airway.
All equipment required for the movement should be available before positioning begins. Depending on the patient’s condition, this may include the adjustable hospital bed, pillows or positioning devices, pressure-redistributing surfaces, slide sheets, lifting equipment, and assistance from another healthcare professional.
The number of personnel required depends on the patient’s size, mobility, clinical stability, and number of attached devices. A small, awake patient who can reposition independently may need minimal assistance, whereas a sedated, obese, or hemodynamically unstable patient with multiple lines and tubes may require several trained staff members.
The bed should be placed at an appropriate working height while preparation is taking place, and the wheels should be locked. When the patient is being moved rather than simply having the electrically operated backrest adjusted, staff should coordinate the movement and use safe patient-handling techniques.
The desired elevation should also be verified rather than estimated visually. Bed angle indicators, built-in displays, or other approved measurement methods can help determine whether the head of the bed has reached the intended degree. AHRQ notes that reliable measurement of head-of-bed elevation can improve consistency because visual estimation may be inaccurate.
Before raising the bed, make sure the patient is positioned sufficiently high on the mattress to accommodate elevation. This is particularly important because raising the backrest while the patient’s pelvis is too low can cause the patient to slide toward the foot of the bed. Sliding can increase friction and shear and can compromise alignment.
For an adult receiving enteral nutrition and invasive mechanical ventilation, preparation should also include checking that the feeding tube and its fixation are secure. CDC guidance recommends 30°–45° head-of-bed elevation for patients at high risk of aspiration, including those receiving mechanically assisted ventilation or enteral tubes, when there is no medical contraindication.
Preparation therefore has two objectives: protect the patient during movement and make it possible to maintain the desired position afterward.
Step-by-Step Positioning Technique
Once the patient and equipment have been assessed, the Semi-Recumbent Position can be established in a controlled sequence. The exact technique may vary according to the type of hospital bed, the patient’s condition, and institutional policy, but the following approach provides a practical framework.
1. Perform hand hygiene and introduce the procedure.
Perform hand hygiene according to infection-prevention policy and use appropriate personal protective equipment when indicated. Identify the patient using approved identifiers and explain what will happen.
For an alert patient, explain that the head of the bed will be elevated and that the patient will be supported to prevent sliding. Ask the patient to report pain, dizziness, breathing difficulty, or other discomfort.
2. Assess the starting position and remove unnecessary obstacles.
Determine whether the patient is in a flat supine position, partially elevated, or another position. Check that there are no objects underneath the patient and that sheets, blankets, tubing, and cables are not trapped in a way that could interfere with movement.
Avoid unnecessary manipulation of tubes and lines. Rather than disconnecting devices simply to make positioning easier, arrange them so they can remain safely connected whenever possible.
3. Check airway and ventilator connections.
For patients on invasive mechanical ventilation, verify that the endotracheal tube is secure and that the ventilator circuit is properly connected. Ensure the circuit is supported and has sufficient slack.
One staff member should pay particular attention to the airway when the patient requires significant repositioning. This is especially important for patients who are sedated, receiving neuromuscular blockade, or unable to cooperate.
A useful principle is to avoid allowing the ventilator circuit to become the source of traction. The patient’s movement should not pull the endotracheal tube away from its intended position.
4. Position the patient’s body before raising the backrest.
If the patient has slid down the bed, reposition the patient appropriately before raising the head. When assistance is needed, use a slide sheet or other approved repositioning equipment rather than dragging the patient directly across the mattress.
The patient’s head, shoulders, trunk, and pelvis should be supported in a way that will allow the backrest to rise without producing excessive sliding.
The patient’s hips should be positioned in relation to the bed’s articulated section when possible. This helps the body move more naturally as the backrest is raised and reduces unnecessary stress on the patient.
5. Elevate the head of the bed gradually.
Raise the backrest slowly to the prescribed or clinically appropriate angle. For many mechanically ventilated adults, the intended Semi-Recumbent Position is approximately 30°–45°. AHRQ describes elevation to at least 30° as a daily care process for eligible patients receiving mechanical ventilation.
The backrest should not simply be raised rapidly to a predetermined number without observing the patient. During elevation, watch for changes in respiratory status, oxygen saturation, blood pressure, heart rate, facial expression, agitation, and ventilator interaction.
If the patient develops significant instability, the movement should be stopped and the patient reassessed.
6. Establish the desired degree of elevation.
Once the head of the bed has reached the intended level, verify the angle. A position that looks approximately 30° may be substantially different from 30° when measured accurately.
The appropriate angle depends on the clinical situation. The common 30°–45° range provides a practical reference, but the patient’s condition, treatment plan, and contraindications must guide the final position.
It is important not to treat 30° as a universal mandatory number under every circumstance. AHRQ’s measurement guidance specifically provides a mechanism for documenting when elevation to 30° or more is contraindicated.
7. Adjust the lower part of the bed if necessary.
If the bed permits, adjust the knee or lower-leg section appropriately to reduce the tendency for the patient to slide downward. The exact configuration depends on the bed design and the patient’s condition.
The purpose is not to create an exaggerated sitting posture but to produce a stable and supported semi-recumbent position.
8. Reassess the airway and ventilator circuit.
After the head of the bed has been raised, reassess the endotracheal tube and ventilator circuit. Confirm that the circuit has not become taut, kinked, disconnected, or positioned in a way that places pressure on the airway.
Observe the patient’s respiratory status and ventilator interaction. Unexpected changes in oxygen saturation, airway pressures, respiratory pattern, or ventilator alarms should prompt assessment rather than being assumed to represent a normal response to positioning.
9. Check all other lines and tubes.
Inspect IV tubing, central lines, arterial lines, urinary catheters, feeding tubes, drains, monitoring cables, and other devices.
No line should be trapped beneath the patient or stretched tightly across the body. Tubing should be organized so that it remains accessible and does not create a source of traction or pressure.
This step is particularly important in the ICU because critically ill patients may have numerous devices connected simultaneously.
10. Support the patient with appropriate positioning aids.
Use pillows or approved positioning devices when needed to support the head, arms, legs, or other vulnerable areas. Avoid placing excessive pressure on areas already showing redness, tissue damage, or pressure injury.
The objective is a stable position that can be maintained comfortably and safely, rather than simply reaching a particular bed angle.
11. Reassess the patient after positioning.
Allow the patient a short period to adjust and then reassess relevant clinical parameters.
For a stable patient, this may include respiratory rate, oxygen saturation, heart rate, blood pressure, pain, comfort, and general appearance. For a patient receiving invasive mechanical ventilation, assessment should also include ventilator alarms, patient-ventilator synchrony, airway security, and other parameters relevant to the patient’s condition.
If the patient is awake, ask whether the position is comfortable and whether there is pain, pressure, dizziness, or difficulty breathing.
12. Ensure safety measures are restored.
Once positioning is complete, ensure the bed is returned to an appropriate safe height, brakes are engaged, necessary side rails are used according to institutional policy and patient needs, and the call system is accessible for an alert patient.
Confirm that monitoring equipment is functioning and that essential tubing remains visible and accessible.
The Semi-Recumbent Position should be treated as a maintained clinical position, not a one-time adjustment. The patient’s body can gradually slide, the bed angle can change, and lines can become displaced during routine care. Periodic reassessment is therefore necessary.
Maintaining Proper Alignment and Position
Achieving the desired angle is only the first part of positioning. The patient must remain properly aligned and supported while in the Semi-Recumbent Position. Poor alignment can produce discomfort, muscle strain, sliding, pressure, impaired mobility, and difficulty maintaining airway and device safety.
The head and neck should generally remain aligned with the trunk unless a specific clinical indication requires another position. Excessive rotation or flexion may be uncomfortable and can complicate airway management. In a mechanically ventilated patient, the nurse should ensure that head and neck positioning does not create unnecessary traction on the endotracheal tube.
The shoulders and upper torso should be adequately supported. If the patient has a tendency to lean to one side, appropriate support may help maintain a more symmetrical position. However, positioning devices should not be used in a way that restricts necessary movement or creates additional pressure.
The pelvis should remain supported rather than sliding progressively toward the foot of the bed. This is one of the most important practical considerations when maintaining an elevated backrest.
When the patient slides downward, the resulting friction and shear can increase the risk of skin injury, particularly over the sacrum and coccyx. Sliding can also cause the hips and knees to assume an awkward position and may make the patient appear to be in the correct head-of-bed angle while the rest of the body is poorly aligned.
A simple visual assessment can identify many alignment problems. The nurse should look at the patient from head to foot and assess whether:
The head and neck are supported and reasonably aligned.
The shoulders are not excessively rotated.
The trunk is centered on the mattress.
The pelvis is supported rather than sliding forward.
The hips and knees are in a comfortable position.
The heels are protected from prolonged pressure.
The arms are supported when necessary.
No tubing or medical device is trapped beneath the patient.
The ventilator circuit is free of excessive tension.
The patient is not leaning against a hard surface or bed component.
The backrest remains at the intended angle.
Preventing sliding and shear
Sliding is a frequent practical problem when maintaining an elevated backrest. The higher the backrest is raised, the more important it becomes to assess whether the patient’s pelvis and lower body remain appropriately supported.
If the patient slides down, staff should not repeatedly pull the patient upward without appropriate assistance. Repositioning should use safe patient-handling methods and adequate personnel or equipment.
For example, suppose an intubated patient is placed at 30° but gradually slides toward the foot of the bed. The patient’s back may become flexed, the sacral area may experience increased shear, and the ventilator circuit may be placed under tension. Simply observing that the bed still reads 30° would miss these problems. The nurse should correct the patient’s body position, reassess all attached devices, and then re-establish the desired elevation.
Supporting pressure-injury prevention
Maintaining alignment also means distributing pressure appropriately. Critically ill patients are particularly vulnerable to pressure injuries because immobility, impaired perfusion, altered sensation, moisture, nutritional problems, and medical devices can occur simultaneously.
The nurse should inspect pressure-prone areas according to the patient’s risk and institutional assessment schedule. Special attention should be given to the sacrum, heels, occiput, elbows, and areas beneath or adjacent to medical devices.
A patient should not remain in one rigid posture simply because the head-of-bed angle is being maintained. Safe care may require small adjustments, repositioning, pressure redistribution, or other interventions while preserving the overall therapeutic goal.
Maintaining airway and equipment alignment
The patient position should be checked whenever the patient is moved, transferred, cleaned, suctioned, or otherwise disturbed.
For an adult receiving mechanical ventilation, a seemingly minor change in body position can alter the path of the ventilator circuit. The tubing may become compressed against the bed, develop a dependent loop, or exert traction on the endotracheal tube. Similar problems can occur with feeding tubes, IV lines, drains, and monitoring equipment.
This provides a systematic way to confirm that the entire setup remains safe after positioning.
Maintaining the desired head-of-bed elevation
The desired elevation should be checked periodically rather than assumed to remain unchanged. Routine activities such as bathing, repositioning, transferring, procedures, diagnostic tests, or changing linens may temporarily lower the bed.
AHRQ recommends daily evaluation of head-of-bed elevation in patients receiving mechanical ventilation and provides a specific documentation category for situations in which elevation to at least 30° is contraindicated.
This makes accurate measurement particularly important. A bed angle that appears appropriate may be lower than intended, especially when staff rely only on visual estimation.
The Semi-Recumbent Position should therefore be maintained as part of ongoing clinical care. The nurse should reassess the angle after activities that change the bed configuration and restore the appropriate position when medically feasible.
Maintaining comfort without compromising safety
Comfort is an important part of maintaining a position, but comfort measures should not compromise airway or device safety. Pillows and supports should be placed strategically rather than accumulating behind the patient in ways that force the trunk into excessive flexion.
An alert patient can provide valuable feedback. For example, a patient may report that the backrest feels comfortable but that the heels are painful or that one shoulder is under excessive pressure. Addressing these concerns can prevent minor discomfort from becoming a significant positioning complication.
For patients who cannot communicate, objective findings become more important. Agitation, facial grimacing, increased respiratory effort, ventilator dyssynchrony, changes in vital signs, or repeated attempts to move may indicate discomfort or intolerance and should prompt reassessment.
Maintaining the Semi-Recumbent Position is therefore an ongoing process rather than a single mechanical adjustment. The appropriate position should remain stable, measured, supported, and compatible with the patient’s airway, ventilator, lines, tubes, skin integrity, and current clinical needs. In critically ill patients, frequent reassessment ensures that the intended therapeutic position continues to be a safe and effective patient position as the patient’s condition changes.
Semi-Recumbent Position Versus Supine and Recumbent Position
Risks and Contraindications
Although the Semi-Recumbent Position is widely used in intensive care and is generally well tolerated by many adults receiving mechanical ventilation, it is not completely risk-free. Raising the head of the bed changes the patient’s relationship with gravity, the distribution of pressure across the body, venous return, and the position of attached medical devices. These effects may be clinically insignificant in one patient but important in another.
For this reason, the decision to maintain a particular patient position should always consider the patient’s current physiological status, treatment goals, mobility, skin condition, airway security, and other clinical restrictions. Evidence-based recommendations generally favor head-of-bed elevation when appropriate, but also emphasize that the position should be modified when it creates a risk or conflicts with another necessary intervention. An expert review recommended a 20°–45° elevation, preferably at least 30°, provided that this does not create risks or conflict with other clinical needs.
The risks associated with the Semi-Recumbent Position are therefore best understood as considerations for individualized positioning rather than reasons to avoid the position routinely.
Hemodynamic and Respiratory Complications
One potential concern when moving a critically ill patient from a supine position toward a more elevated position is a change in cardiovascular physiology. Raising the upper body can alter venous return and blood distribution, which may affect blood pressure in patients who have limited cardiovascular reserve.
This does not mean that every patient will become hypotensive when placed in a Semi-Recumbent Position. Most clinically stable patients can tolerate moderate head-of-bed elevation. However, patients with significant hemodynamic instability, severe hypovolemia, active shock, or other conditions affecting cardiovascular stability may require closer monitoring and individualized positioning.
After changing the position, the nurse should assess relevant indicators such as:
Blood pressure and heart rate
Peripheral perfusion
Mental status
Oxygen saturation
Respiratory rate and effort
Patient-ventilator synchrony
Ventilator pressures and alarms
Overall appearance and tolerance
A sudden deterioration after positioning should not automatically be attributed to the position itself. For example, if a mechanically ventilated patient develops hypotension immediately after the head of the bed is elevated, the nurse should assess for other causes while considering whether the positional change contributed to the deterioration.
The patient’s response is especially important in critically ill patients because physiological reserves can change rapidly. A position that was tolerated several hours earlier may become inappropriate after blood loss, fluid shifts, worsening sepsis, changes in cardiac function, or another acute event.
Respiratory intolerance
The Semi-Recumbent Position is commonly used for adults receiving mechanical ventilation, but individual respiratory responses vary. Changes in body position can alter lung volumes, ventilation distribution, chest-wall mechanics, and diaphragmatic mechanics. Head-of-bed elevation has been associated with increased end-expiratory lung volume in mechanically ventilated patients, but this does not mean every patient will experience the same clinical response.
A patient may occasionally demonstrate worsening respiratory mechanics or discomfort after a positional change. This can be particularly important in patients with severe respiratory failure, restrictive chest-wall conditions, abdominal distention, or other factors affecting ventilation.
Signs of respiratory intolerance may include:
Increasing respiratory effort
Falling oxygen saturation
New or worsening ventilator alarms
Changes in airway pressure
Patient-ventilator dyssynchrony
Tachypnea
Agitation or distress
New abnormal chest movement
Difficulty maintaining the prescribed ventilation
For example, an adult receiving invasive mechanical ventilation may initially be stable in a semi-recumbent position. After a procedure, the patient is repositioned and begins showing increased respiratory effort and repeated ventilator alarms. Rather than simply returning the patient to the previous angle without assessment, the nurse should evaluate the airway, ventilator circuit, tube position, secretions, chest movement, and vital signs. A positional change can reveal or contribute to a problem, but the underlying cause must be determined.
Airway and ventilator-related risks
Movement into or out of a Semi-Recumbent Position can create tension on an endotracheal tube or ventilator circuit if equipment is not managed correctly. An airway that was secure before repositioning can become displaced or subjected to excessive traction during movement.
This is particularly concerning when patients are sedated, paralyzed, confused, or otherwise unable to communicate discomfort.
Following a significant position change, airway and ventilator assessment should include:
Confirming the external endotracheal tube marking against the documented baseline.
Checking that the tube remains securely fixed.
Inspecting the ventilator circuit for kinking or disconnection.
Confirming that tubing is not exerting excessive traction.
Assessing ventilator alarms and pressures.
Reassessing oxygenation and respiratory status.
Evaluating patient-ventilator interaction.
The same principle applies to tracheostomy tubes and other airway devices. Positioning should never create unnecessary mechanical stress on the airway.
When respiratory failure requires another position
The Semi-Recumbent Position should not be considered a substitute for therapeutic positioning specifically indicated by the patient’s condition. For example, some patients with severe acute respiratory distress syndrome may require a prone position for prolonged periods as part of their respiratory management.
In such circumstances, the patient may alternate between therapeutic positions according to the prescribed critical-care plan. The nurse must understand why a particular position is being used rather than assuming that the semi-recumbent position should always be maintained.
The important principle is that positioning must serve the patient’s current clinical objective. A recommended position for routine care may not be the appropriate position during a specialized respiratory intervention, emergency procedure, or episode of clinical deterioration.
Potential conflict between elevation and other interventions
A critically ill patient may have several simultaneous treatment requirements. Maintaining a 30°–45° elevation may be desirable for one purpose, while another intervention temporarily requires a different body position.
For example, a patient may need to be placed closer to a supine position for cardiopulmonary resuscitation, a procedure, imaging, or another urgent intervention. In that situation, immediate clinical priorities take precedence. Once the intervention has been completed and the patient is stable, the appropriate Semi-Recumbent Position can be re-established if there is no contraindication.
This is why guidelines describe head-of-bed elevation as a preferred intervention when appropriate rather than an absolute requirement under every circumstance.
Pressure Ulcers, Shearing, and Patient Sliding
One of the most important disadvantages associated with prolonged elevation of the head of the bed is the potential for pressure ulcers and shear-related tissue injury. The risk becomes particularly relevant in immobilized ICU patients because they may be unable to independently correct their position.
When the backrest is elevated, gravity can cause the patient’s body to migrate toward the foot of the bed. The patient’s skin may remain relatively fixed against the mattress while deeper tissues and the skeleton move, producing shear forces. This can damage tissue even when there is no obvious skin breakdown initially.
The problem is different from simple pressure. Pressure results primarily from force applied over an area, whereas shear occurs when layers of tissue experience forces in different directions. In a critically ill patient, the two mechanisms can occur together.
The sacrum and coccyx are particularly vulnerable when the patient slides downward. Other areas requiring attention include the heels, occiput, elbows, and regions beneath medical devices.
A 2024 systematic review and meta-analysis of randomized trials in mechanically ventilated adults found that a 45° head-of-bed elevation was associated with a higher risk of pressure ulcers than 30° (OR 1.95, 95% CI 1.12–3.37), while the higher angle was associated with lower VAP incidence. This illustrates the clinical trade-off between different outcomes and reinforces the need for individualized positioning rather than assuming that the highest possible elevation is always best.
This relationship is particularly important because the Semi-Recumbent Position may be beneficial for one aspect of care while increasing pressure-related risk if maintained poorly.
Why patient sliding matters
Patient sliding is not simply a comfort issue. When a patient gradually moves toward the foot of the bed, several complications can develop simultaneously.
The patient may experience:
Increased sacral pressure
Shearing of skin and underlying tissues
Increased friction
Poor trunk alignment
Hip and knee discomfort
Reduced stability
Tension on tubes and lines
Altered airway-device positioning
Difficulty maintaining the intended head-of-bed relationship
A patient may therefore appear to be at an appropriate bed angle while the actual body position has become unsafe.
Research examining patient migration in hospital beds has highlighted this distinction: the angle of the bed does not necessarily represent the angle of the patient’s torso because the patient can migrate relative to the bed.
For example, imagine an intubated patient whose bed is maintained at 30°. Over several hours, the patient’s pelvis slides forward while the shoulders remain against the elevated backrest. The patient is now partially folded at the hips, with increased pressure around the sacrum and possible tension on the ventilator circuit. Simply documenting “head of bed 30°” would not fully describe the patient’s actual positioning.
The nurse should therefore assess both the bed angle and the patient’s actual position on the mattress.
Preventing pressure-related complications
Pressure injury prevention should include regular skin assessment, appropriate support surfaces, moisture management, pressure redistribution, and repositioning or micropositioning according to the patient’s condition and institutional protocol.
The patient’s skin should be inspected particularly carefully when there are risk factors such as:
Immobility
Poor tissue perfusion
Advanced age or frailty
Edema
Reduced sensation
Malnutrition
Incontinence or excessive moisture
Prolonged sedation
Vasopressor therapy
Existing pressure injury
Medical devices also deserve attention. An endotracheal tube, feeding tube, oxygen interface, monitoring equipment, urinary catheter, or other device can create localized pressure when the patient’s position changes.
A patient should not be repeatedly dragged across the mattress to correct sliding. Safe patient-handling equipment and adequate assistance should be used when substantial repositioning is required.
Balancing pressure injury and aspiration considerations
An important clinical challenge is balancing competing risks. Elevating the head of the bed is widely recommended for patients at high risk of aspiration, including many mechanically ventilated patients. AHRQ summarizes recommendations from major guidelines supporting semi-recumbent positioning, commonly around 30°–45°.
However, higher elevation may increase pressure and shear in susceptible patients. A review of head-of-bed elevation in critically ill patients concluded that the optimal elevation for simultaneously balancing aspiration and pressure-ulcer risks remains uncertain.
This means that the nurse should not approach positioning as a choice between “always elevate” and “never elevate.” Instead, the patient should be positioned at the safest clinically appropriate angle while additional interventions are used to address pressure injury risk.
For instance, an immobile patient who requires head-of-bed elevation may benefit from pressure-redistributing surfaces, careful pelvic positioning, heel protection, regular skin assessment, and appropriately timed repositioning while maintaining the clinically desired elevation.
Situations Requiring Position Modification
The Semi-Recumbent Position may need to be modified whenever the patient’s clinical condition, procedure, equipment, or safety requirements make the current angle inappropriate.
A modification does not necessarily mean abandoning semi-recumbency completely. Sometimes the safest approach is to change the elevation from 45° to 30°, from 30° to a lower angle temporarily, or to another therapeutic patient position for a specific clinical purpose.
The decision should be based on the patient’s current needs rather than on a fixed rule.
Hemodynamic instability
Patients experiencing significant hypotension or other forms of cardiovascular instability may require individualized positioning. If the patient becomes unstable after elevation, the healthcare team should reassess the relationship between the position and the patient’s cardiovascular status.
For example, a patient receiving vasopressor support for septic shock may have limited cardiovascular reserve. If raising the backrest is followed by a clinically significant blood-pressure decline, the patient may require temporary position modification while the underlying hemodynamic problem is assessed and treated.
The objective is not to permanently place such a patient in the supine position, but to use the position that best supports immediate stabilization while reassessing the possibility of returning to semi-recumbency.
Severe respiratory deterioration
A major deterioration in respiratory status may require a different positioning strategy. Depending on the underlying condition, this could involve adjustment of the bed angle, lateral positioning, or, in selected patients with severe ARDS, a prone position.
The nurse should follow the patient’s individualized respiratory plan and institutional protocol. Positioning decisions in severe respiratory failure should be coordinated with the critical-care team because airway security, ventilator settings, oxygenation, hemodynamics, and other factors must be considered simultaneously.
Surgical and postoperative restrictions
Some postoperative patients have restrictions that affect how they may be positioned. The type of surgery, incision location, spinal precautions, abdominal procedures, orthopedic repairs, drains, and other factors may determine which angles or movements are safe.
For example, a patient immediately after a procedure involving the spine may have specific alignment restrictions. Another patient with major abdominal surgery may have difficulty tolerating a highly elevated position because of incision discomfort or abdominal pressure.
In such cases, the prescribed positioning plan takes priority over a routine positioning target.
Spinal, orthopedic, or traumatic injury
Patients with suspected or confirmed spinal injury may require strict alignment and movement precautions. A routine change from supine to a semi-recumbent posture may not be appropriate until the patient’s restrictions have been evaluated.
Similarly, fractures, pelvic injuries, traction devices, or recent orthopedic procedures may limit the range of safe movement.
The key principle is that the Semi-Recumbent Position should never be established by ignoring an existing movement restriction.
Intracranial or neurological considerations
Some neurological conditions require careful control of head and body positioning. Patients with increased intracranial pressure or other neurological complications may have specific positioning orders designed to optimize cerebral venous drainage and avoid excessive neck rotation or compression.
A patient’s head and neck should therefore be maintained in accordance with the neurological management plan. If a patient requires a specific degree of elevation, the nurse should verify the prescribed target rather than applying a generic positioning rule.
Procedures and emergency care
Certain procedures temporarily require the patient to be positioned differently. Emergency interventions may also take priority over routine head-of-bed elevation.
During cardiopulmonary resuscitation, for example, the patient must be placed in the position required for effective chest compressions. A patient undergoing a procedure may also need to be placed in a flatter position for access or safety.
After the procedure, the patient’s condition should be reassessed and the Semi-Recumbent Position restored when appropriate.
Severe pressure injury or intolerance
If a patient develops worsening pressure injury, significant pain, skin breakdown, or severe sliding in the semi-recumbent posture, the positioning strategy may need modification.
The solution may involve reducing the angle, improving pelvic support, changing the support surface, increasing repositioning frequency, or using an alternative position when clinically acceptable.
A patient’s inability to tolerate a particular angle should not be dismissed simply because the position is recommended in general guidelines.
Feeding and gastrointestinal considerations
Patients receiving enteral nutrition require particular attention to positioning because the combination of mechanical ventilation and tube feeding can increase concern about aspiration. Head-of-bed elevation is commonly maintained when clinically feasible, but severe abdominal distention, procedures, gastrointestinal complications, or other clinical circumstances may require temporary modification.
The decision should consider the entire clinical picture rather than treating head-of-bed elevation as an isolated intervention.
Multiple competing clinical priorities
The most challenging positioning decisions occur when several risks exist simultaneously. For example, an ICU patient may have:
A need for mechanical ventilation
High aspiration risk
Existing sacral pressure injury
Hemodynamic instability
Multiple vascular lines
Limited mobility
Enteral feeding
Severe respiratory disease
There may be no single perfect position for such a patient. Instead, the clinical team must determine which risks are most urgent and which positioning strategy provides the best overall balance.
This is why evidence-based recommendations generally qualify head-of-bed elevation with language such as “when not contraindicated.” Major guidance supports 30°–45° elevation for patients at high risk of aspiration, but clinical circumstances may require a different approach.
Practical example
Consider an adult in the intensive care unit receiving invasive mechanical ventilation and enteral nutrition. The initial plan is to maintain the patient at approximately 30°–45°. After several hours, the nurse notices that the patient has migrated toward the foot of the bed and has developed persistent redness over the sacral area.
The appropriate response is not simply to document that the patient is “at 30°” and continue the same position. The nurse should reassess the patient’s actual body position, skin condition, airway and ventilator circuit, and pressure distribution. The patient may need assisted repositioning, improved support, pressure redistribution, or a modified angle while maintaining aspiration precautions as safely as possible.
If the same patient later becomes significantly hypotensive, the positioning plan may need further modification while the hemodynamic problem is evaluated. If the patient develops severe respiratory deterioration requiring a specialized positioning strategy, the plan may change again.
This example demonstrates why positioning in critical care medicine must remain dynamic. A clinically appropriate position at one point in the patient’s hospitalization may not remain appropriate as physiology, treatment, and risks change.
The Semi-Recumbent Position should therefore be viewed as a flexible component of patient care rather than an inflexible target. Its benefits must be balanced against hemodynamic intolerance, respiratory changes, pressure ulcers, shearing, patient sliding, device displacement, procedural requirements, and other contraindications. Careful assessment allows the healthcare team to maintain the desired elevation when appropriate while modifying the position promptly when patient safety requires it.
Nursing Assessment and Documentation
Nursing assessment is an essential part of maintaining the Semi-Recumbent Position safely. Positioning is not complete when the head of the bed reaches the intended angle. The nurse must determine whether the patient is tolerating the new body position, whether the airway and ventilator remain secure, whether oxygenation is adequate, and whether the patient’s skin and musculoskeletal alignment remain protected.
For adults receiving mechanical ventilation, head-of-bed elevation is commonly evaluated as an ongoing daily care process. AHRQ recommends evaluating whether the head of the bed is at least 30° for mechanically ventilated patients and documenting when this elevation is contraindicated. Its data-collection tool specifically distinguishes between patients whose head of bed is at least 30°, those below 30°, and those for whom elevation is contraindicated.
Assessment should therefore combine objective measurements with clinical observation. A documented 30° angle alone does not demonstrate that the patient is safely positioned. The nurse should also determine whether the patient has slid down the bed, whether the endotracheal tube remains secure, whether the ventilator circuit is intact, whether pressure is developing over vulnerable areas, and whether the patient is tolerating the position.
Monitoring the Patient After Positioning
The patient should be reassessed after the Semi-Recumbent Position has been established. The timing and intensity of monitoring depend on the patient’s condition. A stable patient may require routine reassessment, whereas a critically ill or unstable patient may require continuous monitoring of relevant physiological parameters.
The first assessment should establish whether the patient tolerated the movement itself. Changes in position can produce alterations in respiratory effort, blood pressure, heart rate, oxygen saturation, comfort, and level of consciousness. In a mechanically ventilated patient, the nurse should also observe the interaction between the patient and the ventilator.
Important observations include:
General appearance and level of distress
Respiratory rate and pattern
Oxygen saturation and other available oxygenation measures
Heart rate and blood pressure
Work of breathing
Patient-ventilator synchrony
Ventilator alarms
Airway security
Endotracheal or tracheostomy tube position
Pain or discomfort
Skin color and condition
Evidence of sliding or poor alignment
Position of lines, tubes, drains, and monitoring equipment
The patient’s response should be compared with the baseline assessment obtained before positioning. A change is more meaningful when the nurse knows what the patient’s status was immediately before the intervention.
For example, suppose a mechanically ventilated patient has an oxygen saturation of 96% before the head of the bed is raised from approximately 10° to 30°. After positioning, the saturation remains stable at 96%, the respiratory pattern is unchanged, the patient is synchronous with the ventilator, and blood pressure remains within the patient’s expected range. This provides evidence that the patient tolerated the position well.
In contrast, if oxygen saturation falls substantially, airway pressures change, the patient becomes visibly distressed, or blood pressure falls after positioning, the nurse should perform a focused reassessment rather than simply documenting that the patient is “in semi-recumbent position.”
The nurse should also consider whether the change is actually caused by the position. A deterioration after positioning may indicate an airway problem, secretion obstruction, ventilator-circuit issue, pneumothorax, hemodynamic deterioration, or another clinical event. The temporal relationship is important, but it does not by itself establish causation.
Assessing patient comfort and tolerance
Patient comfort is an important component of assessment. An alert patient should be asked whether the position causes pain, dizziness, pressure, shortness of breath, or discomfort.
Patients who cannot communicate require a different approach. Sedated, intubated, delirious, or neurologically impaired patients may communicate discomfort through facial expression, agitation, changes in vital signs, ventilator dyssynchrony, increased respiratory effort, or attempts to move.
For example, a patient who repeatedly moves the arms toward the face after being placed in the Semi-Recumbent Position may be uncomfortable because of the endotracheal tube, positioning device, pressure point, or another cause. The nurse should investigate rather than assuming that agitation is simply a consequence of critical illness.
Monitoring hemodynamic response
The transition from a near-flat supine position to an elevated position can affect cardiovascular physiology in some patients. Blood pressure and heart rate should therefore be assessed according to the patient’s condition and monitoring requirements.
This is especially important in patients with:
Hypotension
Shock
Significant volume depletion
Cardiac dysfunction
Recent major surgery
High-dose vasoactive medication requirements
Other forms of hemodynamic instability
If a patient becomes hypotensive after elevation, the nurse should assess the patient promptly and communicate significant changes according to clinical protocols.
AHRQ specifically identifies hypotension and low cardiac index among circumstances that may make head-of-bed elevation to at least 30° inappropriate for some mechanically ventilated patients. Other listed circumstances include certain spinal instability or surgery, ventricular assist devices, intra-aortic balloon pump use, open abdomen, unstable psychological status, and patient refusal.
This illustrates why assessment must precede documentation. The nurse should document the position that was clinically appropriate for the patient rather than mechanically recording a target angle that could not safely be achieved.
Reassessing after routine care
The patient should also be reassessed after activities that may disturb the patient position. Bathing, suctioning, linen changes, procedures, transfers, diagnostic examinations, and repositioning can alter the patient’s angle or cause sliding.
For example, a patient may begin the shift at 30° but be temporarily lowered for hygiene care. If the head of the bed is not subsequently restored, the patient may remain in a near-flat position without the nurse realizing that the intended positioning intervention has been interrupted.
AHRQ recommends strategies such as visible bed-angle indicators and other methods of verifying head-of-bed elevation to improve consistency.
Consequently, head-of-bed elevation should be reassessed as part of routine care rather than treated as a one-time intervention.
Assessing Oxygenation, Ventilator Parameters, and Skin Integrity
Assessment of a mechanically ventilated patient in the Semi-Recumbent Position should include three closely related areas: the patient’s oxygenation and respiratory status, the performance and safety of the ventilator and artificial airway, and the condition of the patient’s skin.
These assessments should be interpreted together. A change in oxygen saturation, for example, may be related to the patient’s respiratory disease, airway obstruction, ventilator settings, secretions, tube position, or the position itself.
Assessing oxygenation
Oxygenation assessment should be based on the patient’s clinical condition and available monitoring. Pulse oximetry is commonly used for continuous monitoring, while arterial blood gas analysis may be indicated for selected critically ill patients.
The nurse should compare oxygenation after positioning with the patient’s previous status rather than relying on a single isolated value.
Relevant observations can include:
Oxygen saturation
Respiratory rate
Respiratory pattern
Work of breathing
Skin and mucous membrane appearance when clinically relevant
Mental status
Arterial blood gas results when available and indicated
Ventilator oxygen requirements
Patient-ventilator synchrony
A patient who remains stable after elevation provides a different clinical picture from a patient whose oxygenation deteriorates immediately after movement.
For example, if a patient receiving invasive mechanical ventilation has stable oxygen saturation before and after the head of the bed is elevated, with no increase in respiratory effort, the position appears to be tolerated from an oxygenation standpoint. If the patient develops a significant fall in oxygen saturation accompanied by increased airway pressure or ventilator alarms, additional assessment is required.
The nurse should avoid assuming that the Semi-Recumbent Position itself is responsible. The patient may have developed secretion obstruction or the ventilator tubing may have become kinked during repositioning.
Assessing ventilator parameters
Ventilator assessment is an important component of nursing care for mechanically ventilated patients. The American Association for Respiratory Care’s clinical practice guideline recommends assessment of several parameters, including plateau pressure, tidal volume, PEEP and auto-PEEP, and, where appropriate, driving pressure and inspired oxygen concentration. It also recommends assessing artificial-airway placement and securement, airway cuff pressure, and the skin surrounding artificial airways.
The nurse does not interpret these measurements in isolation. Ventilator parameters should be considered alongside the patient’s clinical condition and prescribed ventilator strategy.
Following a position change, attention should be directed to:
Tidal volume: Determine whether the delivered tidal volume remains consistent with the prescribed strategy. The AARC guideline recommends documenting tidal volume in mL/kg of predicted body weight when assessing lung-protective ventilation.
Airway pressures: Changes in peak or plateau pressures may indicate changes in respiratory mechanics, airway resistance, secretion burden, patient-ventilator interaction, or other problems. A significant unexpected change after positioning requires investigation.
PEEP: The prescribed PEEP should be verified, and changes in measured PEEP or auto-PEEP should be recognized when relevant.
FiO₂: The fraction of inspired oxygen should be assessed in relation to the patient’s oxygenation and prescribed ventilation strategy.
Ventilator alarms: New or persistent alarms following positioning should be investigated rather than repeatedly silenced. The nurse should determine whether the alarm is related to the patient, airway, circuit, or ventilator.
Patient-ventilator synchrony: Observe whether the patient’s respiratory effort appears coordinated with the ventilator. Agitation, ineffective triggering, double triggering, or other forms of dyssynchrony may indicate discomfort, changes in respiratory demand, or a ventilator-related problem.
Assessing the artificial airway
The endotracheal tube or tracheostomy tube should be reassessed after significant positioning changes. The nurse should confirm that the airway remains appropriately secured and that there is no evidence of displacement.
The AARC guideline recommends assessment of proper artificial-airway placement and securement, cuff pressure using a manometer, and the skin surrounding the artificial airway.
This is particularly important because repositioning can change the relationship between the patient’s head, neck, airway, and ventilator circuit.
For example, an intubated patient may initially have an endotracheal tube documented at a particular external marking. After the patient is repositioned, the nurse notices a change in that marking accompanied by a new ventilator alarm. This finding should trigger prompt airway assessment rather than being dismissed as a routine consequence of changing the bed angle.
Assessing skin integrity
Skin assessment is equally important because maintaining an elevated body position for prolonged periods can contribute to pressure and shear.
The nurse should inspect areas exposed to sustained pressure, particularly:
Sacrum and coccyx
Heels
Occiput
Elbows
Shoulder areas
Areas beneath or around medical devices
Skin folds in patients with larger body habitus
Areas showing redness, discoloration, moisture, or breakdown
The presence of redness should be assessed carefully, particularly when it occurs over a bony prominence or beneath a medical device. The nurse should consider whether the area is associated with pressure, shear, moisture, friction, or device-related injury.
A mechanically ventilated patient may have several sources of pressure at the same time. For example, the patient may have pressure from the mattress at the sacrum, an endotracheal tube at the mouth, monitoring devices on the extremities, and tubing beneath the body.
The AARC patient-ventilator assessment guideline specifically recommends assessment of the skin surrounding artificial airways and the dressings associated with tracheostomy tubes and other respiratory interfaces.
Assessing sliding and alignment
Skin assessment should be combined with an assessment of the patient’s actual position on the bed. A patient can have the bed elevated to 30° while the body has migrated downward.
The nurse should therefore ask:
Is the patient’s pelvis still appropriately supported?
Has the patient slid toward the foot of the bed?
Is the trunk centered?
Are the heels protected?
Is there excessive pressure at the sacrum?
Are lines or tubes trapped beneath the patient?
Is the ventilator circuit under tension?
Has the patient developed an awkward posture?
These observations provide more useful information than documenting the bed angle alone.
Documenting Position and Patient Response
Accurate documentation communicates what was done, why it was done, how the patient tolerated it, and what follow-up assessment was performed. Documentation should be objective, clinically relevant, and consistent with the patient’s actual condition.
When documenting the Semi-Recumbent Position, the nurse should avoid vague statements such as “patient positioned comfortably” when more specific information is available.
A useful positioning entry may include:
The position used
The approximate head-of-bed angle
The reason for positioning when clinically relevant
Patient tolerance
Respiratory and oxygenation response
Relevant ventilator observations
Airway/device status
Skin assessment
Any complications or modifications
Interventions performed
Patient reassessment
For example, documentation might state that an intubated patient was maintained with the head of the bed at approximately 30°, tolerated the position without visible distress, had stable oxygen saturation, and had no new areas of skin breakdown. The exact wording should follow the organization’s documentation system and policies.
The important point is that documentation should describe observable findings rather than assumptions.
Documenting the position accurately
If the bed angle is measured, document the measured or displayed angle according to institutional practice. Avoid estimating the angle if the equipment provides a reliable measurement.
AHRQ’s mechanically ventilated patient data-collection tool specifically evaluates whether the head of the bed is at least 30° and records whether elevation is contraindicated.
If the patient cannot be maintained at the desired elevation because of a contraindication, that fact should be documented clearly. For example, simply writing “HOB less than 30°” does not explain why. If the patient has clinically significant hypotension or another documented reason preventing elevation, the relevant reason should be recorded according to institutional policy.
This distinction is important because failure to reach the target angle does not necessarily represent poor nursing care. AHRQ recognizes that some mechanically ventilated patients have legitimate contraindications to elevation, including hypotension, low cardiac index, certain spinal conditions, ventricular assist devices, intra-aortic balloon pump use, open abdomen, and other circumstances.
Documenting respiratory and ventilator response
When clinically relevant, documentation should demonstrate whether the patient tolerated the Semi-Recumbent Position from a respiratory perspective.
For example, the nurse may document relevant findings such as:
Oxygen saturation before and after positioning
Respiratory rate and effort
Ventilator alarm status
Relevant ventilator parameters
Patient-ventilator synchrony
Endotracheal tube or tracheostomy security
Airway secretions or other notable findings
The documentation should not become a list of every ventilator parameter unless required by the organization’s charting system. The focus should be on meaningful findings and changes associated with the patient’s care.
For instance, if the patient was repositioned because of sliding and subsequently developed a ventilator alarm, that event is clinically significant and should be documented along with the assessment and intervention that followed.
Documenting skin integrity
Skin findings should be documented objectively. Rather than recording only “skin intact,” more specific documentation may be appropriate when a vulnerable area has been assessed.
For example, documentation might identify the presence or absence of redness over the sacrum, the condition of the heels, or the condition of skin around an artificial airway.
If an area of redness, pressure injury, moisture-associated skin damage, or device-related injury is identified, the finding should be documented according to the facility’s wound and pressure-injury documentation requirements.
The timing of the assessment also matters. A skin finding discovered after several hours in an elevated position may require comparison with earlier assessments to determine whether it is new or pre-existing.
Documenting interventions and reassessment
Documentation should also show what was done in response to assessment findings.
For example:
The patient was repositioned to approximately 30° semi-recumbent elevation. Endotracheal tube remained secured at the documented external marking. Ventilator circuit remained connected without visible kinking or tension. Oxygen saturation remained within the patient’s target range. Sacral skin inspected with no new pressure-related discoloration noted. Patient tolerated positioning without signs of respiratory distress.
The exact documentation format will vary by institution, but this type of entry demonstrates an important sequence:
If the patient did not tolerate the position, the documentation should describe what occurred and what action was taken.
For example, if a patient becomes hypotensive after the head of the bed is raised, the nurse should document the observed change, the relevant assessment, the intervention performed according to the care plan or clinical direction, and the subsequent response.
Documentation as part of clinical communication
Documentation also supports communication among members of the critical-care team. A patient may be cared for by multiple nurses, respiratory therapists, physicians, and other clinicians during a single hospital stay. Clear documentation helps the next clinician understand the patient’s usual positioning plan and any limitations.
For example, documentation indicating that the patient normally tolerates 30°–45° elevation but requires a lower angle during episodes of hypotension provides useful context for subsequent care.
It also helps identify trends. If a patient repeatedly develops oxygen desaturation or ventilator dyssynchrony after a particular positional change, the pattern may be clinically important even when each individual episode appears minor.
Practical example
Consider an adult receiving invasive mechanical ventilation in the ICU. Before positioning, the patient is assessed and found to have stable blood pressure, an oxygen saturation within the prescribed target, a secure endotracheal tube, and intact sacral skin.
The nurse raises the head of the bed to approximately 30° and reassesses the patient. Oxygen saturation remains stable, respiratory effort does not increase, ventilator alarms remain absent, and the patient remains synchronized with the ventilator. The nurse then checks the patient’s pelvis and confirms that the patient has not slid toward the foot of the bed. The sacrum and heels are inspected, and no new pressure-related changes are observed.
Later, after routine hygiene care, the patient is found to have slid downward and the ventilator tubing is partially compressed. The nurse corrects the patient’s alignment, restores appropriate tubing placement, verifies the head-of-bed angle, and reassesses oxygenation and ventilator function.
This example demonstrates why assessment must continue after the initial positioning intervention. The Semi-Recumbent Position can change during routine care, and the patient’s actual body position may no longer correspond to the original bed setting.
Good nursing documentation should therefore demonstrate more than the fact that the patient was placed in a particular position. It should show that the position was assessed, maintained safely, and evaluated in relation to oxygenation, mechanical ventilation, airway security, skin integrity, comfort, and overall patient response.
In clinical practice, accurate assessment and documentation make the Semi-Recumbent Position a measurable and continuously evaluated component of care rather than a simple bed adjustment. For mechanically ventilated patients, this approach supports consistent head-of-bed elevation while recognizing that the appropriate position must remain responsive to the patient’s changing physiological and clinical needs. AHRQ likewise emphasizes standardized daily evaluation of head-of-bed elevation as part of care for mechanically ventilated patients.
Step-by-Step Positioning Technique
Practical Nursing Example
Semi-Recumbent Positioning of an Adult on Mechanical Ventilation
Consider an adult patient admitted to the intensive care unit (ICU) with acute respiratory failure requiring endotracheal intubation and invasive mechanical ventilation. The patient is sedated, unable to reposition independently, and receiving continuous enteral nutrition through a feeding tube. The patient is hemodynamically stable, with an oxygen saturation within the prescribed target range.
At the beginning of the assessment, the patient is lying at approximately 10° of head-of-bed elevation, which is close to a supine position. The endotracheal tube is secured, the ventilator circuit is connected, and the patient’s vital signs are stable. Because there is no documented contraindication to head-of-bed elevation, the nurse plans to place the patient in an appropriate Semi-Recumbent Position.
Head-of-bed elevation of at least 30° is included in AHRQ’s daily care processes for eligible patients receiving mechanical ventilation, while several major guidelines have recommended approximately 30°–45° for patients at high risk of aspiration.
Before moving the patient, the nurse performs hand hygiene, verifies the patient’s identity, reviews the current treatment plan, and assesses the patient’s physiological status. Blood pressure, heart rate, oxygen saturation, respiratory status, level of sedation, and relevant ventilator parameters are reviewed.
The nurse then examines the patient’s airway. The external marking of the endotracheal tube is compared with the documented position, and the fixation is checked. The ventilator tubing is inspected to ensure that it has enough slack to permit the planned movement without creating traction on the airway.
The feeding tube, IV lines, monitoring cables, urinary catheter, and any other devices are also identified. This is particularly important in an ICU patient because multiple lines and tubes may cross the patient’s body or extend from the bed to external equipment.
The nurse then assesses the patient’s skin, paying particular attention to the sacrum, heels, occiput, elbows, and areas affected by medical devices. Because the patient is sedated and cannot independently relieve pressure, the nurse recognizes that prolonged positioning requires continued skin surveillance.
The patient is then repositioned appropriately on the mattress before the backrest is raised. If the patient has migrated toward the foot of the bed, appropriate assistance and patient-handling equipment are used to restore alignment. The objective is to prevent the patient from sliding as the backrest is elevated.
The nurse gradually raises the head of the bed to approximately 30°–45°, depending on the patient’s prescribed care plan and tolerance. The angle is verified using the bed’s available measurement system rather than being estimated visually. AHRQ specifically recommends reliable verification of head-of-bed elevation and evaluates whether eligible mechanically ventilated patients are maintained at or above 30°.
Once the desired elevation is reached, the nurse reassesses the patient’s entire setup.
The patient remains hemodynamically stable, with no significant change in blood pressure or heart rate. Oxygen saturation remains within the prescribed target. The ventilator continues operating without new alarms, and there is no obvious increase in respiratory effort or patient-ventilator dyssynchrony.
The endotracheal tube remains at the documented external marking, and the ventilator circuit is free from excessive tension or kinking. The feeding tube and IV lines remain secure, and no tubing is trapped beneath the patient.
The nurse then assesses the patient’s alignment. The head and neck are supported, the trunk is centered, the pelvis remains appropriately positioned, and the heels are protected from excessive pressure. The nurse also verifies that the patient has not begun sliding toward the foot of the bed.
This scenario illustrates an important distinction between bed position and patient position. A bed may display an elevation of 30° while the patient has slid substantially downward, producing poor alignment and increased shear. Therefore, verifying the patient’s actual position is as important as verifying the numerical bed angle.
The patient is then monitored for tolerance. Because the patient is sedated, the nurse cannot rely on verbal feedback. Instead, assessment focuses on objective findings such as vital signs, oxygen saturation, ventilator interaction, facial expression, agitation, muscle tension, and other available indicators of discomfort or intolerance.
After the patient remains stable in the Semi-Recumbent Position, the nurse continues routine monitoring and reassesses the position after subsequent nursing activities. This is important because bathing, suctioning, linen changes, procedures, and other interventions can cause the patient to slide or temporarily alter the head-of-bed angle.
Nursing Intervention and Reassessment
The nursing intervention in this scenario is more than simply raising the bed. It consists of assessment, positioning, protection of the airway and medical equipment, pressure redistribution, and evaluation of the patient’s response.
The nurse’s intervention can be organized into several stages.
Initial assessment: The nurse establishes the patient’s baseline physiological condition and determines whether there is any contraindication to the planned position. The patient’s respiratory status, hemodynamic stability, airway security, skin integrity, and attached devices are assessed.
Preparation: The nurse explains the procedure if the patient’s level of consciousness permits, gathers necessary equipment, obtains assistance when required, and ensures that the ventilator circuit and other lines have sufficient slack.
Positioning: The patient is appropriately aligned on the mattress before the head of the bed is elevated. The backrest is raised gradually to the prescribed degree, commonly within the 30°–45° range when clinically appropriate.
Airway protection: The nurse verifies the endotracheal tube and its fixation before and after positioning. The ventilator circuit is checked for kinking, disconnection, compression, or excessive traction.
Device assessment: Feeding tubes, IV lines, central lines, arterial lines, drains, urinary catheters, and monitoring equipment are checked to ensure that they have not been displaced or placed under tension.
Alignment and pressure management: The nurse checks the patient’s head, neck, shoulders, trunk, pelvis, and extremities. Pressure-prone areas are assessed, and appropriate support or pressure redistribution is provided.
Physiological reassessment: Oxygen saturation, respiratory effort, heart rate, blood pressure, ventilator alarms, and other clinically relevant parameters are reassessed after the intervention.
Ongoing monitoring: The nurse continues to observe whether the patient remains appropriately positioned. The head-of-bed angle and actual patient position are reassessed after activities that could disturb the position.
AHRQ identifies head-of-bed elevation to at least 30° as one of the daily care processes for mechanically ventilated patients and recommends continued monitoring of compliance.
Example of a change requiring intervention
Suppose that several hours after positioning, the nurse returns to assess the patient and discovers that the bed remains at 30°, but the patient’s pelvis has moved toward the foot of the bed. The sacral area appears increasingly exposed to pressure, and the ventilator circuit has become partially compressed between the patient and the bed.
The nurse should not consider the position satisfactory merely because the bed still displays 30°.
The patient should be safely repositioned with appropriate assistance. The ventilator circuit should be freed from compression, all lines and tubes should be reassessed, and the patient’s skin should be inspected. After alignment is restored, the head-of-bed angle should be verified again.
The patient’s oxygenation and ventilator status should also be reassessed because the equipment configuration changed during repositioning.
Example of respiratory intolerance
Consider another scenario in which a patient is raised from approximately 10° to 30°, but shortly afterward develops an unexpected fall in oxygen saturation accompanied by increased ventilator pressures.
The nurse should immediately assess the patient rather than assuming that the Semi-Recumbent Position itself is responsible. The airway, endotracheal tube position, ventilator circuit, secretions, chest movement, ventilator settings, and other relevant causes should be evaluated.
If a displaced or obstructed airway is suspected, the appropriate emergency airway and respiratory protocols should be followed. If the patient remains unstable, the position may need to be modified while the underlying problem is addressed.
This example demonstrates why reassessment is an essential part of positioning. A position that is generally appropriate for mechanically ventilated patients can still coincide with an acute airway or respiratory problem.
Example of hemodynamic intolerance
Now consider a patient who becomes significantly hypotensive after the head of the bed is elevated. The nurse should reassess blood pressure, heart rate, perfusion, medications, fluid status, and other relevant clinical factors while considering whether the positional change contributed to the deterioration.
The patient may require temporary modification of the body position while the cause of the hypotension is evaluated and treated. AHRQ’s daily care process explicitly recognizes hypotension and other clinical circumstances as potential reasons why head-of-bed elevation to at least 30° may be contraindicated.
The nurse should document the change, intervention, patient response, and communication with the appropriate members of the healthcare team according to institutional policy.
Example of pressure-related intolerance
A third scenario involves a patient who remains physiologically stable but develops increasing sacral redness after prolonged elevation. The nurse assesses whether the patient has slid downward, whether excessive pressure is concentrated over the sacrum, and whether the support surface and positioning aids are appropriate.
The intervention may include assisted repositioning, pressure redistribution, improved pelvic support, skin protection, and modification of the angle when clinically appropriate.
This situation demonstrates that successful positioning is not defined solely by oxygen saturation or ventilator parameters. Skin integrity and musculoskeletal alignment are also important outcomes of safe positioning.
Reassessment and documentation
Following the intervention, the nurse should document relevant findings according to the facility’s charting system. The entry should indicate the position used, the approximate head-of-bed elevation when required, significant assessment findings, patient tolerance, and any intervention performed in response to a problem.
For example, a concise clinical note might state:
Patient positioned in semi-recumbent position with head of bed elevated to approximately 30°. Endotracheal tube remains secure at documented external marking. Ventilator circuit patent and without visible tension or kinking. Oxygen saturation remains within prescribed target range with no new ventilator alarms. Patient hemodynamically stable. Sacral and heel areas assessed without new pressure-related changes. Patient remains appropriately aligned and has not slid toward foot of bed. Position tolerated well.
If a complication occurs, the documentation should instead describe the objective change and the actions taken. For example, if the patient develops hypotension, the nurse should record the observed blood-pressure change, assessment findings, position modification, interventions, communication, and subsequent response according to clinical documentation requirements.
The case demonstrates that the Semi-Recumbent Position is not a passive bed setting. For adults receiving invasive mechanical ventilation, it is an ongoing nursing intervention requiring assessment before positioning, careful management during movement, and reassessment afterward. AHRQ describes head-of-bed elevation as an evidence-supported daily care process for mechanically ventilated patients, while recognizing that clinical contraindications may require an alternative position.
A safe approach therefore combines the intended head-of-bed elevation with continuous attention to airway security, ventilator function, oxygenation, hemodynamic tolerance, skin integrity, alignment, and the patient’s changing clinical condition.
Conclusion
The Semi-Recumbent Position is an important patient-positioning strategy in critical care, particularly for adults receiving invasive mechanical ventilation. By elevating the head and upper body, commonly to about 30°–45°, this position can support respiratory function, reduce the likelihood of pulmonary aspiration, and contribute to the prevention of ventilator-associated pneumonia. However, the benefits of semi-recumbent positioning should be understood as part of a broader package of critical care interventions rather than as a single measure that eliminates complications.
Safe positioning requires more than simply raising the backrest. The patient’s airway, ventilator circuit, lines, tubes, hemodynamic status, respiratory response, body alignment, and skin integrity must be assessed before and after the position is changed. A position that is appropriate for one critically ill patient may require modification for another because of hemodynamic instability, respiratory deterioration, surgical restrictions, pressure injuries, spinal precautions, or other clinical concerns.
Evidence generally supports head-of-bed elevation over near-flat supine positioning when there is no contraindication, although the optimal degree of elevation remains individualized. Higher elevation may provide additional protection against some respiratory complications but can also increase sliding, shear, and pressure-related injury. Therefore, effective positioning requires balancing respiratory and aspiration-related benefits with patient safety, comfort, mobility, and pressure-injury prevention.
For clinical practice, the Semi-Recumbent Position should be viewed as a dynamic nursing intervention. Accurate positioning, continuous assessment, appropriate modification, and clear documentation allow clinicians to maintain the intended therapeutic effect while responding promptly to changes in the patient’s condition. When integrated with appropriate ventilator management, aspiration precautions, infection-prevention measures, skin protection, and individualized critical care, semi-recumbent positioning can be a practical and valuable component of safe care for mechanically ventilated patients.
Frequently Asked Questions
What does semi-recumbent mean?
Semi-recumbent means a position in which a person is lying back with the upper body partially elevated rather than completely flat. The head of the bed is commonly raised to about 30°–45°.
What is a semi-recumbent posture?
A semi-recumbent posture is a partially upright lying position in which the head and upper torso are elevated while the patient remains supported by the bed. It is frequently used in intensive care, including for patients receiving mechanical ventilation.
What does the semi-reclining position mean?
The semi-reclining position means resting with the back and upper body inclined backward rather than sitting fully upright or lying completely flat. It is essentially a partially reclined posture.
Are Semi-Fowler and semi-recumbent positions the same?
They are very similar but not always exactly the same. Semi-Fowler generally refers to a specific head-of-bed elevation, often around 30°–45°, whereas semi-recumbent is a broader term describing partial elevation of the upper body. Thus, a Semi-Fowler position can be considered a type of semi-recumbent position.
Left Lateral Position: Complete Guide to Lateral Decubitus Patient Positioning
Patient positioning is an essential part of safe and effective patient care because the way a patient’s body is positioned can influence comfort, respiratory function, circulation, skin integrity, musculoskeletal alignment, and the safety of clinical procedures. The Left Lateral Position is a commonly used position in which the patient is placed on the left side of the body while the head, trunk, pelvis, and extremities are appropriately supported and aligned. Although placing a patient on the side may appear straightforward, proper positioning requires careful consideration of the individual’s condition, mobility, anatomical limitations, procedure being performed, and length of time the position will be maintained. Appropriate positioning helps promote comfort and stability while reducing avoidable risks associated with prolonged pressure, excessive joint movement, nerve compression, and impaired circulation.
The Left Lateral Position has applications across a range of nursing, diagnostic, procedural, and perioperative settings. It may be used when providing routine patient care, performing selected examinations, supporting certain medical procedures, or creating access to specific anatomical areas during surgery. Its effects are not limited to physical alignment; changing the patient’s orientation can also alter ventilation and perfusion relationships, cardiovascular dynamics, pressure distribution, and the mechanical relationship between body structures. These effects become particularly important when the patient has limited mobility or is unable to communicate discomfort, as well as when anesthesia removes normal protective responses during a procedure.
Safe use of the Left Lateral Position requires attention to several interconnected principles:
Alignment: The head, neck, spine, pelvis, and limbs should be positioned to maintain a stable and anatomically appropriate posture.
Support: Pillows, pads, and other positioning aids may be required to support dependent structures and maintain the intended position.
Pressure protection: Areas over bony prominences and other vulnerable tissues should be protected from excessive or prolonged pressure.
Neurovascular protection: Extremities should be positioned to avoid unnecessary compression, stretching, or restriction of circulation.
Airway and respiratory protection: The patient’s ability to maintain an adequate airway and appropriate ventilation must remain a priority.
Ongoing assessment: Positioning is not a one-time intervention; the patient’s condition, comfort, skin, circulation, and overall tolerance should be reassessed as appropriate.
The clinical application of the Left Lateral Position also requires distinguishing it from related positions. The term lateral decubitus generally describes a patient lying on one side, while lateral recumbent position is another term used to describe side-lying. A Left Lateral Position specifically identifies the left side as the dependent side. By contrast, the Sims position involves a modified lateral orientation with greater flexion and rotation, while the supine position places the patient on the back and the prone position places the patient on the abdomen. Understanding these distinctions is important because the correct position depends on the clinical objective, the patient’s condition, and the requirements of the procedure.
In surgical settings, the Left Lateral Position can have an additional purpose: creating appropriate exposure of the operative area while maintaining patient safety. The position may be adapted according to the surgical site, including procedures involving thoracic or retroperitoneal structures. Adjustments to the operating table and the use of positioning supports may help improve access while maintaining stable body alignment. At the same time, anesthesia and surgical staff must consider potential effects on ventilation, hemodynamics, pressure points, and peripheral nerves. Perioperative positioning therefore represents a coordinated patient-safety responsibility rather than simply a method of placing the patient on one side.
A comprehensive understanding of the Left Lateral Position therefore involves more than knowing which side the patient should lie on. It requires an understanding of the rationale for selecting the position, the physiological effects that may occur, the correct method of positioning, and the precautions required to protect the patient. It also requires recognition that positioning should be individualized rather than performed according to a rigid formula. Factors such as age, mobility, body habitus, existing injuries, skin condition, neurological status, respiratory or cardiovascular problems, medical devices, and the nature and duration of a procedure can all influence how positioning should be performed.
This guide examines the Left Lateral Position from these clinical perspectives, beginning with its definition and relationship to other commonly used positions. It then explores its uses, physiological effects, preparation requirements, and the steps involved in positioning a patient correctly. Particular attention is given to its use in the operating room, where positioning may need to balance surgical access with protection of the airway, circulation, nerves, skin, and musculoskeletal structures. The discussion also addresses patient safety, complication prevention, nursing assessment, monitoring, and common errors. Together, these principles provide a practical foundation for understanding how the Left Lateral Position can be applied safely and appropriately across different areas of patient care.
Understanding the Left Lateral Position
The Left Lateral Position is an important form of lateral positioning used across nursing, medical, diagnostic, and perioperative care. In its basic form, the patient is turned so that the left side of the body is supported against the bed or operating surface, while the head, trunk, pelvis, and limbs are arranged to maintain stability and appropriate anatomical alignment. Lateral positioning is commonly described as side-lying, and the degree of rotation can vary according to the clinical purpose. Nursing references describe lateral positioning as placing the patient on one side with the upper leg positioned over the lower leg, while clinical literature recognizes lateral, lateral decubitus, and lateral recumbent as related terms for side-lying positioning.
Understanding this position requires more than identifying which side of the body is facing downward. The patient’s Left Lateral Position must be established in a way that distributes pressure appropriately, protects vulnerable anatomical structures, maintains a stable posture, and accommodates the patient’s clinical condition. The head and neck should generally remain appropriately aligned, the upper and lower limbs should be supported according to the patient’s needs, and positioning aids may be required to prevent unwanted rolling or excessive pressure. In perioperative settings, positioning also has to accommodate the requirements of anesthesia and the intended surgical approach.
Definition of the Left Lateral Position
The Left Lateral Position refers to a side-lying posture in which the patient’s left side is the dependent side—the side closest to and supported by the bed, examination surface, or operating table. The patient’s right side is therefore the upper or nondependent side. The precise degree of rotation is not necessarily identical in every clinical situation. A lateral position may range from a relatively modest tilt to a more complete side-lying orientation approaching 90 degrees, depending on the clinical objective and the patient’s physical condition.
In a properly established Left Lateral Position, several elements of the patient’s body require attention:
Head and neck: The head should be supported so that the neck remains in a comfortable, neutral alignment rather than being excessively flexed, extended, or rotated.
Trunk and spine: The trunk should be positioned in a stable relationship with the pelvis rather than being twisted unnecessarily.
Shoulders and arms: The dependent arm requires particular attention because it is exposed to pressure and compression against the supporting surface. The upper arm should also be supported in a manner that avoids excessive abduction or stretching.
Pelvis and hips: The pelvis should remain appropriately aligned with the trunk, while the hips are positioned according to the patient’s condition and the purpose of the position.
Knees and lower limbs: Padding or other support may be placed between the knees and beneath vulnerable areas to reduce pressure and prevent unwanted rotation.
Back: A support behind the back may help maintain stability and prevent the patient from unintentionally rolling toward the supine position.
These components are important because side-lying changes which parts of the body bear weight. Unlike a patient lying flat on the back, a patient in a lateral position has a more concentrated distribution of pressure along the dependent shoulder, hip, knee, and other bony areas. Appropriate supports can therefore improve stability while reducing unnecessary loading of vulnerable tissues.
The Left Lateral Position can also be modified according to the purpose for which it is being used. In routine nursing care, the position may be selected to provide comfort, facilitate hygiene or selected procedures, redistribute pressure away from the sacral region, or assist with mobility and repositioning. In a surgical setting, the same basic orientation can be adapted considerably to provide access to the thorax, retroperitoneal structures, hip, or other operative areas. The exact configuration should therefore be determined by the patient’s clinical requirements rather than by assuming that every lateral position should look identical.
For example, consider a patient who has been lying supine for an extended period and requires repositioning. Turning the patient onto the left side can shift pressure away from the sacrum and redistribute loading to other areas. However, simply rolling the patient onto the left side is not sufficient. If the upper leg is unsupported, the pelvis may rotate; if the dependent shoulder is compressed, discomfort or neurovascular compromise may develop; and if the head is inadequately supported, the neck may be placed in an uncomfortable or unsafe alignment. Proper patient positioning therefore involves the entire body, rather than focusing only on the direction in which the patient is turned.
The position is also clinically significant because the side selected can influence physiological function. Lateral positioning can alter ventilation, perfusion, hemodynamics, and the distribution of pressure. Research and clinical guidance indicate that these effects can vary depending on whether the patient is spontaneously breathing or mechanically ventilated, whether pulmonary disease is present, and how much the body is rotated. Consequently, the Left Lateral Position should be selected and maintained with consideration of the patient’s overall clinical status rather than treated as a purely mechanical maneuver.
Lateral Decubitus and Lateral Recumbent Position
The terms lateral decubitus and lateral recumbent position are commonly used when describing side-lying. In practical clinical communication, they may refer to essentially the same broad orientation: the patient is lying on one side rather than on the back or abdomen. A major nursing reference defines lateral positioning as lying on one side of the body, while a systematic review identifies lateral position, lateral decubitus position, and lateral recumbent position among the terms used for side-lying positioning.
The word decubitus is particularly useful in clinical terminology because it describes a reclining or lying posture. Thus, when the term lateral decubitus is used, it indicates that the patient’s body is positioned laterally, with one side dependent. When the side is specified, the terminology becomes more precise. For example:
Left lateral decubitus: the left side is dependent.
Right lateral decubitus: the right side is dependent.
This distinction is important in clinical and operative communication because the dependent and nondependent sides have different relationships with the supporting surface and the anatomical structures involved in a procedure.
The term lateral recumbent position is also used to describe this side-lying orientation. In many nursing contexts, it may be encountered alongside terms such as side-lying or lateral position. The terminology can vary between textbooks, institutions, and clinical specialties, but the essential concept remains the same: the patient is positioned on one side with the body supported in a stable lateral orientation.
However, it is important not to assume that every use of the word lateral describes exactly the same degree of rotation. A patient may be partially tilted to the side, placed at approximately 30 or 45 degrees, or positioned closer to a full 90-degree lateral orientation. The appropriate angle depends on the intended clinical outcome. For instance, pressure redistribution during routine patient care may require a different degree of rotation from the configuration needed to expose an operative site. The literature also notes that the optimal degree of rotation can vary and is not universally defined for every clinical circumstance.
Another important distinction is between lateral positioning and specialized variations that have their own clinical purposes. The Sims position, for example, is a modified side-lying or semiprone posture rather than simply another name for every form of lateral decubitus positioning. Similarly, a surgical lateral position may involve table adjustments, additional supports, and specific limb placement that are not necessary for ordinary bedside repositioning.
Therefore, when documenting or communicating a patient’s position, greater specificity is often helpful. Rather than simply stating that the patient is “lateral,” healthcare professionals may identify whether the patient is left lateral or right lateral and, when clinically relevant, describe additional positioning modifications. This reduces ambiguity and allows the care team to understand which side is dependent and how the patient has been arranged.
Left Lateral Position vs. Sims Position
The Left Lateral Position and Sims position are closely related and are sometimes confused because both involve a side-lying orientation. They are not, however, identical. The key difference lies in the degree of rotation and flexion used to create the posture.
In a standard lateral position, the patient is positioned primarily on one side. The body is generally maintained in a relatively straight lateral alignment, with the upper leg supported over the lower leg and the arms arranged to avoid unnecessary compression. By contrast, Sims positioning places the patient partway between the supine and prone positions, with the legs flexed and the trunk rotated toward the bed. Nursing references specifically describe Sims positioning as halfway between supine and prone and identify it as a position used for procedures such as enema administration.
Several features can help distinguish the two:
Feature
Left Lateral Position
Sims Position
Basic orientation
Primarily side-lying
Modified lateral/semiprone
Body rotation
More directly toward the left side
More rotated toward prone
Leg arrangement
Upper leg may be flexed for support
Legs are typically flexed
Typical purpose
Repositioning, patient care, selected procedures and surgery
Selected rectal and perineal procedures
Relationship to prone
Clearly lateral
Intermediate between lateral and prone
The Left Lateral Position is therefore broader in its clinical application. It may be used simply as a therapeutic or comfort position, as part of routine repositioning, or as a surgical position. Sims positioning has a more specific configuration and is particularly familiar in nursing practice because it facilitates access for certain procedures. Open nursing resources describe Sims positioning as involving flexion of the legs and placement of the patient between the supine and prone positions.
For example, if a patient needs routine repositioning to redistribute pressure away from the sacrum, a standard left lateral orientation may be appropriate. If the patient is being prepared for an enema, a modified Sims position may be selected because its body orientation facilitates access to the rectal area. Calling both configurations simply “left lateral” could therefore create confusion about how the patient’s body should actually be arranged.
There can also be variation in how Sims positioning is described across nursing resources. Some descriptions emphasize that the patient is positioned on the left side with the upper leg flexed, while others emphasize the greater rotation toward the prone position and the placement of the lower arm behind the body. This variation reinforces the importance of following the procedure-specific positioning instructions used by the healthcare institution rather than relying solely on the name of the position.
The distinction becomes particularly important when positioning a patient who has restricted mobility, musculoskeletal limitations, or an increased risk of pressure or nerve injury. A more rotated position changes which structures bear weight and may require different support. Therefore, positioning should always be based on the intended procedure or clinical objective, the patient’s physical capabilities, and the need to protect vulnerable anatomical structures.
Left Lateral Position vs. Supine Position
The Left Lateral Position and supine position differ primarily in the orientation of the patient’s body and, consequently, in how weight and pressure are distributed. In the supine position, the patient lies flat on the back with the face directed upward. In the left lateral position, the patient is turned onto the left side, making the left side the dependent surface. Standard nursing references describe supine positioning as lying flat on the back, whereas lateral positioning places the patient on one side.
This basic difference has important clinical consequences. In supine positioning, pressure is distributed across posterior areas such as the occiput, scapular region, elbows, sacrum, and heels. In a Left Lateral Position, pressure is redistributed toward lateral structures such as the dependent shoulder, hip, and portions of the lower extremities. The change in pressure distribution is one reason side-lying can be incorporated into repositioning strategies for patients who are unable to move independently.
The two positions can also differ in their effects on respiratory mechanics. Body orientation influences the relationship between gravity, the lungs, chest wall, and abdominal contents. Clinical literature indicates that lateral positioning can alter ventilation and perfusion compared with supine positioning, although the magnitude and clinical significance of these changes depend on factors such as lung condition, spontaneous versus mechanical ventilation, and the degree of lateral rotation.
The choice between the two positions should therefore be based on the patient’s clinical needs rather than on the assumption that one is universally superior.
For example:
A patient requiring prolonged bed rest may be alternated between supine and lateral positions as part of an individualized repositioning plan.
A patient with a procedure requiring access to structures on the left side may need to be positioned laterally rather than remaining supine.
A patient with respiratory disease may require individualized assessment because changing from supine to lateral positioning can affect ventilation and perfusion.
A patient undergoing surgery may need a lateral configuration because the surgeon requires access to the thorax, retroperitoneum, hip, or another anatomical region.
The Left Lateral Position may also be particularly relevant in certain pregnancy-related positioning situations. Nursing references describe lateral positioning as potentially helping reduce pressure on the inferior vena cava in pregnant patients and supporting blood flow to the fetus. However, the appropriate position for an individual pregnant patient should be determined according to gestational age, symptoms, clinical condition, and the specific care situation rather than applying a universal rule.
From a safety perspective, neither supine nor lateral positioning should be considered inherently risk-free. Each position creates different areas of pressure and different opportunities for compression or malalignment. In the Left Lateral Position, particular attention is required for the dependent shoulder and upper extremity, hip, knees, and other pressure-bearing areas. In surgical positioning, excessive pressure or stretching of neurovascular structures can contribute to complications such as peripheral nerve injury.
The comparison can therefore be summarized as follows:
Consideration
Left Lateral Position
Supine Position
Body orientation
Patient lies on the left side
Patient lies on the back
Dependent surface
Left side of the body
Posterior surface of the body
Pressure distribution
Concentrated more on lateral structures
Concentrated more on posterior structures
Common purpose
Repositioning, selected care, procedures, and surgery
General care, examination, procedures, and surgery
Major positioning concern
Protection of dependent structures and appropriate side alignment
Protection of posterior pressure points and neutral alignment
Surgical application
Provides lateral access to selected anatomical regions
Provides broad anterior access for many procedures
The central principle is that the Left Lateral Position and supine position are not simply two interchangeable ways of placing a patient in bed. Each creates a different relationship between the patient’s body and the supporting surface, producing different considerations for pressure, alignment, respiratory mechanics, circulation, comfort, and procedural access. Selecting the appropriate position therefore requires an understanding of both the intended clinical objective and the individual patient’s risks.
Uses of the Left Lateral Position
The Left Lateral Position has applications that extend from routine bedside care to diagnostic procedures, regional anesthesia, and major surgical interventions. The reason for choosing this position depends on the patient’s condition, the anatomical area that needs to be accessed, the procedure being performed, and the level of monitoring required. It is therefore more appropriate to view the Left Lateral Position as a clinical positioning option that can be adapted to different circumstances rather than as a single fixed posture.
In routine care, side-lying can help redistribute pressure away from posterior areas of the body and may improve comfort for patients who have remained in the same position for prolonged periods. In procedural settings, lateral positioning can facilitate access to particular anatomical structures, while in the operating room it can provide a stable platform for procedures involving the thorax, shoulder, kidney, retroperitoneal structures, and selected areas of the spine. However, every use requires an assessment of potential pressure, neurovascular, respiratory, and hemodynamic consequences. Perioperative literature emphasizes that positioning-related complications can involve peripheral nerves, soft tissue, joints, and vascular structures, with risk increasing during prolonged procedures and when general anesthesia is used.
Nursing and Patient Care
In nursing practice, the Left Lateral Position is frequently used as part of routine repositioning and supportive patient care. Changing a patient’s orientation can redistribute pressure across the body, provide a different weight-bearing surface, facilitate hygiene, and improve comfort. This is particularly relevant for patients who are unable to reposition themselves independently because of weakness, reduced consciousness, sedation, paralysis, pain, neurological impairment, or postoperative restrictions.
One important purpose is pressure redistribution. When a patient remains in the same position for an extended period, sustained pressure can compromise tissue perfusion, particularly around bony prominences. Repositioning can help relieve pressure from areas that have been bearing weight. Current pressure-injury guidance recommends individualized repositioning and avoiding prolonged pressure over existing injuries and vulnerable bony areas.
For example, a patient who has spent several hours in the supine position may develop increased pressure over the sacral region and heels. Moving that patient into a carefully supported Left Lateral Position changes the distribution of pressure. However, this does not eliminate pressure-injury risk; it shifts pressure to different anatomical areas, including the dependent shoulder, hip, knee, and other lateral structures. Consequently, the nurse must inspect the skin and use appropriate support rather than assuming that simply turning the patient is sufficient.
The Left Lateral Position can be particularly useful when a patient requires regular repositioning according to an individualized pressure-injury prevention plan. The appropriate angle and duration should be determined by factors such as:
Skin integrity and existing wounds
Mobility and ability to reposition independently
Nutritional and hydration status
Level of consciousness
Body habitus
Sensory impairment
Circulatory status
Presence of medical devices
Pain and musculoskeletal limitations
Overall clinical condition
The degree of lateral rotation is also important. A full 90-degree lateral position does not necessarily represent the safest option for every patient. Evidence concerning different repositioning angles is variable, and pressure distribution changes as the degree of lateral rotation changes. Some evidence suggests that a 30-degree lateral tilt may distribute pressure differently from a full lateral position, emphasizing the importance of individualized positioning rather than applying one angle universally.
The Left Lateral Position may also facilitate certain aspects of daily nursing care. A patient can be positioned laterally when performing selected hygiene activities, changing linens, assessing the posterior body surface, or assisting with care that requires access to the back or dependent side. During these activities, positioning should be coordinated with the patient’s mobility and pain level.
For a dependent patient, the sequence of care is particularly important. Before turning, the nurse should assess the patient’s ability to assist, identify lines and devices that could become displaced, and determine whether additional personnel are required. During the turn, the patient’s body should be moved in a coordinated manner rather than pulling on an individual extremity. After positioning, the nurse should verify alignment, comfort, skin condition, and security of medical devices.
The position may also be useful for patients who experience discomfort while lying continuously in one posture. Alternating between appropriately selected positions can provide relief and reduce prolonged loading of a single area. Nevertheless, patient comfort should not be the only consideration. A position that initially feels comfortable may still place excessive pressure on a nerve or bony prominence if maintained improperly.
A practical example is a patient with limited mobility following a stroke. The patient may be unable to independently move the affected side and may remain in one posture unless assisted. A supported Left Lateral Position can be incorporated into the patient’s individualized repositioning plan, but the nurse must consider the affected extremities, shoulder integrity, muscle tone, skin condition, and any restrictions imposed by the medical team. Positioning should promote stability without forcing a weak or contracted limb into an unnatural posture.
Another important application involves patients with reduced consciousness. Such patients may not be able to report pain, numbness, or pressure. This makes regular assessment particularly important because the absence of a verbal complaint does not indicate that the position is safe or comfortable. Guidance for critically ill and unconscious patients emphasizes individualized repositioning according to the patient’s clinical condition, while recognizing that the evidence supporting one specific lateral angle over another is not uniform.
The Left Lateral Position can therefore serve several nursing purposes:
Repositioning: Changing the patient’s weight-bearing surface as part of an individualized care plan.
Pressure management: Reducing prolonged loading of previously dependent areas.
Comfort: Providing an alternative posture when supine positioning becomes uncomfortable.
Access for care: Allowing nurses to assess or provide care to posterior and lateral body surfaces.
Supportive care: Accommodating patients whose condition makes another position less appropriate.
Preparation for procedures: Establishing an appropriate body orientation before selected examinations or interventions.
The position should always be adapted to the individual rather than used automatically. A patient with a recent hip operation, spinal precautions, unstable fractures, severe respiratory compromise, or significant hemodynamic instability may require a different positioning strategy or additional assistance.
Medical Procedures and Examinations
The Left Lateral Position is also used to facilitate selected medical procedures and examinations. Its principal advantage in these situations is that it can expose anatomical structures that are difficult to access when the patient is supine. It can also provide a stable posture for procedures in which the patient’s side, back, or posterior structures need to be accessible.
The exact positioning requirements depend on the procedure. Some interventions require a relatively straightforward side-lying posture, whereas others require greater flexion, rotation, or modification of the patient’s trunk and extremities. This is why healthcare professionals should follow the positioning requirements associated with the specific procedure rather than assuming that all lateral procedures use an identical configuration.
One important example is the use of a lateral decubitus orientation during spinal anesthesia. The lateral decubitus position can be used to facilitate neuraxial anesthesia, particularly when a patient has difficulty sitting or when the clinical circumstances favor a side-lying approach. Research comparing lateral and sitting positions for spinal anesthesia has demonstrated that positioning can influence hemodynamic responses and the onset characteristics of the block. In one prospective study involving patients undergoing knee arthroscopy, blood pressure decreased after spinal anesthesia induction in both groups, with more pronounced decreases observed in the lateral group compared with the sitting group.
This illustrates an important principle: position is part of the clinical context of a procedure, not merely a preliminary step. When regional anesthesia is performed in the lateral position, the anesthesia professional must account for the patient’s alignment, ability to maintain the required posture, anticipated movement, and subsequent changes in blood pressure or sensory and motor function.
The Left Lateral Position may also be selected when a procedure requires access to the posterior or lateral aspect of the body. Positioning can make an examination easier by moving the target anatomical region into an accessible orientation while allowing the healthcare professional to maintain appropriate visualization and procedural control.
During any procedure, the patient should be assessed before positioning. Relevant considerations include:
Ability to tolerate lateral positioning
Existing musculoskeletal restrictions
Spinal or pelvic conditions
Skin integrity
Neurovascular status
Respiratory function
Hemodynamic stability
Presence of catheters, drains, intravenous lines, or monitoring equipment
Level of consciousness and ability to communicate discomfort
The patient’s response should also be monitored during and after the procedure. A patient who reports new numbness, tingling, weakness, severe pain, dizziness, difficulty breathing, or unusual discomfort may require immediate reassessment of the position.
The Left Lateral Position can also be useful when the procedure requires temporary access to a specific side of the body. In these circumstances, the side selected is determined by the anatomical target rather than by a general preference for left-sided positioning. If the procedure concerns structures on the opposite side, a right lateral configuration may be more appropriate.
This distinction becomes especially important when communicating procedural plans. Simply documenting that a patient was “lateral” may be insufficient when the dependent side has clinical significance. Clear communication should identify the side and any important modifications to the standard position.
Surgical Procedures and Anesthesia
The Left Lateral Position has an important role in the operating room because it can provide surgical access to structures that are difficult to reach when the patient is supine. The position may be adapted for thoracic, pulmonary, retroperitoneal, renal, spinal, shoulder, and other procedures depending on the surgical approach.
In the operative environment, positioning has two simultaneous objectives:
Provide adequate access and exposure to the surgical site.
Protect the patient from positioning-related injury.
These objectives must be balanced throughout the procedure. A position that provides excellent surgical exposure may create excessive pressure, nerve stretch, vascular compression, or respiratory compromise if it is not established correctly. Surgical positioning guidelines emphasize that the risk of positioning injury is influenced by factors such as the type of position, duration of surgery, patient characteristics, and the amount of manipulation required to obtain adequate exposure.
TheLeft Lateral Position is particularly important in thoracic surgery. A lateral orientation can provide access to the chest while allowing the surgical team to work directly on structures within the thoracic cavity. In procedures requiring one-lung ventilation, the relationship between the dependent and nondependent lungs becomes especially important. Lateral positioning changes the distribution of ventilation and perfusion between the lungs, and these effects must be considered by the anesthesia team.
For example, during a thoracic procedure, the patient may be placed laterally to provide access to the operative hemithorax. The surgical team may require a stable position that permits optimal exposure, while anesthesia must maintain airway security and adequate oxygenation. The patient may have an endotracheal tube, intravenous access, arterial monitoring, urinary catheterization, and other devices that must remain secure during the turn and throughout the operation.
The position is also used for procedures involving the retroperitoneal region. In these cases, the patient’s body may be arranged to increase the distance between the costal margin and iliac crest and improve exposure of the operative area. The operating table may be adjusted to increase access, but these modifications must be performed carefully because excessive flexion or pressure can increase the risk of tissue and nerve injury.
Positioning for surgery therefore requires deliberate coordination. Before the patient is moved, the anesthesia professional, surgeon, nurses, and other members of the surgical team should understand the intended position and the required sequence of movement. The airway and invasive lines require particular attention because movement from supine to lateral can place traction on tubes and catheters or alter their position.
Once the patient has been positioned, several considerations become especially important:
Airway security: The airway device must remain correctly positioned and accessible to the anesthesia team.
Ventilation: Changes associated with lateral positioning and mechanical ventilation must be monitored.
Circulation: Blood pressure, heart rate, perfusion, and other relevant hemodynamic parameters should be assessed.
Pressure protection: Dependent areas require appropriate padding and support.
Peripheral nerve protection: The arms and shoulders must be positioned to avoid excessive traction or compression.
Medical-device security: Intravenous lines, drains, catheters, monitoring cables, and other devices should remain functional and free from excessive tension.
Surgical exposure: The position must provide sufficient access without requiring unnecessary or extreme body rotation.
The risks associated with lateral positioning are particularly relevant under anesthesia because the patient may be unable to recognize or communicate developing discomfort. General anesthesia also removes many protective responses and can make prolonged pressure or nerve stretch more difficult for the patient to detect. Reviews of perioperative positioning identify peripheral nerve injury as one of the major concerns and emphasize the importance of preventive positioning practices.
The brachial plexus is one structure requiring particular attention. Excessive shoulder displacement, arm positioning, or traction can contribute to nerve injury. Literature concerning lateral decubitus surgery has identified brachial plexus injury, peripheral neurapraxia, and other neurovascular complications among potential risks.
Pressure-related complications are another concern. Lateral positioning reduces the surface area through which body weight is distributed compared with some other positions, potentially increasing localized pressure. A surgical series examining lateral positioning reported pressure injuries among postoperative complications and emphasized the importance of individualized protection of weight-bearing areas.
The duration of the procedure matters as well. The longer a patient remains immobile under anesthesia, the longer tissues, nerves, and joints may be exposed to pressure or mechanical stress. Patient-specific factors—including age, body weight, frailty, pre-existing neurological disease, vascular disease, and limited tissue tolerance—can further modify risk. Perioperative literature therefore recommends considering both the characteristics of the patient and the requirements of the operation when establishing the surgical position.
An example can be seen in a patient undergoing a thoracic operation requiring a lateral surgical approach. The patient may initially be transferred onto the operating table in the supine position. After anesthesia has been established and the airway secured, the surgical team carefully turns the patient onto the required side. Once the Left Lateral Position has been established, the team confirms that the head and neck are aligned, the dependent shoulder and arm are protected, the upper extremity is supported, the pelvis is stable, pressure points are padded, and all lines and tubes remain secure. The surgeon then confirms that the position provides adequate access to the surgical field while anesthesia continues to monitor respiratory and cardiovascular function.
This multidisciplinary approach is fundamental. Positioning is not the responsibility of one member of the team alone. The surgeon determines the exposure required, anesthesia manages airway and physiological considerations, and perioperative nurses contribute to positioning, padding, equipment preparation, safety checks, and ongoing observation. Effective communication among the surgical staff is particularly important when the patient’s body must be moved or when modifications are required after the procedure has begun.
The Left Lateral Position may therefore be selected for surgical procedures not simply because it places the patient on the left side, but because it can create a practical relationship between the patient’s anatomy and the surgical field. Its successful use depends on achieving adequate exposure without compromising airway management, circulation, nerve integrity, tissue perfusion, or overall patient safety. This balance is especially important under anesthesia, when the patient cannot independently adjust the body in response to pressure or discomfort.
Physiological Effects of the Left Lateral Position
The Left Lateral Position produces several physiological changes because moving the body from a back-lying posture to a side-lying posture changes the relationship between gravity, the lungs, heart, abdominal organs, blood vessels, and the supporting surface. These changes are not necessarily harmful. In many clinical circumstances, the Left Lateral Position can be beneficial because it redistributes pressure, changes pulmonary blood flow, and, in particular circumstances such as pregnancy, can reduce compression of major abdominal vessels.
The magnitude of these effects depends on the patient’s underlying condition, the degree of rotation, whether the patient is breathing spontaneously or receiving mechanical ventilation, the duration of the posture, and whether sedation or anesthesia is being used. A healthy, awake adult may experience relatively modest cardiopulmonary changes, whereas a patient with respiratory disease, cardiovascular instability, obesity, pregnancy, or prolonged surgery may demonstrate more clinically important effects. Research on body posture shows that respiratory and hemodynamic responses vary according to both the posture itself and the patient’s physiological state.
Respiratory and Cardiovascular Effects
One of the most important physiological consequences of the Left Lateral Position is the redistribution of ventilation and pulmonary blood flow between the two lungs. When a person lies on the left side, the left lung becomes the dependent lung while the right lung is the nondependent lung. Gravity affects both ventilation and perfusion, but it does not affect them in exactly the same way. In a spontaneously breathing person, the dependent lung generally receives a greater proportion of pulmonary perfusion because blood flow follows gravitational gradients. Ventilation can also favor the dependent lung under many circumstances because the diaphragm and chest wall mechanics allow relatively effective expansion of that lung.
The relationship between ventilation and perfusion is particularly important because effective gas exchange requires air and blood to reach compatible regions of the lungs. In the awake individual, the Left Lateral Position can produce a relatively favorable distribution of ventilation and perfusion. However, this relationship changes after induction of anesthesia and initiation of positive-pressure ventilation. Anesthesia reduces functional residual capacity and alters respiratory muscle tone and chest-wall mechanics. As a result, the dependent lung may become more vulnerable to compression, airway closure, and atelectatic changes.
The dependent lung is exposed to the weight of structures such as the mediastinum and abdominal contents. This additional mechanical load can reduce its functional residual capacity and compliance, particularly in anesthetized patients. At the same time, the nondependent lung may remain more aerated. Consequently, ventilation can become less evenly distributed between the two lungs. These changes become especially important when the patient has underlying pulmonary disease or when mechanical ventilation is required.
For example, consider a patient who is awake and breathing normally while lying on the left side. Gravity increases perfusion toward the left, dependent lung, while respiratory mechanics can support ventilation in that region. If the same patient is subsequently anesthetized for thoracic surgery, muscle relaxation and positive-pressure ventilation alter the mechanical behavior of both lungs. The dependent left lung may become more susceptible to reduced aeration, making careful respiratory monitoring important.
The Left Lateral Position also has important implications during one-lung ventilation. When the nondependent lung is intentionally excluded from ventilation during thoracic surgery, gravity favors greater pulmonary blood flow toward the dependent ventilated lung. Hypoxic pulmonary vasoconstriction can further reduce blood flow to the nonventilated lung. These mechanisms can improve ventilation-perfusion matching and help maintain oxygenation, although one-lung ventilation still creates a substantial physiological shunt and can produce hypoxemia.
Respiratory effects therefore cannot be interpreted simply as “better” or “worse” than those produced by another posture. The clinical effect depends on the patient’s condition. A patient with unilateral pulmonary disease may respond differently from a patient with healthy lungs, and the response of an awake patient may differ considerably from that of a mechanically ventilated patient.
Cardiovascular effects are similarly influenced by the patient’s baseline condition and the degree of body rotation. In healthy individuals who are breathing spontaneously, ordinary lateral positioning generally causes relatively small changes in hemodynamics. A clinical guideline reviewing the available evidence reported that hemodynamic changes in healthy spontaneously breathing individuals are generally minimal, although blood pressure may change slightly.
The relationship between thoracic and abdominal pressure can nevertheless affect cardiac filling. When the body is rotated, the position of the heart, diaphragm, abdominal organs, and major vessels changes relative to gravity. This can modify preload and therefore influence stroke volume and cardiac output in susceptible individuals. These changes are generally more clinically significant when the patient has limited cardiovascular reserve, is receiving anesthesia, or has another condition that alters intrathoracic or intra-abdominal pressures.
The distinction between an awake patient and an anesthetized patient is particularly important. Under anesthesia, loss of normal muscle tone, positive-pressure ventilation, vasodilating medications, and mechanical effects of the posture can interact. Research examining the hemodynamic effects of lateral positioning under anesthesia found that ordinary lateral positioning produced relatively little change, whereas a more pronounced kidney-rest modification was associated with reductions in mean arterial pressure, right atrial pressure, cardiac index, and stroke volume index. The investigators attributed the reduction in cardiac output to decreased venous return and increased systemic vascular resistance associated with the modified posture.
For clinical assessment, this means that a change in blood pressure or oxygen saturation after turning should not automatically be attributed to the Left Lateral Position alone. The clinician should consider other factors, including medications, fluid status, respiratory disease, anesthesia, mechanical ventilation, blood loss, pain, and the exact degree of rotation.
Effects on Venous Return and the Vena Cava
The effects of the Left Lateral Position on venous return are closely related to the position of the major abdominal vessels. Venous return refers to the movement of blood from the systemic circulation back toward the heart. Because cardiac output depends partly on adequate cardiac filling, significant obstruction of venous return can reduce preload and potentially decrease stroke volume and blood pressure.
The Left Lateral Position is particularly important in pregnancy because the enlarging uterus can compress the inferior vena cava when the pregnant patient lies flat on the back. Compression of this large vein can reduce blood returning from the lower body to the heart. A leftward tilt or left side-lying posture shifts the uterus away from the major vessel and can reduce this compression.
This mechanism explains why left-sided positioning is frequently used when managing hemodynamic concerns associated with advanced pregnancy. Research using magnetic resonance imaging has demonstrated that inferior vena cava volume is substantially greater in a 30-degree left lateral tilt than in the supine posture in pregnant women, indicating less compression. Other studies have similarly demonstrated that the inferior vena cava is compressed in many pregnant women when supine and that this compression is relieved to a significant degree when the body is moved laterally.
The physiological importance of this effect becomes clearer when considering the sequence of events:
The enlarged uterus can compress the inferior vena cava in the supine posture.
Compression reduces blood flow returning from the lower body.
Reduced venous return decreases cardiac filling.
Reduced cardiac filling may decrease stroke volume and cardiac output.
Maternal blood pressure may fall if compensatory mechanisms are insufficient.
Moving the uterus away from the vessel can improve venous return and maternal hemodynamics.
This is particularly relevant after approximately the middle of pregnancy, when the uterus has enlarged sufficiently to produce clinically meaningful aortocaval compression in susceptible patients. Clinical reviews recommend a left lateral tilt or comparable lateral displacement when hypotension associated with pregnancy and supine positioning is a concern.
An important point is that the physiological response is not identical in every pregnant patient. The degree of compression depends on gestational age, uterine size, fetal position, maternal anatomy, and the precise angle of rotation. Imaging research has shown that a 30-degree left lateral tilt can produce greater inferior vena cava volume than a supine posture, while a 15-degree tilt may not provide the same degree of decompression in some patients.
For example, if a pregnant patient becomes light-headed or hypotensive while lying flat, moving her toward a Left Lateral Position may reduce vascular compression and improve circulation. The response should still be monitored rather than assumed. Blood pressure, heart rate, symptoms, oxygenation, and fetal status when appropriate should be evaluated according to the clinical situation.
Outside pregnancy, the effect of the Left Lateral Position on venous return is usually less dramatic. In a healthy adult, simply lying on the left side does not normally produce clinically significant obstruction of the inferior vena cava. The cardiovascular response is determined by several interacting factors, including intrathoracic pressure, abdominal pressure, circulating volume, vascular tone, and cardiac function.
It is also important to distinguish ordinary side-lying from specialized surgical modifications. A kidney-rest posture, for example, can create greater flexion and separation of the flank structures than ordinary lateral positioning. This may improve access to a surgical field but can produce more substantial hemodynamic changes. Research comparing ordinary lateral positioning with the kidney-rest modification found significantly greater cardiovascular effects with the latter.
Therefore, the effect on venous return should be understood as a dynamic physiological response rather than a fixed property of all side-lying postures. The patient’s anatomy, degree of rotation, abdominal pressure, surgical modifications, and clinical condition all influence the final cardiovascular response.
Effects on Musculoskeletal Alignment and Pressure Distribution
The Left Lateral Position changes the way body weight is transmitted through the skeleton and supporting surface. Instead of distributing much of the load across posterior structures as occurs when lying on the back, the body relies more heavily on the dependent shoulder, lateral chest, pelvis, hip region, and portions of the lower limb. This redistribution can be beneficial because it unloads some previously compressed areas, but it simultaneously increases mechanical loading on other structures.
Pressure distribution is therefore not simply a matter of reducing pressure; it involves redistributing pressure from one anatomical region to another. A patient who has been lying on the back for an extended period may benefit from turning because areas such as the sacral region are unloaded. However, the dependent side can then become vulnerable if the patient remains in that posture for too long or if body weight is concentrated over a small area.
Research examining interface pressure has demonstrated that the degree of lateral rotation matters. A 30-degree lateral tilt produced lower interface pressure than a traditional 90-degree side-lying posture in several studies. More recent pressure-mapping research has also shown that pressure over the greater trochanter increases as the degree of rotation increases from 30 to 60 degrees.
This finding has an important clinical implication: a full side turn is not automatically the best way to redistribute pressure. In a patient at high risk for tissue injury, a smaller lateral tilt may sometimes distribute load more effectively than placing the person directly on the dependent hip. The appropriate angle, however, must be individualized rather than applied as a universal rule.
The dependent shoulder and hip are particularly important because they can carry substantial mechanical load. The greater trochanter, knees, ankles, and other bony areas may also become exposed to pressure depending on how the legs are arranged. If the trunk is rotated while the pelvis remains poorly aligned, shear and torsional forces can develop across soft tissues and joints. These forces may be especially problematic in patients who have limited mobility, fragile skin, reduced sensation, or impaired circulation.
A well-aligned Left Lateral Position allows the head, neck, trunk, pelvis, and lower limbs to remain in a physiologically supported relationship. The spine should not be forced into excessive rotation simply to maintain the posture. The pelvis should remain stable, and the upper limbs should be supported rather than allowed to hang forward or backward. The knees may be separated with appropriate support when necessary to prevent excessive pressure between bony surfaces.
The mechanical effects also extend to the muscles and joints. Prolonged asymmetrical loading can produce discomfort, muscle fatigue, joint stress, or restricted movement. Patients with arthritis, spinal disorders, recent orthopedic surgery, neurological weakness, or musculoskeletal deformity may tolerate one degree of rotation poorly even when the posture is technically correct.
For example, a patient with left hip pain may technically be capable of being placed on the left side, but prolonged loading of the painful hip may be inappropriate. In such a situation, the purpose of repositioning is not merely to achieve a textbook posture. The clinician must consider the patient’s pain, surgical restrictions, skin condition, mobility, and tolerance when determining how much rotation can safely be maintained.
Pressure distribution also depends on the support surface. Mattresses, pillows, wedges, foam supports, and other devices alter the contact area between the body and the bed. Evidence shows that support materials can substantially influence interface pressure, and a poorly selected support device can create additional high-pressure areas rather than eliminating them. One study found that standard lateral turning did not reliably unload every area exposed to high interface pressure and that the type of support used to maintain the posture affected the resulting pressure pattern.
This is why the Left Lateral Position should not be regarded as a single fixed configuration. Two patients can both be described as left-side lying while experiencing very different pressure distributions. One patient may have the trunk supported at a modest angle with the hip partially unloaded, while another may be positioned almost directly on the left hip with substantial pressure concentrated over the greater trochanter.
The duration of the posture is also significant. Tissue can tolerate pressure for only a limited period before prolonged compression begins to interfere with local perfusion. The risk is greater when pressure is combined with shear, moisture, friction, impaired sensation, poor nutrition, reduced mobility, or compromised circulation. Perioperative guidance therefore emphasizes individual risk assessment and appropriate support surfaces, particularly when a patient will remain in a posture for an extended procedure.
Another important physiological consideration is that the patient’s posture can gradually change after it has been established. A pillow or wedge may initially provide excellent support but become displaced, allowing the body to rotate further and increasing pressure on a bony prominence. Research involving older immobile adults found that a 30-degree side-lying tilt was difficult to maintain with ordinary pillows, with the average angle decreasing over time, whereas a purpose-designed positioning device maintained the intended angle more effectively.
This demonstrates why reassessment is essential. The physiological effects of the Left Lateral Position are not determined only at the moment the patient is turned. They can change as the patient slides, rotates, relaxes, moves an extremity, or becomes fatigued. A posture that was well aligned immediately after repositioning may become less supportive later.
For pressure redistribution, the practical objective is therefore to achieve an individualized distribution of body weight while preserving alignment and minimizing excessive loading of vulnerable tissues. The clinician should observe the dependent shoulder and hip, inspect vulnerable skin when appropriate, assess comfort, and verify that support devices are maintaining rather than distorting the intended posture.
The overall physiological effect of the Left Lateral Position can therefore be understood as a balance between unloading some anatomical regions and loading others. It can improve access to previously compressed areas, modify pulmonary blood-flow distribution, and reduce vena caval compression in selected patients, particularly during pregnancy. At the same time, excessive rotation, prolonged pressure, poor support, or inadequate alignment can produce respiratory compromise, cardiovascular changes, tissue ischemia, or musculoskeletal discomfort. Safe clinical use depends on recognizing these physiological responses and adapting the posture to the individual patient’s needs.
Left Lateral Position Vs Sims Position
How to Position a Patient in the Left Lateral Position
Positioning a patient in the Left Lateral Position requires more than simply turning the person onto the left side. The process involves assessment, preparation, coordinated movement, anatomical alignment, appropriate support, and reassessment after the turn. The objective is to achieve a stable posture that maintains the patient’s airway, protects vulnerable tissues and nerves, supports the limbs, and minimizes unnecessary strain on the musculoskeletal system.
The exact technique varies according to the patient’s mobility, level of consciousness, body size, medical condition, procedure, presence of tubes or drains, and ability to cooperate. A patient who can independently turn in bed may need only verbal guidance and limited assistance, whereas a dependent or critically ill patient may require several healthcare workers and specialized equipment.
Safe handling is also important for healthcare workers. Current AORN guidance emphasizes individualized planning for lateral transfers and repositioning rather than relying on a fixed number of staff members. The number of people and assistive devices required should reflect factors such as the patient’s weight, physical characteristics, clinical condition, and starting and ending postures. The team should use enough assistance to maintain body alignment, protect the airway, and support the extremities throughout the movement.
Before beginning, the clinician should explain the procedure to an awake patient, confirm that the intended side is appropriate, assess mobility and pain, identify restrictions, and determine whether additional assistance is required. Equipment such as pillows, wedges, slide sheets, friction-reducing devices, or mechanical lifts should be available before the movement begins. This avoids placing the patient in an unstable posture while staff search for equipment.
Preparing and Moving the Patient
Preparation begins with a focused assessment. The clinician should determine whether the patient can follow instructions and participate in the turn. Strength, balance, level of consciousness, pain, range of motion, recent surgery, fractures, neurological deficits, skin condition, and cardiopulmonary stability can all affect how the movement should be performed.
Particular attention should be given to patients who cannot independently reposition themselves. Patients with impaired consciousness, sedation, neuromuscular weakness, acute illness, spinal precautions, recent orthopedic surgery, or significant pain may be unable to protect themselves during movement. In such cases, attempting to turn the patient without adequate assistance can result in falls, joint injury, dislodgement of medical devices, or injury to the healthcare worker.
Before moving the patient, check the bed and surrounding environment. The bed should be at an appropriate working height for staff, the wheels should be locked, and unnecessary equipment should be moved out of the way. Lines, catheters, drains, oxygen tubing, infusion tubing, monitoring cables, and other devices should be identified and positioned so they will not become trapped underneath the patient or pulled during the turn.
For a patient who can participate, explain the sequence in simple terms. For example, the clinician might ask the patient to bend the right knee, place the right arm across the chest, and assist with the turn toward the left. The instructions should be adapted to the person’s physical ability rather than assuming that every patient can perform the same movements.
When the patient cannot assist, coordinated movement becomes more important. Staff should agree on who will direct the turn and communicate clearly before moving. The head, trunk, pelvis, and extremities should be moved in a controlled manner rather than allowing one part of the body to rotate independently.
A slide sheet or other friction-reducing device can be useful when the patient must be moved laterally across the bed before or after turning. Such equipment reduces friction between the patient’s body and the bed surface and can decrease the physical effort required from staff. AORN’s current safe-handling guidance recommends individualized plans and appropriate assistive technology rather than depending solely on manual lifting.
The patient should generally be moved toward the side of the bed opposite the direction of the intended turn before beginning, provided this is appropriate for the clinical situation. For a turn toward the left, positioning the patient with sufficient space on the left side of the bed helps prevent the person from rolling beyond the mattress during the maneuver. However, the exact sequence depends on the bed, available equipment, number of caregivers, and the patient’s condition.
During the turn, avoid pulling on the patient’s arm, shoulder, or leg. Large areas of the body should be moved together, with staff controlling the trunk and pelvis. Sudden twisting can place excessive stress on joints and soft tissues.
Once the patient has been turned onto the left side, the body should not be left in the position simply because the initial movement was successful. The clinician should pause and assess the result. Check that the head and neck are supported, the spine is aligned, the dependent shoulder is not excessively compressed, the upper limbs are supported, the pelvis is stable, and the legs are appropriately separated.
Medical devices require particular attention. An intravenous line should not be compressed beneath the body. A urinary catheter should remain free of kinks, and drainage tubing should maintain appropriate flow. Oxygen tubing should remain unobstructed. Drains should not be placed underneath areas of direct pressure. Any device that crosses the patient’s body should be checked after the turn.
For example, consider an older adult who has weakness on the right side following a stroke. The patient may be able to understand instructions but may not have sufficient strength to assist effectively. The nurse should therefore provide additional support during the turn, protect the affected shoulder and arm, and ensure that the weakened extremity is not left underneath the body or allowed to fall into an awkward position.
The movement should also take into account the patient’s pain. A person with a recent hip operation, rib injury, abdominal incision, or spinal disorder may experience significant discomfort when rotated. In such cases, the healthcare team should follow the relevant surgical or medical restrictions and modify the movement technique accordingly rather than forcing the body into a standard posture.
Aligning the Head, Spine, and Pelvis
Once the patient has been turned, alignment of the head, spine, and pelvis becomes the foundation of the Left Lateral Position. These structures should form a stable, supported relationship rather than being rotated independently.
The head should be supported so that the neck remains as close as possible to a neutral anatomical relationship with the trunk. A pillow of appropriate height can fill the space between the head and the mattress without forcing the neck upward or allowing it to fall downward. The correct pillow height depends on the patient’s shoulder width, body habitus, mattress characteristics, and degree of rotation.
Excessive neck rotation can place strain on muscles and joints and may contribute to nerve compression or stretching. This is particularly important in patients who are sedated or anesthetized because they cannot reliably report discomfort or automatically correct an awkward posture. NCBI’s guidance for lateral positioning recommends maintaining the head and neck in a neutral relationship and protecting the dependent ear and eye from external pressure.
The dependent ear should be checked after the patient has settled. The ear should not be folded underneath the head or compressed between the patient’s head and the mattress. The same principle applies to the eye on the dependent side, particularly when the patient is unconscious or under anesthesia.
The spine should remain supported without excessive lateral bending or twisting. Ideally, the head, neck, thorax, lumbar region, and pelvis should remain in reasonable anatomical alignment. A patient should not appear to be bent sharply at the waist simply because a pillow or wedge has been placed beneath one part of the trunk.
One common problem occurs when the shoulder and pelvis rotate in different directions. For example, the patient’s shoulders may face almost completely toward the mattress while the pelvis remains partially supine. This creates torsion through the trunk and may produce discomfort or excessive stress on the spine and surrounding tissues.
Another problem occurs when the pelvis rolls forward or backward. If the pelvis is unstable, the patient may gradually drift out of the intended posture. A support behind the back can help stabilize the trunk when clinically appropriate, but the support should not create a concentrated area of pressure or force the spine into an unnatural curve.
The pelvis should also be aligned with the trunk. The left hip should not be excessively rotated inward or outward unless the patient’s condition or the intended clinical procedure requires a particular modification. Maintaining a stable pelvis helps the lower limbs remain appropriately positioned and decreases unnecessary torsion through the lumbar region.
Alignment should be reassessed after the patient has been supported because the first appearance of the posture may change when the patient’s weight settles into the mattress. A patient may initially appear straight but develop trunk rotation after the pillow behind the back compresses.
A useful clinical assessment is to observe the patient from the head toward the feet. The clinician can ask:
Is the head supported without excessive neck flexion or rotation?
Is the trunk reasonably aligned with the pelvis?
Is the pelvis stable?
Is the patient leaning excessively forward or backward?
Is any part of the body being forced into an awkward angle?
Are pressure points being created by the bed or support devices?
These checks are particularly important for patients who cannot communicate discomfort.
In an anesthetized patient, alignment should be verified visually and manually because the patient cannot provide the usual warning of pain, pressure, numbness, or stretching. AORN emphasizes that positioning must remain a continuous safety consideration during procedures because the patient’s body can shift after the initial setup.
Positioning the Arms, Hips, and Legs
The arms require careful attention because inappropriate placement can cause compression or stretching of nerves, joints, muscles, and blood vessels. In the Left Lateral Position, the dependent left arm is particularly vulnerable because it is located between the patient’s body and the supporting surface.
The dependent arm should therefore be placed in a supported posture rather than allowing the patient to lie directly on the arm. Depending on the clinical environment and intended use of the posture, the arm may be positioned forward or supported on a padded surface. The specific arrangement should follow institutional policy and the requirements of the procedure.
The upper arm also needs support. It should not be allowed to hang unsupported toward the mattress or be excessively abducted. Excessive shoulder abduction can place traction on neural structures, while prolonged compression can compromise circulation or produce nerve symptoms.
For perioperative positioning, NCBI guidance describes supporting the dependent upper limb on a padded surface and maintaining the nondependent arm in a supported configuration while avoiding excessive abduction.
The patient’s hands and fingers should remain free from compression. Fingers should not become trapped underneath the body, between support equipment, or beneath another limb. After positioning, the clinician should visually inspect the hands and assess circulation when clinically indicated.
The hip and pelvis should remain stable. The upper leg should not simply fall forward without support because this can rotate the pelvis and place stress on the hip and lower back. Likewise, allowing the upper leg to fall backward can destabilize the posture.
The legs are commonly arranged with some degree of flexion, particularly at the knees, to increase stability and reduce tension. A pillow or other appropriate support can be placed between the knees and lower legs so that the upper leg does not rest directly against the dependent leg. This also reduces contact between bony areas.
Support between the legs is particularly useful because the knees, ankles, and feet can otherwise come into direct contact. AORN’s patient-positioning resources specifically describe the use of pillows between flexed legs to reduce tissue injury and help maintain appropriate hip alignment.
The feet should be assessed as well. The dependent foot should not be trapped underneath the upper leg, while the upper foot should not be left unsupported in a way that creates excessive pressure or abnormal joint rotation.
For a patient with reduced mobility, the nurse may need to provide more support than would be necessary for an independent patient. For example, a patient with hemiplegia may not be able to control the upper leg or arm. Without adequate support, the affected extremities can fall into positions that increase joint stress or expose the skin to pressure.
The patient’s existing restrictions must always take precedence over a generic positioning pattern. A patient with a recent hip replacement, fracture, spinal injury, or orthopedic restriction may have specific limits on hip flexion, rotation, or limb movement. The clinician should follow the prescribed precautions rather than applying a standard side-lying technique.
A patient’s body size also influences limb placement. Larger patients may require additional support surfaces or equipment to prevent the upper leg from pulling the pelvis forward. Smaller patients may require appropriately sized pillows or positioning aids so that the support does not force the joints into excessive angles.
The position should be stable but not rigid. The purpose of supports is to maintain alignment without forcing the body into an unnatural posture. A patient should not be tightly wedged between multiple devices simply to prevent movement.
Using Padding and Positioning Supports
Padding and positioning supports are used to distribute load, maintain alignment, reduce friction and shear, and protect vulnerable anatomical structures. They should complement good positioning rather than compensate for poor alignment.
The choice of support depends on the patient’s anatomy, risk factors, duration of the posture, clinical purpose, and available equipment. Common options include pillows, foam supports, wedges, gel-based surfaces, pressure-redistributing mattresses, and specialized positioning devices.
The dependent shoulder and hip deserve particular attention because they can experience substantial pressure in side-lying. Padding can help distribute the load over a larger area rather than allowing body weight to become concentrated over a small bony prominence.
The knees and ankles should also be separated when necessary. Placing an appropriate pillow or support between the legs reduces direct contact and can help prevent excessive rotation of the upper leg. AORN specifically identifies padding and pressure redistribution as important components of preventing positioning-related tissue injury.
Padding should be sufficiently supportive without being excessively thick. An overly thick pillow under the head can place the neck into lateral flexion, while insufficient support may allow the head to fall toward the mattress. Similarly, a large support behind the back can force the trunk too far forward.
The support should therefore be selected according to the patient’s anatomy rather than according to a one-size-fits-all rule.
Pressure redistribution is especially important when the patient will remain in the posture for an extended period. Patients who are immobile, sedated, anesthetized, malnourished, or otherwise vulnerable to tissue injury may require more extensive preventive measures. AORN recommends structured risk assessment and pressure-redistributing surfaces for patients at increased perioperative risk.
The type of mattress or support surface also matters. A pressure-redistributing surface can reduce localized loading, but it does not eliminate the need for proper anatomical alignment and regular assessment. Positioning devices themselves can become sources of pressure if they are too firm, incorrectly placed, or left in direct contact with vulnerable tissue for too long.
This is an important principle: a positioning device can protect the patient when correctly selected and used, but it can also contribute to injury when improperly placed. Current AORN guidance specifically cautions against improvised or inappropriate devices and emphasizes selecting equipment according to the patient’s characteristics, procedure, and expected duration.
Padding should also be checked after the patient has been moved. A pillow that was correctly positioned before the turn can become folded, displaced, or compressed during movement. Any wrinkles, folds, hard edges, or concentrated pressure areas should be corrected.
The clinician should avoid placing padding directly over areas where pressure could compromise circulation or nerve function. For example, padding should not be positioned in a manner that compresses the axilla or places excessive pressure against vulnerable neural structures. Likewise, straps and securing devices should be applied so that they stabilize the patient without restricting circulation.
In prolonged procedures, reassessment is especially important. Evidence summarized by AORN indicates that perioperative patients are vulnerable to pressure injury because they remain immobile, may have reduced sensation, and cannot independently reposition themselves in response to discomfort.
A practical example is a patient undergoing a lengthy procedure in the Left Lateral Position. The patient may initially be correctly aligned with padding under the head, support behind the trunk, cushioning between the knees, and appropriate protection beneath pressure-sensitive areas. As the procedure continues, however, the mattress may compress and the patient’s body may shift. The healthcare team should therefore reassess the visible alignment and support rather than assuming that the initial setup remains unchanged.
Positioning supports should also allow healthcare professionals to maintain access to the patient and necessary equipment. A support should never obstruct essential monitoring, interfere with vascular access, compress tubing, or prevent assessment of the skin and extremities.
After the final support has been applied, a systematic check should be completed. The clinician should verify that the head and neck are aligned, the dependent shoulder and hip are protected, the arms and legs are supported, the knees and ankles are separated when appropriate, and no extremity is trapped beneath the body. Pulses and distal circulation should be assessed when clinically indicated. AORN’s current positioning guidance highlights reassessment of padding, head and neck alignment, extremity location, pulses, and securing devices as important safety checks.
The completed Left Lateral Position should therefore be viewed as a dynamic clinical arrangement rather than a single fixed pose. Safe positioning involves preparing the patient carefully, coordinating the movement, maintaining alignment, supporting vulnerable structures, redistributing pressure, and reassessing the result. These steps become even more important when the patient cannot communicate discomfort or independently correct an unsafe posture.
For example, an awake patient who can move independently may immediately report that the shoulder feels compressed or that the neck is uncomfortable. An anesthetized patient cannot provide this feedback. The healthcare team must therefore anticipate potential problems and use observation, anatomical assessment, appropriate padding, and ongoing reassessment to maintain a safe posture throughout the period in which the patient remains in the Left Lateral Position.
Left Lateral Position in the Operating Room
The Left Lateral Position has an important role in the operating room because it can provide direct access to anatomical structures that are difficult to reach when the patient is lying on the back. In thoracic, pulmonary, renal, retroperitoneal, and selected orthopedic procedures, placing the patient on the left side can move the operative area upward and create a more favorable working angle for the surgeon.
In the operating room, however, the Left Lateral Position is considerably more complex than ordinary side-lying. The patient is usually anesthetized, unable to recognize pressure or discomfort, and often connected to an endotracheal tube, vascular access, urinary catheter, monitoring equipment, and other devices. The patient’s inability to reposition independently means that the surgical team assumes responsibility for maintaining anatomical alignment and protecting the patient throughout the procedure. AORN identifies improper positioning as a potential contributor to nerve injury, pressure injury, respiratory problems, hemodynamic instability, and other perioperative complications.
The intended surgical exposure should therefore be considered before the patient is turned. The team should know which anatomical region must be exposed, which side is operative, what equipment will be required, how the table will be manipulated, where anesthesia equipment will remain accessible, and how the patient will be secured. AORN recommends individualized planning that considers the procedure, patient characteristics, anatomy, range of motion, circulation, sensation, body size, and required positioning equipment.
Positioning for Thoracic and Pulmonary Surgical Access
The Left Lateral Position can provide extensive access to the left or right hemithorax depending on the operation and the side placed upward. In many thoracic operations, the operative side is positioned upward so that the surgeon has unobstructed access to the chest wall and intrathoracic structures. The exact arrangement depends on the procedure, incision or port locations, surgeon preference, and whether open or minimally invasive surgery is being performed.
The physiological demands are particularly important during pulmonary surgery. Once the patient has been anesthetized and the airway secured, the anesthesia team may use lung-isolation techniques to allow the operative lung to collapse while ventilation is maintained in the opposite lung. This creates a larger working space inside the thorax. During video-assisted thoracic surgery, for example, a double-lumen endotracheal tube may be used to permit selective ventilation of the nonoperative lung. After the patient is rotated, the anesthesiologist must verify that the tube remains correctly positioned because turning the patient can alter its location.
This verification is especially important because a correctly positioned airway device before rotation may not remain correctly positioned afterward. The change from a supine to a lateral posture can alter the relationship between the trachea, bronchi, endotracheal tube, and bronchial structures. In thoracic procedures requiring one-lung ventilation, the anesthesia provider therefore reassesses lung isolation after the patient has been positioned and again when clinically indicated during the operation.
One-lung ventilation also produces distinctive physiological challenges. When one lung is deliberately excluded from ventilation, blood flow continues to reach portions of the nonventilated lung, producing an intrapulmonary shunt. Gravity in the lateral posture can favor blood flow toward the dependent ventilated lung, while hypoxic pulmonary vasoconstriction reduces blood flow to areas of the nonventilated lung. These mechanisms can help limit the degree of oxygenation impairment, but they do not eliminate the possibility of hypoxemia.
For this reason, positioning and anesthesia cannot be considered separate tasks during thoracic surgery. The posture directly influences ventilation and perfusion, while the ventilation strategy can influence how well the surgical field is exposed.
The chest and upper torso must also be positioned so that the surgeon has adequate access without placing excessive stress on the shoulder, neck, or upper extremity. The arms may be positioned forward in a supported arrangement, depending on the procedure and institutional technique. They should not be placed in extreme abduction or extension. Excessive stretching of the shoulder region can place neural structures at risk, particularly when the patient is unable to report discomfort because of anesthesia.
An axillary support may be used according to the surgical team’s positioning protocol. Its purpose is not to press directly into the axilla. Instead, it is positioned below the axillary region to help reduce pressure on the brachial plexus and axillary vascular structures while supporting the upper part of the thorax. Incorrect placement can itself create pressure, so the device must be positioned carefully and checked after the patient has been turned.
The dependent shoulder, elbow, wrist, and hand should also be assessed. Bony prominences require appropriate cushioning, and the arm should not become trapped underneath the patient’s torso. The nondependent arm requires support as well, particularly when the surgical team needs to manipulate the table or when the procedure will be prolonged.
For example, consider a patient undergoing a left thoracoscopic pulmonary procedure. After induction of general anesthesia and establishment of appropriate airway control, the patient is carefully turned so that the right side is dependent and the left chest is elevated for access. The team confirms airway position, checks the dependent shoulder and arm, supports the upper extremity, protects pressure-sensitive areas, secures the body, and verifies that monitoring lines remain functional. The table is then adjusted to provide the surgeon with the required chest exposure. Each component is interconnected: a change in table angle can alter body alignment, airway access, pressure distribution, and the surgeon’s working field.
Thoracic positioning therefore requires continuous attention rather than a single positioning event. A patient may be correctly positioned initially but shift after table manipulation, surgical traction, or prolonged immobility. The perioperative team should remain alert to these changes throughout the procedure. AORN specifically emphasizes that positioning should be reassessed because anesthetized patients cannot independently respond to discomfort or correct an unsafe posture.
Positioning for Retroperitoneal Surgical Access
The Left Lateral Position is also valuable for operations involving structures located behind the peritoneal cavity, particularly renal and adrenal procedures and selected operations involving the retroperitoneal space. The principal objective is to expose the flank and increase the working distance between important anatomical landmarks.
For renal surgery, the patient may be placed laterally with the operative side upward. This places the flank in a more accessible orientation and allows the surgeon to approach the kidney without passing through the anterior abdominal cavity in procedures where a retroperitoneal approach is selected.
The relationship between the costal margin and iliac crest is particularly important. When the operating table is appropriately adjusted, the flank can be opened and the distance between these structures increased. This creates additional working space and can make access to the kidney and surrounding retroperitoneal structures easier. Reviews of open partial nephrectomy describe placing the patient laterally with the flank over the table break so that the table can be flexed to increase this distance.
The patient’s exact degree of rotation depends on the surgical approach. The trunk should be stable enough to prevent unintended movement while still allowing the surgeon to obtain the necessary exposure. Specialized devices may be used to stabilize the patient on the table, but these devices must be positioned so that they do not create concentrated pressure or interfere with circulation.
Retroperitoneal procedures can be prolonged, making pressure prevention particularly important. The dependent hip, shoulder, forearm, and other contact areas may remain under pressure for several hours. A review of open partial nephrectomy specifically identifies the axilla, dependent hip, and forearms as areas requiring attention during lateral renal surgery.
The dependent arm should be protected from excessive compression, and the upper arm should be supported so that the shoulder is not pulled forward or excessively stretched. The head and neck should remain aligned with the trunk. The legs should be stabilized without creating excessive pressure over the knees, ankles, or fibular region.
The patient’s body must also be securely supported because the table may be flexed after the patient has been turned. Flexing the table changes the shape of the patient’s support surface and can alter the relationship between the trunk and pelvis. If the patient is not adequately secured, this movement can produce sliding or rotation.
Robotic retroperitoneal procedures illustrate the importance of coordination. In robotic partial nephrectomy, patients may be placed laterally with the operative side upward, after which the table is flexed to increase the space between the costal margin and iliac crest. The location of the robotic equipment can also influence access for anesthesia personnel, making preoperative planning particularly important.
For example, during a retroperitoneal renal procedure, the surgeon may require additional flank exposure. The patient is placed in the appropriate lateral posture, the flank is positioned over the table break, and the table is gradually flexed. Before and after this adjustment, the team should verify that the airway, vascular access, dependent arm, head, neck, pelvis, and pressure areas remain safe. The purpose of the adjustment is to improve exposure without sacrificing physiological stability.
This illustrates an important principle of intraoperative positioning: the position is modified to serve the procedure, but the patient’s safety remains the limiting factor. If an adjustment improves exposure but produces unacceptable pressure, vascular compromise, airway difficulty, or nerve tension, the positioning strategy must be reconsidered.
Flexing the Operating Table for Surgical Access
Flexing the operating table is a specialized technique used to modify the patient’s anatomy and improve surgical exposure. In the Left Lateral Position, table flexion is particularly useful during procedures involving the flank, kidney, adrenal region, and retroperitoneal structures.
The table may contain a central break or adjustable segments that allow the torso and pelvis to be positioned at different angles. When the patient is appropriately aligned over the table break, flexion can increase the separation between the lower ribs and iliac crest. This effectively opens the flank and creates a larger surgical working space.
The adjustment should be gradual and coordinated with the entire team. It should not be viewed simply as a mechanical action performed after positioning. Flexing the table changes the patient’s body geometry and can influence pressure distribution, vascular flow, respiratory mechanics, and the tension placed on joints and soft tissues.
Before flexion, the team should verify that the patient is properly secured and that the relevant lines, tubes, monitoring equipment, and anesthesia connections have sufficient slack. A line that appears adequately positioned before table movement may become taut once the table is flexed.
The anesthesia provider should also have clear access to the airway and monitoring equipment. This is particularly important because the anesthetized patient cannot communicate if the new posture produces discomfort or restriction.
After flexion, the team should reassess the patient’s alignment. The head should remain supported, the neck should not become excessively rotated, and the shoulders should remain appropriately supported. The dependent arm should not become trapped or compressed, and the upper extremity should remain within a safe range of motion.
The legs should also be reassessed because table flexion can change the relationship between the pelvis and lower limbs. A support that was appropriately placed before flexion may shift or become excessively compressed afterward.
The effect on pressure distribution deserves particular attention. Flexing the table can change where the patient’s weight is concentrated. Areas that were relatively unloaded before the adjustment may become more heavily loaded after flexion. AORN emphasizes that pressure redistribution is essential during surgery because anesthetized patients cannot independently change their posture when pressure becomes uncomfortable.
For example, suppose a patient is placed laterally for a renal procedure and the table is initially flat. The dependent hip, shoulder, and lower limb are checked and adequately supported. The table is then flexed to widen the flank. After flexion, the patient’s pelvis may shift slightly, increasing pressure at the dependent hip. The team therefore reassesses the hip, support devices, limb alignment, and securing straps rather than assuming that the original arrangement remains unchanged.
Table flexion can also affect surgical access in minimally invasive procedures. Robotic renal procedures, for example, may use lateral placement combined with table flexion to enlarge the working space between the iliac crest and costal margin.
The table should never be flexed solely because it is customary for a particular operation. The degree of adjustment should be based on the surgical approach and the patient’s anatomy. Excessive flexion can create unnecessary mechanical stress and may compromise safe access to the patient.
Communication is therefore essential. The surgeon may request greater exposure, while the anesthesia provider may identify a concern about ventilation or hemodynamic stability. The perioperative nurse may recognize that the patient’s dependent shoulder or hip has become excessively compressed. These observations need to be considered together before additional table adjustments are made.
Coordinating With Anesthesia and Surgical Staff
Safe use of the Left Lateral Position in the operating room requires coordinated action by the entire perioperative team. The surgeon, anesthesia professional, perioperative nurse, surgical technologist, and other personnel have different responsibilities, but their activities must converge around one objective: obtaining appropriate surgical exposure without compromising the patient’s physiological stability or causing positioning-related injury.
Coordination begins before the patient is turned. The team should discuss the intended posture, operative side, anticipated table adjustments, required supports, airway strategy, lines and monitoring equipment, and any patient-specific risks. AORN recommends a team-based approach to positioning and emphasizes individualized planning according to the patient’s characteristics and the procedure.
The anesthesia professional has particular responsibility for the airway and physiological effects of the posture. Before rotation, the airway must be secure and accessible. After rotation, airway position should be reassessed, particularly when lung isolation is being used. During thoracic procedures, changing from the supine posture to lateral can cause a double-lumen endotracheal tube to move, which may interfere with appropriate lung isolation. Surgical literature specifically recommends checking tube placement after the patient has been rotated.
Anesthesia personnel also monitor oxygenation, ventilation, blood pressure, heart rate, cardiac rhythm, and other relevant physiological variables throughout the procedure. A sudden change after rotation or table flexion may indicate a physiological response to the new posture, an airway problem, altered ventilation, vascular compression, blood loss, or another intraoperative event.
The perioperative nurse plays an important role in protecting the patient during positioning. Before anesthesia, the nurse may identify preexisting skin problems, musculoskeletal limitations, neurological deficits, vascular concerns, or areas of altered sensation that could influence the positioning plan. After anesthesia, the nurse helps ensure that the planned posture is correctly established and maintained.
The nurse also serves as an advocate for the anesthetized patient. An awake person can say, “My shoulder hurts,” “My hand is numb,” or “I cannot breathe comfortably.” An anesthetized patient cannot provide those warnings. AORN therefore emphasizes the responsibility of perioperative personnel to anticipate positioning-related injury and advocate for patients who cannot move or respond to discomfort during anesthesia.
The surgical team is responsible for communicating how much exposure is needed and whether changes in the table or patient posture are necessary. This communication should occur before making major adjustments whenever possible. A change in surgical exposure may require additional rotation, table flexion, repositioning of an arm, or adjustment of a support device. Each change should prompt consideration of its effects on the patient.
For example, during thoracic surgery, the surgeon may request additional chest exposure. The surgical team should not simply pull the patient into a more extreme posture without considering the airway, shoulder, arm, and pressure areas. Instead, the team can determine whether a modest table adjustment or modification of an existing support would provide the required exposure while maintaining safe anatomical alignment.
The same principle applies during renal surgery. If the surgeon needs greater flank exposure, the table may be flexed. Before doing so, anesthesia personnel should confirm that the airway and monitoring equipment remain secure, while the perioperative team verifies that the patient’s body and extremities are adequately supported.
Communication becomes even more important when robotic equipment is used. Large robotic components may limit access to the patient’s head or airway once the procedure begins. The team therefore needs to anticipate the final position of the equipment and confirm that anesthesia personnel can still reach essential lines and airway equipment if an emergency occurs. Retroperitoneal robotic procedures illustrate this concern because the robot may be positioned near the patient’s head while the body remains in lateral positioning with table flexion.
The surgical team should also communicate before and after any major movement. A clear command such as “ready to turn,” followed by confirmation from all involved personnel, reduces the risk that one person begins moving the patient while another is still managing an airway, vascular line, drain, or monitoring cable.
After the patient has been positioned, a final team assessment should confirm several key elements:
The operative area is adequately exposed.
The head and neck are appropriately aligned.
The airway and breathing circuit are secure and accessible.
Monitoring equipment remains functional.
Intravenous lines, catheters, drains, and other tubes are not kinked or compressed.
The dependent arm and shoulder are adequately protected.
The upper extremity is supported without excessive abduction or traction.
Pressure-sensitive areas are appropriately protected.
The pelvis and lower limbs are stable and supported.
The patient is securely positioned against unintended movement.
The planned table configuration is compatible with both the operation and anesthesia access.
These checks should not be treated as a one-time event. If the table is subsequently flexed, rotated, raised, lowered, or returned toward its original configuration, the patient should be reassessed. AORN notes that positioning can change during surgery and that perioperative personnel should remain attentive to alignment and support throughout the procedure.
Documentation is another component of coordinated perioperative care. The record should reflect relevant positioning information according to institutional policy, including the posture used, positioning devices, padding, significant adjustments, and other measures taken to reduce injury risk. Documentation provides continuity of care and establishes what was done to protect the patient during the procedure.
The Left Lateral Position in the operating room is therefore best understood as a coordinated surgical strategy rather than simply a side-lying posture. Thoracic operations use it to facilitate access to the chest and manage the relationship between surgical exposure and ventilation. Retroperitoneal operations use it to expose the flank and facilitate access to structures such as the kidney. Table flexion can further expand the operative field, while careful coordination with anesthesia protects the airway and maintains physiological stability.
The quality of the final posture depends on the interaction of all members of the perioperative team. Surgical exposure, airway management, pressure protection, limb support, table manipulation, monitoring, and communication must function together. When these elements are coordinated, the Left Lateral Position can provide effective operative exposure while reducing preventable positioning-related complications.
Patient Safety and Complication Prevention
Safe use of the Left Lateral Position requires more than placing a patient on the left side and adding pillows for comfort. The position changes how body weight is distributed, alters the relationship between the dependent and nondependent limbs, and can affect respiratory mechanics, circulation, nerves, joints, and skin integrity. The degree of rotation, duration, patient characteristics, and use of support devices all influence the risk of complications.
For a conscious patient, discomfort may provide an early warning that a joint is overstretched, a nerve is compressed, or excessive pressure is developing over a bony area. This protective response is reduced or absent in patients receiving sedation or general anesthesia. Consequently, the perioperative team must anticipate positioning-related injury rather than waiting for the patient to report symptoms. AORN emphasizes individualized positioning plans, appropriate equipment, team communication, and ongoing reassessment because positioning injuries can include pressure injuries, peripheral nerve damage, respiratory problems, vascular complications, and musculoskeletal injury.
The safest approach is therefore to consider the Left Lateral Position as a dynamic clinical intervention. The patient’s alignment and tolerance should be reassessed after the initial turn, after supports are placed, after any operating-table adjustment, and periodically during prolonged procedures. A 2026 AORN safety review specifically emphasizes reassessing padding, head and neck alignment, extremity placement, pulses, and safety straps rather than treating positioning as a one-time task.
Preventing Pressure Injuries
Pressure injury prevention is one of the most important safety considerations when using the Left Lateral Position. Turning a patient onto the left side redistributes pressure away from areas such as the sacrum, but it does not eliminate pressure. Instead, mechanical loading is transferred toward structures that become dependent, including portions of the shoulder, lateral chest, pelvis, hip, knee, ankle, and foot. If the patient remains in the same posture for an extended period, sustained pressure can impair local tissue perfusion and contribute to tissue damage.
The risk becomes greater when pressure is combined with shear or friction. For example, a patient who is partially slid downward after being positioned may experience tissue deformation even though the patient’s body still appears appropriately aligned. Similarly, a pillow placed beneath a joint may initially appear protective but can create a concentrated area of pressure if it is too firm, incorrectly positioned, or allowed to shift.
Patients undergoing procedures are particularly vulnerable because anesthesia and sedation reduce sensation and prevent voluntary movement. AORN identifies immobility, reduced sensation, prolonged procedure duration, positioning devices, and pressure from relatively firm surfaces as important contributors to perioperative pressure injury. AORN recommends a comprehensive assessment rather than relying solely on a generic pressure-risk score. For perioperative patients, validated tools such as the Munro Scale, ELPO, PRAMS, and Scott Triggers may be used according to institutional practice.
Before placing a patient in the Left Lateral Position, the nurse should inspect the skin and identify existing redness, wounds, fragile areas, edema, bruising, surgical incisions, or other conditions that could influence the choice of supports. Particular attention should be given to areas that will become dependent. The patient’s nutritional status, mobility, age, body habitus, circulation, sensation, comorbidities, and anticipated duration of immobility should also be considered.
Pressure redistribution should be accomplished by appropriately selected support surfaces and positioning aids rather than by simply adding multiple layers of padding. Padding should distribute forces over a broader area while preserving alignment. It should not create new pressure points. For example, a cushion supporting the upper leg should be positioned so that it supports the limb without concentrating force directly over the knee or ankle.
The dependent shoulder deserves particular attention. It should be supported in a manner that avoids excessive compression and allows the arm to remain in a comfortable, anatomically appropriate relationship with the trunk. Likewise, the dependent hip should not be exposed to unnecessary focal pressure. A support between the knees can separate bony surfaces and help maintain lower-limb alignment.
High-risk surgical patients may require pressure-redistributing surfaces or other specialized support systems. AORN recommends pressure-redistributing surfaces for perioperative patients and high-specification reactive or alternating-air surfaces for selected high-risk patients.
Duration is also important. A patient who remains in a Left Lateral Position for a brief nursing intervention has a different risk profile from a patient who remains laterally positioned for several hours during a complex surgical procedure. Longer procedures increase cumulative exposure to pressure and make continuous assessment increasingly important. A systematic review of operating-table positioning injuries found that pressure ulcers, peripheral nerve injuries, vascular injuries, musculoskeletal injuries, and other positioning-related complications can occur across surgical positions.
Example: Consider an older adult undergoing prolonged thoracic surgery. The patient is anesthetized and cannot communicate that the dependent hip has become painful or that the arm has shifted into an abnormal angle. A properly completed initial assessment is not enough. The perioperative nurse should ensure that the dependent areas remain adequately supported, reassess exposed and accessible areas when appropriate, monitor the patient’s overall positioning, and document significant positioning interventions.
Pressure prevention should also continue after the procedure. Once the patient returns to the recovery area, the nurse should inspect the skin and ask about pain, numbness, tingling, or unusual discomfort when the patient’s level of consciousness permits meaningful assessment. Early identification of an area of concern allows prompt intervention before a minor positioning-related problem progresses.
Preventing Nerve and Brachial Plexus Injuries
Nerve injury can occur when a nerve is compressed, stretched, or subjected to prolonged pressure. The Left Lateral Position presents particular concerns because the dependent upper extremity and shoulder girdle are exposed to mechanical forces, while the nondependent arm can also be placed in an excessive or unsupported position.
The brachial plexus is especially important because it supplies major motor and sensory pathways to the upper extremity. Excessive shoulder displacement, traction, compression near the neck or shoulder, or prolonged abnormal arm positioning can increase the risk of neurological injury. AORN notes that anesthetized patients cannot respond to excessive stretching or uncomfortable positioning, making careful positioning by the surgical team essential.
A major preventive principle is to avoid extremes of joint movement. The upper arm should be supported rather than allowed to hang unsupported. Excessive abduction, extension, or rotation should be avoided, and the head and neck should remain aligned with the trunk. The hand and fingers should also be positioned so that they are not compressed against equipment, the operating table, or another body structure.
The dependent arm requires particular attention because the patient’s body weight can restrict its movement or compress tissues. The arm should not become trapped underneath the torso. It should be placed where circulation and nerve function can be preserved and where the shoulder is not pulled forward or downward excessively.
The upper arm also requires support. If an arm is positioned on a support device, the support should distribute the weight without creating a focal pressure point. The position should be checked after the patient has been turned because the arm may move during the transfer even when the initial plan was correct.
The neck is another important consideration. Excessive rotation or lateral bending can place tension on neural and vascular structures and may also compromise comfort and musculoskeletal alignment. Maintaining the head and neck in a neutral, supported relationship with the trunk is therefore an important preventive measure.
The nurse should also consider patient-specific risk factors. A patient with preexisting peripheral neuropathy, limited range of motion, arthritis, previous neurological injury, diabetes, vascular disease, or other conditions affecting sensation may have less physiological reserve and may require additional precautions. Previous neurological symptoms should be documented so that postoperative findings can be compared with the patient’s baseline.
During prolonged procedures, reassessment is particularly important. AORN recommends maintaining attention to positioning throughout the procedure and checking that extremities remain supported. If the patient is repositioned, the team should reassess alignment rather than assuming that the original positioning remains intact.
Example: A patient undergoing a lengthy thoracic procedure is positioned laterally with the dependent arm supported. Several hours into the procedure, the surgical team changes the table configuration. Even though the patient is still technically in the same overall posture, the change may alter the shoulder and arm relationship. The nurse should therefore reassess the dependent arm, shoulder, head, neck, and other pressure-sensitive areas rather than assuming that the original arrangement remains safe.
Postoperatively, possible nerve injury may present as numbness, tingling, weakness, altered sensation, loss of movement, or persistent pain. Any unexpected neurological change should be assessed promptly and compared with the patient’s preoperative status.
Protecting the Airway and Circulation
Protection of the airway and circulation is essential whenever the Left Lateral Position is used, particularly in patients who are sedated, unconscious, critically ill, or receiving general anesthesia. Turning the patient changes the relationship between the airway, chest wall, lungs, cardiovascular structures, and monitoring equipment. These changes must be anticipated before and during movement.
For an awake patient with an intact airway, lateral positioning may be well tolerated and can sometimes provide useful protection against aspiration compared with lying flat on the back. However, the position should never be assumed to guarantee airway safety. Patients with impaired consciousness, respiratory disease, excessive secretions, facial or airway obstruction, or reduced protective reflexes require close assessment.
When anesthesia is present, airway management becomes a major priority. Before turning an anesthetized patient, the team should establish who is responsible for airway control and how the airway device and breathing circuit will be protected during the movement. Lines and tubing should have sufficient slack to permit the turn without traction, but they should not be left so loose that they become displaced or contaminated.
After the patient is turned, the airway should be reassessed rather than assuming that the airway device remained in exactly the same position. This is particularly important when a patient has an endotracheal tube, a double-lumen tube, or another specialized airway device. Changes in head and neck position and movement of the torso can alter airway-device position. In thoracic procedures requiring one-lung ventilation, correct lung-isolation device placement is especially important because malposition can interfere with ventilation and oxygenation.
Respiratory monitoring should therefore continue after positioning. The nurse and anesthesia professional should assess oxygen saturation, respiratory mechanics, airway pressures when applicable, chest movement, breath sounds when clinically indicated, and other parameters appropriate to the anesthetized patient. Any unexpected deterioration should prompt immediate evaluation of the airway, ventilation, circulation, equipment, and positioning.
Circulatory protection is equally important. Excessive compression of the dependent shoulder, axillary region, abdomen, pelvis, or lower extremity can affect blood flow. The nurse should ensure that the patient’s limbs are not compressed against the table or supports and should assess pulses and distal perfusion when appropriate. AORN’s positioning safety recommendations specifically include checking extremity location and the presence of pulses during reassessment.
The Left Lateral Position can also influence venous return and cardiovascular function depending on the patient’s condition and the degree of rotation. This is especially relevant in patients with cardiovascular compromise, pregnancy, hypovolemia, or conditions in which small changes in venous return may have significant effects.
Table modifications can further change these effects. For example, flexing the operating table during a renal procedure changes the geometry of the trunk and may alter pressure and vascular relationships. Any major adjustment should therefore be followed by a reassessment of the airway, ventilation, hemodynamic status, lines, and body alignment.
Circulation should also be considered during the transfer itself. When turning a dependent patient, the team should avoid pulling on an extremity or compressing the body against the mattress. IV lines, arterial lines, central venous catheters, urinary catheters, drains, and other devices should be identified before movement and checked afterward.
Example: A sedated patient is being turned into the Left Lateral Position for a procedure. During the turn, the patient becomes partially displaced toward the edge of the table. A line becomes taut and the dependent arm is positioned underneath part of the torso. The team should stop, correct the patient’s body alignment, free the arm, check the line, reassess the airway and circulation, and only then continue with the procedure. This illustrates why positioning should be treated as a coordinated clinical maneuver rather than a simple physical turn.
Preventing Musculoskeletal Injury
Musculoskeletal injury may involve muscles, joints, ligaments, tendons, bones, or the soft tissues surrounding them. The risk increases when the patient is moved forcefully, positioned outside their normal range of motion, or left in an awkward posture for an extended period.
The Left Lateral Position should respect the patient’s existing anatomical limitations. A patient with arthritis, hip replacement, spinal disease, fractures, contractures, or recent orthopedic surgery may not tolerate the same degree of rotation or limb flexion as another patient. Before positioning, the nurse should identify relevant restrictions and communicate them to the team.
Movement itself should be coordinated. Whenever possible, the patient’s head, shoulders, trunk, pelvis, and legs should move together during the turn. Sudden twisting between the shoulders and pelvis can place unnecessary stress on the spine and surrounding tissues. Adequate personnel and appropriate assistive equipment should be used for patients who cannot safely move independently.
AORN’s safe patient-handling guidance emphasizes individualized assessment and determining the appropriate number of personnel and assistive devices needed for movement and positioning. This protects both the patient and healthcare workers from preventable handling injuries.
Once the patient is in the Left Lateral Position, the spine and pelvis should be assessed for alignment. The trunk should not be excessively rotated forward or backward unless the specific procedure requires a modification. Likewise, the hips and knees should be positioned according to the patient’s anatomy and clinical requirements rather than forced into a particular angle simply because it is commonly used.
Supporting the upper leg can reduce unwanted rotational forces at the hip. A support between the knees can prevent direct contact and help maintain a more stable relationship between the hips, knees, and ankles. However, supports should not be used to force a joint beyond its comfortable or permitted range of motion.
The lower extremities should also be checked for compression. Knees, ankles, and feet can come into contact with each other or with the operating table, creating pressure and contributing to nerve or musculoskeletal problems. Adequate separation and support should be maintained where appropriate.
The patient’s size and body habitus must also be considered. A positioning technique that works well for a small, mobile adult may be inadequate for a larger patient or a patient with limited mobility. Appropriate equipment, additional staff, wider support surfaces, and specialized transfer devices may be necessary.
Musculoskeletal protection is particularly important during lengthy procedures. Even when the initial posture is anatomically acceptable, prolonged immobility can cause stiffness, muscle strain, joint discomfort, and pressure-related tissue injury. The systematic review of operating-table positioning complications identified musculoskeletal injury among the documented harms associated with surgical positioning, reinforcing the importance of individualized positioning and ongoing assessment.
The nurse should also distinguish between a position that is technically possible and one that is clinically appropriate. For example, a patient may physically be able to rotate farther toward the left side, but doing so may aggravate a painful shoulder or place excessive strain on a restricted hip. The correct approach is to use the least restrictive positioning that provides the necessary clinical or procedural access.
Before leaving the patient in the Left Lateral Position, the team should perform a final systematic check. The head and neck should be supported, the spine and pelvis should be aligned, the arms should be free from compression and excessive stretch, the hips and knees should be appropriately supported, pressure-sensitive areas should be protected, and all lines, tubes, and drains should be free from traction. During prolonged care, the position should be reassessed because supports can shift and the patient’s body can gradually migrate.
Safe positioning therefore depends on a continuous cycle of assessment, positioning, protection, reassessment, and documentation. AORN’s current guidance stresses that positioning should remain an ongoing safety focus rather than a task completed only at the beginning of a procedure.
For nursing students, an important principle is that complications associated with the Left Lateral Position are often preventable when the nurse anticipates risk instead of responding after an injury occurs. Pressure injuries can be reduced through appropriate pressure redistribution and skin assessment; nerve injuries through neutral alignment and protection of vulnerable structures; airway and circulatory complications through careful monitoring and device management; and musculoskeletal injuries through coordinated movement and respect for anatomical limitations. This makes patient positioning an active component of clinical safety rather than simply a matter of comfort or convenience.
Left Lateral Position Vs Supine Position
Nursing Care and Monitoring
Nursing care does not end once a patient has been placed safely in the Left Lateral Position. Positioning is a continuing process that requires assessment before, during, and after the patient assumes the posture. The nurse must determine whether the patient’s skin, circulation, neurological function, respiratory status, cardiovascular status, musculoskeletal system, and overall comfort remain stable.
This ongoing assessment is particularly important because the effects of positioning may change over time. A patient may initially appear well aligned, but pillows can become displaced, the body can gradually slide, an extremity can become compressed, or a patient may develop discomfort after remaining in the same posture for an extended period. In an anesthetized or heavily sedated patient, these changes may occur without any verbal warning because the patient cannot independently reposition themselves or communicate discomfort. AORN therefore emphasizes that positioning should remain a continuous safety focus, with reassessment of padding, head and neck alignment, extremity location, pulses, and other safety considerations throughout care.
The nurse’s assessment should also be individualized. Age, mobility, nutritional status, body habitus, skin condition, sensory function, circulation, preexisting neurological problems, respiratory disease, cardiovascular status, surgical procedure, expected duration, and level of consciousness can all affect how well a patient tolerates the Left Lateral Position. Evidence concerning surgical positioning demonstrates that positioning-related complications can involve neurological, integumentary, vascular, musculoskeletal, respiratory, and other systems, reinforcing the need for a broad rather than single-system assessment.
Assessing Skin and Pressure Areas
Skin assessment is an essential component of nursing care whenever the Left Lateral Position is maintained for an extended period. The nurse should identify areas exposed to sustained pressure, friction, shear, moisture, or contact with equipment. Although turning onto the left side redistributes pressure away from some posterior structures, it transfers mechanical loading to other areas. The dependent shoulder, lateral chest, pelvis, hip, knee, ankle, and other prominent structures may therefore require careful observation.
A baseline assessment should be completed before positioning whenever possible. The nurse should look for existing redness, discoloration, bruising, skin tears, wounds, edema, surgical incisions, fragile skin, or other abnormalities. This baseline is important because postoperative findings can otherwise be difficult to interpret. AORN materials emphasize detailed preoperative skin assessment because changes that develop later need to be distinguished from conditions that were already present.
After the patient is placed in the Left Lateral Position, the nurse should inspect accessible pressure areas and verify that support devices are functioning as intended. Padding should distribute pressure rather than concentrate it. A support that has shifted underneath the patient may create a new pressure point even though the original positioning was appropriate.
Particular attention should be given to bony prominences. Areas over the shoulder, greater trochanter, knee, ankle, and other prominent structures can be vulnerable when pressure is sustained. The nurse should also consider areas where medical equipment comes into contact with the patient. Tubing, cables, monitoring devices, straps, and other equipment can produce localized pressure that may be overlooked during a general assessment.
Skin assessment should not be limited to visual inspection. Changes in temperature, firmness, tenderness, moisture, swelling, or tissue consistency can provide additional information about tissue tolerance. In a patient who can communicate, the nurse should ask about localized pain, burning, pressure, or unusual sensitivity.
The nurse should recognize that visible skin changes do not always reflect the full extent of tissue injury. Deep tissue damage may develop beneath apparently intact skin, and some positioning-related injuries may become evident only after the procedure. AORN notes that deep pressure injuries may not become apparent until days after surgery, which makes communication between perioperative and postoperative nurses particularly important.
For patients at increased risk, the nurse should follow the facility’s pressure-injury prevention protocol and use the appropriate structured assessment approach. Perioperative patients may require risk assessment tools and pressure-redistributing surfaces selected according to the procedure and individual risk profile. AORN’s recommendations emphasize structured risk assessment and appropriate pressure-support surfaces for patients at elevated risk.
Example: An older patient undergoes a prolonged procedure in the Left Lateral Position. At the end of the procedure, the dependent hip appears slightly reddened. The nurse should not dismiss this finding as an expected consequence of positioning. The area should be assessed, documented according to institutional policy, pressure should be relieved, and the finding should be communicated during handoff so that subsequent nurses can monitor whether the skin returns to baseline or progresses.
Skin assessment should also continue after the patient leaves the operating room or procedure area. A postoperative nurse should know which areas were subjected to prolonged pressure and should compare findings with the preoperative assessment. This continuity is important because positioning-related tissue injury can evolve after the procedure rather than becoming immediately obvious.
Assessing Neurovascular Status
Neurovascular assessment is particularly important because the Left Lateral Position can place pressure or stretch on nerves and blood vessels, especially around the dependent shoulder and upper extremity, pelvis, and lower extremities. The nurse should establish a baseline whenever appropriate and reassess for changes following positioning and after prolonged immobilization.
A neurovascular assessment commonly considers circulation, sensation, movement, and pain, with specific components determined by the patient’s condition and clinical setting. Circulatory findings may include skin color, temperature, capillary refill, pulses, and swelling. Neurological assessment may include sensation, motor function, numbness, tingling, weakness, and pain.
The dependent upper extremity deserves particular attention. If the arm becomes trapped beneath the trunk or compressed against the operating surface, neurological and vascular complications may occur. The nurse should verify that the arm is free, adequately supported, and not placed under excessive pressure.
The brachial plexus is another important structure to protect. Excessive displacement of the shoulder or abnormal positioning of the upper extremity can contribute to nerve stretch or compression. The nurse should therefore assess whether the shoulder remains appropriately supported and whether the upper limb is maintained within a safe range of motion.
The nondependent arm also requires assessment. Although it is less exposed to direct body weight, it can still be positioned excessively or left unsupported. A poorly supported upper limb can create sustained traction at the shoulder or pressure at the elbow, wrist, or hand.
The lower extremities should be assessed as well. The nurse should ensure that the knees, ankles, and feet are not exposed to unnecessary compression. If the patient is awake, questions about numbness, tingling, pain, or weakness can provide valuable information. If the patient is unconscious, objective findings and careful positioning checks become even more important.
AORN recommends that positioning reassessment include extremity location and the presence of pulses. The organization also stresses that positioning must remain an ongoing concern because adjustments may be necessary during a procedure.
Postoperative neurological findings should be compared with the patient’s preoperative baseline. New numbness, weakness, loss of movement, severe pain, or altered sensation should not automatically be attributed to anesthesia or the patient’s underlying condition. Such findings may indicate a positioning-related problem and require prompt clinical evaluation.
Example: A patient awakens after prolonged lateral surgery and reports numbness and weakness in the dependent hand. The nurse should assess sensation, motor function, circulation, pulses, skin temperature and color, pain, and the patient’s preoperative neurological baseline. The finding should be communicated promptly to the appropriate clinician because persistent postoperative neurological changes require further evaluation.
Neurovascular monitoring is especially important in patients with preexisting neurological or vascular disease. A patient who already has reduced sensation may not recognize excessive pressure, while a patient with compromised circulation may have less tolerance for compression. The nurse should therefore avoid assuming that a lack of reported discomfort means that the position is safe.
Monitoring Respiratory and Cardiovascular Status
The Left Lateral Position can influence respiratory mechanics and cardiovascular physiology, making respiratory and cardiovascular monitoring important components of nursing care. The degree of lateral rotation, the patient’s underlying disease, spontaneous versus assisted ventilation, anesthesia, procedure duration, and modifications to the operating table can all affect physiological tolerance.
Respiratory assessment begins with observing the patient’s breathing pattern and overall respiratory effort. Depending on the clinical setting, the nurse may monitor respiratory rate, oxygen saturation, work of breathing, breath sounds, chest movement, airway pressure measurements, and other relevant parameters.
In an awake patient, the nurse should observe for dyspnea, increased work of breathing, coughing, chest discomfort, anxiety associated with breathing, or changes in oxygen saturation. Patients with chronic pulmonary disease may tolerate a particular degree of lateral positioning differently from healthy individuals.
For patients receiving supplemental oxygen or ventilatory support, the nurse should ensure that oxygen tubing and respiratory equipment remain correctly connected and unobstructed after movement. A tubing problem can appear to be a respiratory deterioration when the actual cause is displacement, kinking, or disconnection of the equipment.
Patients receiving general anesthesia require even closer surveillance. The patient cannot voluntarily reposition themselves, report shortness of breath, or correct an uncomfortable airway position. Anesthetized patients may also experience changes in ventilation associated with the interaction between body position, anesthesia, mechanical ventilation, and the surgical procedure. AORN identifies respiratory distress among the potential consequences of improper positioning and emphasizes collaboration between perioperative nurses and anesthesia professionals.
This is particularly relevant during thoracic procedures involving one-lung ventilation. In this setting, the anesthetized patient is intentionally ventilated through one lung while the other lung is excluded from ventilation to facilitate surgery. Position-related changes in ventilation and perfusion can become clinically important, so oxygenation and ventilation require continuous professional monitoring by the anesthesia team.
Airway-device position should also be considered after turning. A patient with an endotracheal tube or other airway device may experience changes in device position during movement. For this reason, the airway should be reassessed after major repositioning rather than assuming that the device remained unchanged.
Cardiovascular monitoring should likewise continue after the patient assumes the Left Lateral Position. Depending on the patient’s condition, assessment may include blood pressure, heart rate, cardiac rhythm, peripheral perfusion, skin temperature, capillary refill, and other hemodynamic parameters.
The nurse should be particularly alert to changes in blood pressure or heart rate following positioning. A clinically significant change may reflect altered venous return, reduced circulating volume, anesthetic effects, compression, blood loss, or another physiological problem. Positioning should therefore be considered alongside the patient’s entire clinical picture rather than treated as an isolated cause.
Patients with limited cardiovascular reserve may be less tolerant of physiological changes associated with positioning. Similarly, patients undergoing prolonged surgery may experience several simultaneous influences on hemodynamic status, including anesthesia, fluid shifts, blood loss, temperature changes, positive-pressure ventilation, and table adjustments.
Example: A patient under general anesthesia is placed in the Left Lateral Position for a prolonged procedure. Shortly after a significant table adjustment, the blood pressure decreases and oxygen saturation begins to fall. The nurse should not simply document the changes as expected. The team should promptly assess the airway, ventilation, equipment, hemodynamic status, lines, body alignment, and the effect of the table adjustment while the anesthesia professional manages the patient’s physiological response.
Respiratory and cardiovascular monitoring should also be integrated into handoff communication. The receiving nurse should know the patient’s pre-procedure status, significant positioning modifications, duration of the procedure, airway requirements, relevant intraoperative physiological changes, and any concerns identified during positioning.
Evaluating Comfort and Tolerance
Comfort assessment is an important part of nursing care because a patient may tolerate the Left Lateral Position differently depending on pain, mobility, musculoskeletal condition, anxiety, fatigue, and previous experience with positioning. Comfort is not simply a matter of making the patient feel better; discomfort may be an early indicator that alignment, pressure distribution, or support requires correction.
For an awake patient, the nurse should ask directly whether the position is comfortable and whether the patient feels pressure, pain, numbness, tingling, stiffness, shortness of breath, or difficulty maintaining the posture. The nurse should ask specifically about areas that may be exposed to sustained pressure, such as the shoulder, hip, knee, or ankle.
Pain assessment should include the location, severity, quality, timing, and aggravating or relieving factors. For example, a patient who reports shoulder pain after being positioned laterally may require assessment of arm placement and shoulder support rather than simply receiving an analgesic.
Comfort should also be assessed after any adjustment. Moving a pillow or changing the position of an arm may relieve one source of pressure while creating another. The nurse should therefore reassess the patient’s response after interventions.
Patients who cannot communicate require a different approach. Sedated, mechanically ventilated, cognitively impaired, or unconscious patients cannot reliably report discomfort. The nurse must instead use objective findings, physiological monitoring, body alignment, facial expression when observable, muscle tension or movement when applicable, and positioning assessments to determine tolerance.
AORN emphasizes that anesthetized and sedated patients cannot reposition themselves or alert the healthcare team when they experience discomfort. This makes the nurse’s role as patient advocate particularly important during procedures.
Comfort also has a psychological component. Patients may feel vulnerable when being turned or exposed, particularly when they have limited mobility. The nurse should explain what is happening before movement, maintain privacy, communicate clearly, and encourage the patient to participate when their condition permits.
For patients who can assist, asking them to communicate discomfort early can help prevent complications. However, the nurse should not rely exclusively on patient feedback. A patient may say that a position is comfortable even when an extremity is poorly aligned or a pressure area is developing. Objective assessment remains necessary.
Example: A patient placed in the Left Lateral Position for a bedside procedure reports that the lower leg feels uncomfortable. On assessment, the nurse discovers that the ankle is resting directly against the mattress without adequate support. The nurse can correct the support, reassess the patient’s comfort and circulation, and document the intervention. In this situation, the patient’s complaint provided an early warning of a positioning problem.
Comfort should also be reassessed after prolonged positioning. Even when the patient initially tolerates the posture well, discomfort can develop as muscles fatigue or supports shift. For this reason, the nurse should periodically determine whether the patient remains appropriately aligned and whether the position continues to meet the clinical objective.
Tolerance is particularly important when the Left Lateral Position is used therapeutically. A position may have a specific clinical purpose, but that purpose must be balanced against the patient’s ability to tolerate it safely. If the patient develops worsening respiratory distress, hemodynamic instability, severe pain, neurological symptoms, or evidence of tissue compromise, the nurse should promptly reassess the indication for continuing the posture and communicate concerns to the appropriate healthcare professional.
Documentation completes the monitoring process. Depending on the setting and institutional policy, documentation may include the patient’s baseline condition, skin findings, positioning devices used, neurovascular findings, respiratory and cardiovascular status, comfort level, significant repositioning, patient response, and any abnormalities communicated to the healthcare team. Good documentation creates continuity between nurses and helps distinguish preexisting findings from complications that develop after positioning.
The central nursing principle is that the Left Lateral Position should never be regarded as a static endpoint. Assessment continues after the patient has been turned because tissue pressure, neurological function, circulation, breathing, hemodynamic status, and comfort can change with time. AORN’s current positioning guidance similarly emphasizes reassessment rather than relying solely on the initial positioning check.
For nursing students, a useful way to remember the assessment priorities is to think systematically: inspect the skin, check circulation and neurological function, monitor breathing and cardiovascular status, and ask whether the patient is tolerating the position. When the patient cannot answer, the nurse must rely more heavily on objective findings and proactive observation. This approach transforms positioning from a simple physical maneuver into an ongoing nursing assessment and patient-safety responsibility.
Common Positioning Errors and Nursing Considerations
Even when the Left Lateral Position appears straightforward, small positioning errors can have significant consequences when they are maintained for an extended period. A patient may look appropriately positioned from a distance while having an arm trapped underneath the body, excessive rotation of the neck, concentrated pressure over a bony prominence, or a medical device placed under tension.
Positioning errors can affect several body systems simultaneously. Poor alignment may contribute to musculoskeletal strain and nerve compression; inadequate support may increase pressure on vulnerable tissues; incorrectly placed limbs can compromise circulation or peripheral nerves; unsecured lines and tubes can become displaced; and failure to reassess can allow an initially minor problem to become a significant injury.
The risk is especially important in patients who are unconscious, sedated, mechanically ventilated, neurologically impaired, or otherwise unable to reposition themselves. An awake patient may instinctively move away from an uncomfortable surface, while an anesthetized patient cannot provide this protective response. AORN identifies improper or prolonged positioning as a potential source of respiratory, circulatory, neuromuscular, and integumentary injury and emphasizes individualized planning and continued assessment.
For nursing practice, recognizing an error should be followed by a structured response: identify the problem, determine whether the patient is being harmed, correct the positioning when safe to do so, reassess the affected body system, and communicate or document the finding according to clinical policy. Positioning should therefore be treated as an ongoing safety responsibility rather than a task completed immediately after the patient is turned.
Poor Body Alignment
Poor body alignment occurs when the head, neck, trunk, pelvis, and extremities are not maintained in an anatomically appropriate relationship. In the Left Lateral Position, this may occur when the patient is rotated too far forward or backward, the pelvis is twisted relative to the shoulders, the head is unsupported, or the spine is placed in excessive lateral flexion.
One common error is allowing the upper body to rotate toward the mattress while the pelvis remains more laterally oriented. This creates torsion through the trunk and may place unnecessary stress on the spine, muscles, and supporting tissues. Another error occurs when the patient’s head is allowed to fall forward or backward because the pillow is too high, too low, or has shifted.
Alignment should be evaluated from several anatomical reference points rather than by looking only at the patient’s shoulders. The head and neck should have appropriate support, the trunk should be reasonably aligned with the pelvis, and the hips and lower limbs should be positioned in a manner consistent with the patient’s anatomy and clinical restrictions.
Poor alignment can also develop gradually. A patient may initially be positioned correctly but slowly slide toward the foot or edge of the bed. Pillows can compress, a support can move, or the patient may shift because of muscle relaxation or repeated movement. This is why reassessment is necessary even when the initial positioning was performed correctly.
The consequences depend on the degree and duration of the abnormal posture. Short-term effects may include discomfort, muscle fatigue, stiffness, or localized pressure. Prolonged abnormal alignment may contribute to joint strain, nerve compression, impaired circulation, or postoperative pain.
AORN recommends individualized positioning based on factors such as the patient’s anatomy, range of motion, size, weight, medical history, circulation, sensation, and the requirements of the procedure.
Example: A patient is placed in the Left Lateral Position for a prolonged procedure. The head initially rests in a neutral relationship with the trunk, but the pillow compresses during the operation and the patient’s neck gradually bends toward the mattress. The problem may not be obvious beneath surgical drapes. If the nurse performs a positioning check and identifies the change, the support can be corrected before prolonged neck positioning contributes to musculoskeletal or neurological complications.
Poor alignment should also be considered during routine bedside nursing. A patient who has weakness on one side of the body may be unable to maintain the position independently. A stroke patient, for example, may allow the affected shoulder or arm to fall into an unsupported posture. In such a situation, the nurse should not simply place the patient on the side and leave them there. The affected extremity must be deliberately supported and reassessed.
Another important consideration is that anatomical alignment should not be confused with rigid symmetry. The patient’s posture may need to be modified because of pain, surgery, contractures, fractures, or other clinical restrictions. The goal is not to force every patient into an identical posture but to achieve the safest functional alignment that meets the clinical purpose of the position.
Inadequate Padding or Support
Inadequate padding is another frequent positioning problem. Padding is intended to redistribute pressure, protect vulnerable anatomical structures, maintain alignment, and prevent direct contact between areas that could otherwise become compressed.
However, more padding does not necessarily mean safer positioning. Excessive or poorly placed material can elevate one part of the body, create new pressure points, interfere with alignment, or cause the patient to become unstable. Conversely, insufficient support may leave a limb unsupported or permit direct pressure over a bony prominence.
The nurse should therefore consider the purpose of every support device. A pillow beneath the upper leg may be intended to maintain alignment and separate the knees. A support under the upper arm may reduce traction on the shoulder. Padding beneath a dependent area may redistribute pressure. Each device should have a clear clinical purpose.
One error is placing a small, firm object directly beneath a bony prominence. Although the object may appear to “protect” the area, it can concentrate force over a smaller surface and increase localized pressure. Another error is using improvised materials that have not been evaluated for positioning. AORN specifically warns that inadequate equipment can lead to incorrect positioning or the use of improvised devices that increase injury risk.
The nurse should also inspect positioning equipment before use. Supports should be clean, intact, appropriate for the patient’s size, and suitable for the intended purpose. Defective or compressed padding may provide substantially less protection than expected.
Padding should be assessed after the patient is turned because material can fold or shift during movement. The nurse should check that there are no wrinkles, folds, seams, hard edges, or gaps beneath pressure-sensitive areas. Equipment and positioning aids should not become sources of pressure themselves.
The patient’s body size is also relevant. A support that adequately accommodates one patient may be inadequate for another. Larger patients may require additional equipment or appropriately sized surfaces rather than simply adding several layers of ordinary pillows.
Pressure redistribution is particularly important during prolonged procedures. AORN emphasizes that pressure injury prevention requires attention to patient-specific risk factors, procedure duration, positioning devices, and appropriate pressure-redistributing surfaces.
Example: A patient undergoing several hours of surgery is placed in the Left Lateral Position with a cushion supporting the upper leg. During a later check, the cushion has migrated downward and is now pressing against the knee rather than supporting the thigh. Simply adding another pillow on top would not necessarily solve the problem. The safer response is to reassess the entire limb, reposition the support appropriately, inspect the skin and circulation, and confirm that the patient’s alignment has been restored.
Support should also be proportional to the patient’s clinical needs. A patient with intact mobility who will remain laterally positioned for a short period may require relatively simple support. A patient with impaired sensation, poor circulation, fragile skin, or prolonged anesthesia requires substantially greater attention to pressure redistribution and reassessment.
Improper Limb Positioning
The arms and legs are particularly vulnerable to positioning errors because they contain superficial nerves, blood vessels, joints, and pressure-sensitive structures. Incorrect limb placement in the Left Lateral Position can therefore produce several complications at once.
The dependent arm should never become trapped beneath the patient’s torso. This error may occur during a rapid turn or when the team fails to confirm the location of the arm after movement. Compression of the arm can interfere with circulation and may expose peripheral nerves to prolonged pressure.
The upper arm also requires careful support. It should not be allowed to hang unsupported or be pulled excessively away from the trunk. Excessive shoulder movement may place traction on the brachial plexus or other neural structures. AORN emphasizes that positioning-related nerve injury can result from compression or inappropriate stretching and recommends individualized positioning based on anatomy and range of motion.
The fingers should also remain free from compression. A finger caught between the patient and a support surface may sustain pressure that is not immediately obvious, particularly when the patient is anesthetized. Similar attention should be given to the elbow, wrist, and hand.
The upper arm can also become compressed against the chest or support equipment. The nurse should verify that the arm is supported without excessive elevation, extension, or rotation. Any support device should distribute weight rather than create a narrow pressure point.
The lower extremities present their own risks. If the upper leg is left unsupported, it may fall forward or backward and rotate the hip and pelvis. If the knees are placed directly against each other, sustained pressure can develop over the medial knee structures. The ankles may also come into contact with one another or with the mattress.
A support between the knees and lower legs can help maintain alignment and separate vulnerable areas, but the support should be positioned according to the patient’s anatomy and clinical needs. It should not force the hip or knee into an unnatural angle.
Patients with orthopedic restrictions require additional caution. For example, a patient with a recent hip replacement may have specific restrictions concerning hip flexion, adduction, or rotation. The nurse must follow the patient’s postoperative orders rather than applying a generic lateral-positioning technique.
Example: A patient with limited shoulder mobility is being positioned for a diagnostic procedure. The nurse notices that the upper arm is being moved farther away from the trunk to improve access. Rather than assuming that greater exposure is automatically better, the nurse should recognize the patient’s range-of-motion limitation and communicate the concern. The position may need to be modified to provide adequate procedural access without placing the shoulder at excessive risk.
Another error occurs when limb positioning is changed after the surgical field has been established. A surgeon or anesthesia professional may need to adjust the patient’s posture or operating table during the procedure. Every such change can alter the position of the limbs. The nurse should therefore reassess them after significant table movement or changes in body posture.
This is particularly important when surgical drapes obscure the patient’s extremities. AORN notes that accidental hyperextension or shifting can be hidden beneath drapes and emphasizes the importance of checking positioning when adjustments occur.
Failure to Secure Lines, Tubes, and Drains
Medical devices introduce another major positioning concern. Patients placed in the Left Lateral Position may have intravenous lines, central venous access, arterial lines, urinary catheters, feeding tubes, drains, oxygen tubing, endotracheal tubes, monitoring cables, or other devices. If these are not considered before movement, the act of turning can cause traction, kinking, compression, obstruction, dislodgement, or accidental removal.
The first principle is to identify the devices before moving the patient. The nurse should know what each line or tube is connected to, whether it is currently functioning, and whether it has sufficient length to accommodate the planned movement.
Lines should have enough slack to permit movement without tension. However, excessive slack should also be managed so that tubing does not become trapped beneath the patient, wrapped around an extremity, or caught on the bed or equipment.
During the turn, one member of the team should pay particular attention to lines and tubes while other team members coordinate movement of the patient. For complex patients, assigning a specific person to protect the airway or critical devices can improve safety.
After the patient reaches the Left Lateral Position, every device should be reassessed. The nurse should verify that:
IV lines remain patent and are not kinked.
Central or arterial lines have not been placed under traction.
Drainage tubing remains unobstructed.
Urinary catheters are not compressed beneath the patient.
Oxygen tubing remains connected and unobstructed.
Enteral or other feeding tubes have not been displaced.
Airway equipment remains correctly positioned.
Monitoring cables have sufficient length and are not exerting pressure on the patient.
Airway devices require particular attention when the patient is anesthetized. Movement of the head, neck, and torso can alter the position of an endotracheal tube or other airway device. AORN specifically emphasizes coordination between the surgical and anesthesia teams when positioning changes could affect airway management.
A similar concern exists when the operating table is flexed. Flexing the table can increase the distance between anatomical structures for surgical exposure, but it also changes the geometry of the patient’s body and can alter the tension or path of lines and tubes. Devices should therefore be checked both before and after table adjustment.
Example: A patient with an arterial line is turned into the Left Lateral Position. The line initially functions normally, but after the turn the tubing becomes stretched around the patient’s arm. The blood-pressure waveform becomes abnormal. The nurse should recognize that the change may be related to positioning, inspect the line for kinking or tension, correct the problem according to clinical protocol, and reassess the monitoring signal.
Drains also require special attention because their location may be close to the operative site or dependent body surface. A drain that becomes compressed beneath the patient may not function correctly. A tube that becomes excessively dependent or kinked may alter drainage.
The nurse should also consider infection prevention. Tubing and drainage systems should remain positioned according to clinical requirements and should not be allowed to contact contaminated surfaces unnecessarily.
The principle is simple but important: every device that crosses the patient’s body becomes part of the positioning assessment. It is not enough to position the patient’s body correctly if the attached medical equipment is placed under unsafe tension.
Failure to Reassess the Patient
One of the most important positioning errors is assuming that the initial positioning check is sufficient. The Left Lateral Position can change after the patient settles into the mattress, after padding compresses, after the operating table moves, after equipment is attached, or simply because the procedure continues for several hours.
Reassessment allows the nurse to identify problems before they become injuries. AORN’s current guidance specifically recommends a final positioning safety check that includes padding over bony prominences, head and neck alignment, extremity location, pulses, and safety straps. The organization emphasizes that positioning should remain a continuous focus because adjustments may be necessary throughout the procedure.
Intraoperative reassessment is especially challenging because surgical drapes, equipment, and the operative field may limit access to the patient. Nevertheless, limited visibility does not eliminate the responsibility to assess what can safely be assessed. AORN describes strategies for integrating positioning checks into lengthy procedures and recommends establishing processes that make reassessment more consistent.
Reassessment should occur after significant events, including:
completion of the initial turn;
placement or adjustment of support devices;
movement of the operating table;
changes in the patient’s posture;
repositioning of an extremity;
movement of airway equipment;
major changes in surgical access;
prolonged periods in the same posture; and
transfer from one care environment to another.
The exact frequency of reassessment depends on the patient’s condition, procedure, institutional policy, and clinical circumstances. For lengthy procedures, facilities may establish scheduled positioning checks. AORN describes an example of a practice in which procedures lasting more than three hours are assessed every two hours, illustrating how structured reassessment can be incorporated into perioperative workflow. This should not be interpreted as a universal replacement for clinical judgment or facility policy.
Reassessment should be systematic rather than limited to asking whether the patient “looks okay.” The nurse should reconsider the major safety domains:
Alignment: Is the head, neck, trunk, pelvis, and extremities still appropriately aligned?
Pressure: Are bony prominences adequately protected? Have supports shifted or compressed?
Neurovascular status: Are pulses, circulation, sensation, and movement appropriate for the clinical situation?
Respiratory status: Is the airway secure? Is ventilation adequate? Are oxygenation and respiratory parameters stable?
Cardiovascular status: Are blood pressure, heart rate, rhythm, and peripheral perfusion acceptable?
Medical devices: Are lines, tubes, drains, and monitoring equipment patent, secure, and free from tension?
Safety equipment: Are straps and other supports appropriately positioned without causing excessive pressure?
Patient tolerance: If the patient is awake, does the patient report pain, numbness, pressure, difficulty breathing, or another concern?
A common error is to perform a check only when something appears obviously wrong. However, the purpose of reassessment is preventive. The nurse should not wait for hypotension, loss of a pulse, skin injury, neurological deficit, or airway compromise before checking the patient’s position.
Example: A patient has been in the Left Lateral Position for several hours during surgery. The surgical table is subsequently adjusted to improve access. The patient remains on the same side, so the team might assume that no new assessment is necessary. However, the table movement changes the patient’s body angle and causes the dependent arm to shift. A structured reassessment identifies the change, allowing the arm to be repositioned before prolonged compression occurs.
Reassessment is also important during transfers. When a patient moves from the operating room to a recovery area, the nurse should not assume that positioning remains unchanged. The transfer itself may cause the patient to slide, shift an extremity, displace padding, or place tension on a device. A brief but systematic post-transfer assessment can identify these changes.
Documentation supports this process. The nurse should document relevant positioning interventions and assessments according to institutional requirements, including significant positioning changes, support devices, pressure-risk interventions, skin findings, neurovascular concerns, and abnormalities requiring communication. AORN emphasizes the importance of documentation of positioning changes and added padding or positioning devices.
Good handoff communication is equally important. If the patient developed redness over a pressure area, experienced a positioning-related neurological concern, required unusual support, or had a device that required special attention, the receiving nurse should be informed. This prevents the next clinician from treating a new finding as though it were an unexplained postoperative event.
For nursing students, the major lesson is that safe use of the Left Lateral Position depends not only on knowing how to place the patient but also on recognizing when the position has become unsafe. Poor alignment, inadequate support, improper limb placement, unsecured medical devices, and failure to reassess are interconnected errors. One positioning problem can trigger another: a shifted pillow can alter alignment, altered alignment can place pressure on a nerve, and a patient’s movement can pull on an IV or drain.
A strong nursing approach is therefore proactive. The nurse anticipates how the patient’s body and equipment may change over time, performs systematic reassessment, corrects problems promptly, and communicates significant findings to the healthcare team. This continuous attention is especially important during prolonged procedures, when the patient cannot protect themselves through movement or verbal feedback.
Conclusion
The Left Lateral Position is a fundamental patient-positioning technique with applications ranging from routine nursing care and diagnostic examinations to anesthesia and complex surgical procedures. Although placing a patient on the left side may appear simple, safe positioning requires a thorough understanding of anatomy, physiology, patient-specific limitations, and the purpose for which the position is being used. The position can redistribute pressure, influence respiratory and cardiovascular function, facilitate access to particular anatomical regions, and improve procedural exposure when appropriately selected.
For nurses, the most important consideration is that positioning is not a one-time task. A patient who is initially well aligned can develop problems as the body settles, support devices shift, pressure accumulates, or medical equipment becomes displaced. Regular assessment of the skin, neurovascular status, respiratory and cardiovascular function, and overall tolerance is therefore essential. Particular attention should be given to vulnerable structures such as the dependent shoulder, hip, knees, ankles, and areas where nerves or blood vessels may be compressed.
The Left Lateral Position also demonstrates why patient positioning must be individualized. There is no single configuration that is appropriate for every patient. Age, body habitus, mobility, neurological function, musculoskeletal limitations, skin condition, circulation, respiratory status, level of consciousness, and the planned procedure can all influence how the patient should be positioned and supported. A patient receiving routine bedside care may require a different approach from an anesthetized patient undergoing several hours of thoracic or retroperitoneal surgery.
In the operating room, positioning becomes a shared responsibility. Nurses, anesthesia professionals, surgeons, and other members of the surgical team must communicate before movement, protect the airway and medical devices, maintain appropriate alignment, provide adequate support, and reassess the patient whenever the body or operating table is adjusted. This team-based approach is particularly important because an anesthetized patient cannot recognize excessive pressure, report pain, or voluntarily correct an unsafe posture.
Ultimately, effective use of the Left Lateral Position combines technical skill with clinical judgment. The nurse must understand not only how to position a patient, but also why the position is being used, what complications may develop, and how to recognize early signs of intolerance or injury. When positioning is approached as an ongoing component of patient care rather than merely a physical maneuver, it can promote comfort, protect physiological function, facilitate treatment and procedures, and reduce preventable harm. For nursing students, mastering these principles provides a strong foundation for safe, evidence-informed patient care across a wide range of clinical settings.
Frequently Askes Questions
What is left lateral position?
The Left Lateral Position is a posture in which the patient lies primarily on the left side of the body, with the left side supported by the bed or surface. The head, spine, pelvis, arms, and legs are positioned and supported to maintain safe alignment and reduce pressure or injury.
What is left lateral position in pregnancy?
The Left Lateral Position in pregnancy involves placing the pregnant patient on the left side, often with appropriate support under the abdomen and between the legs. It can help reduce compression of major abdominal blood vessels by the uterus and may improve maternal venous return, particularly in later pregnancy.
What are the risks of the lateral position?
Potential risks include pressure injuries, nerve compression or stretching, reduced circulation, musculoskeletal strain, respiratory changes, and displacement or compression of tubes and lines. Risk increases with prolonged positioning, anesthesia, limited mobility, and inadequate support.
Which side is lateral?
Lateral means lying on the side rather than on the back or abdomen. Therefore, a lateral position can be either left lateral or right lateral, depending on which side of the body is facing downward.
Sims Position: A Complete Guide to Patient Positioning, Lateral Position, Vaginal Examination, and Nursing Uses
Patient positioning is a fundamental component of safe and effective nursing care. The position selected for a patient can influence access to a particular anatomical area, facilitate a clinical examination or procedure, support physiological function, and affect the patient’s overall comfort and safety. Among the commonly used clinical positions, the Sims Position is particularly important because it combines elements of a lateral and semi-prone posture. In its commonly described form, the patient lies on the left side with the upper hip and knee flexed, creating access to the posterior and perineal regions while allowing the body to remain supported in a side-lying posture. Clinical nursing resources commonly associate the Sims Position with rectal procedures and enema administration.
Understanding the Sims Position requires more than recognizing that a patient is lying on the left side. The precise arrangement of the trunk, pelvis, hips, knees, arms, and head determines whether the patient is correctly positioned and whether the intended clinical access is achieved. A properly arranged Sims Position generally involves:
Positioning the patient on the side, commonly the left side.
Flexing the upper hip and knee forward while keeping the lower leg relatively extended.
Positioning the upper arm comfortably so that it does not become trapped beneath the body.
Maintaining appropriate alignment of the head, neck, spine, and pelvis.
Using pillows or other supports when necessary to maintain stability and reduce unnecessary pressure.
These details are clinically important because patient positioning is not simply a matter of placing the body in a particular posture. Nurses must consider the reason for the position, the patient’s physical condition, mobility, pain level, skin integrity, ability to cooperate, and the presence of tubes, drains, catheters, or other medical devices. Proper positioning therefore combines anatomical knowledge with continuous assessment and individualized patient care.
The Sims Position is also closely related to, but should not be considered identical to, the ordinary lateral position. Both involve the patient lying on the side, but the Sims posture has a characteristic semi-prone arrangement in which the upper leg is flexed forward and the patient’s body is positioned to facilitate access to posterior structures. The lateral decubitus position is similarly used for clinical examinations, but the degree of trunk rotation and leg positioning can vary according to the purpose of the examination. In rectal assessment, for example, the lateral decubitus or Sims posture may be particularly useful when a patient is too ill or unable to assume another examination position.
The clinical applications of the Sims Position extend across several areas of patient care. One of its best-established uses is during procedures involving the rectum. Nursing skills guidance recommends positioning a patient on the left side in the Sims Position when administering an enema, while the same general posture may be used when administering certain rectal medications. This arrangement provides access to the anal region while allowing the patient to remain supported on the side.
The position may also be used during rectal examination. A modified left lateral decubitus posture can allow inspection and palpation of the anorectal region, particularly when the patient cannot tolerate or safely assume another examination posture. For example, patients with significant mobility limitations, certain musculoskeletal conditions, or other physical restrictions may require a lateral approach. Importantly, the optimal position depends on the purpose of the examination and the patient’s individual circumstances; the Sims posture is one option rather than a universally preferred position for every rectal assessment.
The relationship between the Sims Position and vaginal examination is more specialized. The historical Sims posture became associated with gynecological examination and treatment because of its ability to provide access to the vaginal and posterior pelvic regions. Modern clinical practice, however, uses several different positions for vaginal examination, and the choice depends on the examination being performed, the patient’s condition, the required anatomical exposure, and the clinician’s technique. The Sims posture should therefore be understood as one positioning option within the broader range of positions available for vaginal and pelvic procedures rather than as a replacement for the lithotomy position in all circumstances.
The terminology surrounding the Sims Position also has a historical dimension. The position is associated with James Marion Sims, a nineteenth-century American physician whose work included the development of gynecological surgical techniques and the instrument known as the Sims vaginal speculum. Historical scholarship has examined the development of both the posture and the speculum and has challenged some commonly repeated assumptions about their origins.
Understanding this history also requires attention to the ethical controversies surrounding Sims. His gynecological research and surgical experimentation included procedures performed on enslaved Black women, and modern scholarship has extensively examined questions involving consent, exploitation, anesthesia, race, and the ethical standards of nineteenth-century medical experimentation. Consequently, when discussing the origins of the Sims Position and the Sims speculum, it is important to acknowledge both the historical influence of the innovations and the ethical context in which some of the work was conducted.
From a contemporary nursing perspective, the importance of the Sims Position lies primarily in its clinical application and the principles of safe positioning that accompany it. Positioning patients appropriately can help nurses facilitate procedures while minimizing unnecessary discomfort and reducing preventable risks. This requires attention to several considerations:
Body alignment: The head, neck, spine, pelvis, and extremities should be arranged appropriately for the patient’s condition and the intended procedure.
Pressure protection: Areas exposed to prolonged pressure should be assessed, particularly when a patient has limited mobility or impaired skin integrity.
Patient comfort: Pillows and positioning aids may be used to provide support and reduce strain.
Medical devices: Catheters, drains, intravenous lines, oxygen equipment, and other devices should remain free from compression, kinking, or displacement.
Privacy and dignity: Only the area required for the procedure should be exposed, particularly during rectal or vaginal examinations.
Ongoing assessment: Positioning should not be treated as a one-time action. The patient’s comfort, circulation, respiratory status, skin condition, and tolerance should be reassessed as appropriate.
The Sims Position is therefore best understood as both a specific clinical posture and an example of the broader principles involved in patient positioning. Its correct use depends on understanding the relationship between body mechanics, anatomical access, procedural requirements, and patient safety. A patient who is technically placed on the correct side may still be poorly positioned if the hips and legs are incorrectly aligned, pressure areas are inadequately protected, or the posture causes unnecessary discomfort.
This guide examines the Sims Position from these clinical and nursing perspectives. It begins by establishing the defining characteristics of the position and explaining how it differs from other lateral and semi-prone postures. It then examines its applications in patient care, including enema administration, rectal examination, and selected vaginal procedures. The discussion progresses to the practical process of positioning a patient, comparisons with the supine, prone, and lithotomy positions, and the patient positioning guidelines necessary to promote safety.
The later sections address the specific considerations associated with vaginal procedures, nursing responsibilities, patient privacy and dignity, infection prevention, documentation, potential benefits and limitations, and common positioning errors. Practical examples involving enema administration, rectal examination, and vaginal examination further demonstrate how the principles of the Sims Position can be applied in clinical settings. Taken together, these concepts provide a foundation for understanding not only how the position is performed, but also why it is selected, when it is appropriate, and how it can be incorporated safely into patient care.
Understanding the Sims Position
Definition and Characteristics of the Sims Position
The Sims Position is a modified side-lying posture in which the patient is positioned between the supine and prone positions, creating a semi-prone position. The patient generally lies on one side with the lower leg relatively extended and the upper hip and knee flexed forward. In commonly taught nursing descriptions, the upper leg is supported with a pillow, while the arms are positioned comfortably so that they are not trapped beneath the patient’s body. This arrangement creates a stable posture while exposing portions of the posterior and perineal regions for selected clinical procedures.
The Sims Position is sometimes described as a modified lateral or semi-prone posture because it does not place the patient completely on the side in the same way as a conventional lateral position. Instead, the patient’s trunk is rotated somewhat forward. This partial rotation changes the relationship between the pelvis, buttocks, and examining surface and can provide greater access to the anorectal and perineal areas.
A useful way to understand the Sims Position is to visualize it as occupying the space between two familiar positions:
Supine position: The patient lies flat on the back.
Sims Position: The patient is rotated toward the side and partially toward the prone direction.
Prone position: The patient lies on the abdomen.
This intermediate arrangement is the defining characteristic of the Sims Position. Nursing fundamentals resources specifically describe it as being halfway between supine and prone, with the legs flexed.
Several physical characteristics distinguish the Sims Position:
Side-lying orientation: The patient rests primarily on one side rather than directly on the back or abdomen.
Forward rotation: The trunk is rotated partially toward the bed, producing the characteristic semi-prone posture.
Asymmetrical leg positioning: The upper leg is more flexed than the lower leg, helping stabilize the body and facilitate access to the posterior region.
Supported positioning: A pillow or positioning device can be placed beneath the upper leg to maintain alignment and reduce strain.
Appropriate arm placement: The arms should be arranged so that they remain comfortable and are not compressed underneath the patient’s torso.
The exact degree of flexion and rotation does not need to be identical for every patient. Proper patient positioning is individualized according to the procedure, physical condition, mobility, pain, body habitus, and ability to maintain the posture. A patient with restricted hip movement, for example, may not tolerate the same degree of flexion as a patient with normal range of motion.
The Sims Position is particularly useful when access to the posterior aspect of the body is required without placing the patient completely prone. For example, nursing skills references identify it as a position used for procedures such as enema administration.
The posture can also be valuable during selected examinations. In rectal assessment, a lateral decubitus or Sims-type posture may be used when the patient is unable to assume another examination position because of illness, mobility limitations, joint problems, or other physical restrictions.
It is important, however, not to interpret the Sims Position as a universally appropriate posture for every procedure. The appropriate patient position depends on the anatomical area being examined, the clinical objective, the patient’s condition, and the healthcare professional’s technique. The position should therefore be selected deliberately rather than simply because it is familiar.
Sims Position and the Lateral Position
The Sims Position and the lateral position are closely related, but they are not identical. Both involve patient positioning on the side, yet the orientation of the trunk and lower extremities differs. Understanding this distinction is important because using the terms interchangeably can lead to incorrect positioning during clinical procedures.
In a conventional lateral position, the patient lies directly on one side of the body. The upper leg is commonly flexed over the lower leg, and pillows may be used to support the upper arm and leg. This position can be used for comfort, pressure redistribution, and routine repositioning. Nursing fundamentals describe lateral positioning as lying on one side with the upper leg positioned over the lower leg.
The Sims Position, in contrast, involves more forward rotation of the trunk toward the bed. The patient is therefore not simply resting squarely on the lateral aspect of the body. Instead, the posture combines lateral and prone elements, producing the characteristic semi-prone position.
The distinction can be summarized as follows:
Feature
Lateral position
Sims Position
Basic orientation
Directly side-lying
Side-lying with forward rotation
Trunk
Primarily lateral
Partially rotated toward prone
Leg arrangement
Upper leg generally flexed over lower leg
Upper hip and knee more distinctly flexed
Body posture
More symmetrical side-lying
More asymmetrical, semi-prone
Typical purpose
Repositioning, comfort, pressure redistribution, selected care
Access to posterior/perineal areas and selected procedures
Relationship to prone
Primarily side-lying
Between lateral and prone
One reason the distinction matters is procedural access. In a standard lateral position, the patient’s posterior region may remain relatively difficult to access depending on the patient’s anatomy and the procedure. The forward rotation incorporated into the Sims Position can move the upper buttock and pelvic structures into a more accessible orientation.
For example, during an enema, the patient’s position needs to provide practical access to the anus while maintaining adequate support. The left-sided Sims posture is commonly taught for this purpose because it provides access to the rectal area while allowing the patient to remain in a supported side-lying posture.
The distinction is also relevant during a rectal examination. Clinical examination references describe the lateral decubitus or Sims position as an option when a patient cannot assume other examination positions. The patient’s buttocks can be positioned appropriately near the edge of the examination surface, with the upper hip and knee flexed to facilitate examination.
However, terminology varies somewhat between clinical references. Some resources use Sims Position and modified left lateral decubitus almost interchangeably, while others describe subtle differences in the degree of trunk rotation, leg flexion, and arm placement. Therefore, in practice, the essential consideration is not the label alone but whether the patient’s body has been arranged appropriately for the intended procedure and safely supported.
Another important distinction is between positioning for a procedure and positioning for general patient care. A patient may be placed in a conventional lateral position simply to redistribute pressure or change position in bed, whereas the more specific Sims posture may be selected when access to the posterior or perineal region is needed. The clinical objective should guide the positioning choice.
Left Lateral and Right Lateral Sims Position
The left lateral version is the form of the Sims Position most commonly taught in nursing. In this arrangement, the patient is positioned on the left side, with the right hip and knee flexed forward and the body rotated partially toward the mattress. Nursing resources commonly identify the left-sided posture as the standard Sims configuration, particularly for procedures such as enemas and certain rectal examinations.
The left lateral position is frequently selected because it provides convenient access to the rectal region and is well established in nursing procedural practice. During an enema, for example, the left-sided posture is commonly used while the patient remains supported by the bed. The choice should nevertheless be based on the patient’s clinical circumstances and the specific procedure rather than treated as an inflexible rule.
A typical left-sided arrangement includes:
The patient is turned onto the left side.
The lower, left leg remains relatively extended.
The right hip and knee are flexed forward.
The trunk is rotated slightly toward the mattress.
The left arm is positioned safely and comfortably rather than being trapped underneath the torso.
The right arm is positioned in a comfortable location that does not interfere with the procedure.
A pillow or other support is placed beneath the upper leg when necessary.
Traditional descriptions may vary in the exact placement of the arms and degree of flexion. For example, some clinical references describe the left arm as positioned behind the body, while contemporary nursing skills resources emphasize comfortable arm placement and avoiding compression underneath the patient.
The right lateral Sims variation reverses the orientation. The patient lies on the right side, and the opposite leg becomes the upper, flexed leg. This variation may be useful when the patient’s condition, injury, surgical site, equipment, or procedural requirements make the left side inappropriate.
The ability to modify the position is an important aspect of positioning patients safely. For example, if a patient has an injury involving the left hip, a surgical wound on the left side, or a medical device that would be compressed by left-sided positioning, the clinician may need to consider an alternative side or another appropriate patient position.
The left-sided form should therefore be understood as the standardly taught configuration, not as a requirement that overrides patient-specific considerations. Positioning decisions should account for:
The purpose of the procedure.
The patient’s mobility and range of motion.
Existing wounds or pressure injuries.
Pain or musculoskeletal limitations.
Recent surgery.
Presence and location of drains, catheters, and other devices.
The need for adequate anatomical access.
The patient’s ability to tolerate the posture.
The importance of individualized positioning becomes particularly clear in patients with joint limitations. A patient with severe arthritis or a knee replacement, for example, may be unable to flex the upper hip and knee adequately. Clinical literature notes that a modified Sims posture may be necessary for some patients with arthritis or knee replacements and may also be useful for certain pregnant patients during anorectal examination.
Thus, the goal is proper positioning, not forcing every patient into an identical configuration. If the standard left-sided posture cannot be achieved safely, the position can be modified or another appropriate position can be selected.
Body Alignment and Anatomical Features
Correct body alignment is central to safe patient positioning. In the Sims Position, the patient’s body should be arranged so that the semi-prone posture is maintained without unnecessary twisting, excessive joint stress, compression, or instability.
The principal anatomical regions requiring attention are the head and neck, shoulders and arms, spine and trunk, pelvis, hips, knees, and ankles.
Head and Neck
The head should remain in a comfortable, neutral alignment with the neck supported as necessary. A pillow may be adjusted to prevent excessive lateral flexion or rotation of the neck.
The objective is not simply comfort. Excessive neck rotation can create muscular strain and may be particularly problematic in patients with cervical spine disease, restricted mobility, or neurological conditions.
For example, if the pillow is too high, the head may be pushed upward and the neck laterally flexed. If it is too low, the patient’s head may drop toward the mattress. Both situations can interfere with comfortable alignment.
Shoulders and Arms
The arms should be positioned so that they are not trapped beneath the patient’s torso. Nursing fundamentals specifically emphasize keeping the arms comfortably positioned rather than underneath the body.
This is important because prolonged compression can cause discomfort and may contribute to nerve or soft-tissue compression. The upper arm can be supported with a pillow when needed, particularly if the patient will remain in the position for an extended period.
The nurse should also verify that intravenous lines, blood pressure cuffs, oxygen tubing, and other equipment are not compressed or kinked by the patient’s body.
Spine and Trunk
The spine should be supported in a comfortable alignment while allowing the forward rotation that characterizes the Sims Position. The trunk should not be twisted excessively.
The patient is neither completely supine nor completely prone. Instead, the torso assumes an intermediate orientation. This partial rotation is what gives the posture its semi-prone position classification and helps expose posterior structures.
Pelvis and Hips
The pelvis should remain stable, while the upper hip is flexed forward. The degree of hip flexion should be adapted to the patient’s mobility and the requirements of the procedure.
Excessive hip flexion may create discomfort in patients with hip pathology or limited range of motion. Conversely, insufficient flexion may make it difficult to maintain the intended posture.
A pillow under the upper leg can help support the hip and knee and prevent the upper leg from falling forward or pulling the pelvis into an uncomfortable position. Nursing fundamentals specifically recommend a pillow under the upper leg in Sims positioning.
Knees and Lower Extremities
The upper knee is typically flexed forward while the lower leg remains more extended. This asymmetrical arrangement contributes to the stability of the posture.
The lower extremities should be supported according to the patient’s needs, particularly when the patient has limited muscle control, weakness, contractures, or reduced mobility. Positioning aids should be used to prevent the legs from resting against one another in a way that creates unnecessary pressure.
Posterior and Perineal Access
One of the defining anatomical advantages of the Sims Position is the access it can provide to the posterior and perineal regions.
The forward rotation of the pelvis and trunk can make the buttocks and anal region more accessible during selected procedures. This explains why the position is commonly associated with enema administration and rectal assessment. In rectal examination, the lateral decubitus/Sims posture allows the examiner to access and inspect the anorectal region while the patient remains supported on the side.
The degree of exposure required varies according to the procedure. The position should never be exaggerated simply to increase exposure. Instead, the clinician should achieve the minimum degree of movement necessary to perform the intended procedure safely and effectively.
Pressure Distribution
Body alignment also has implications for pressure management. Side-lying and semi-prone positions redistribute pressure away from some areas that bear weight in supine positioning, but they introduce or increase pressure on other anatomical sites.
Depending on the patient’s body habitus and the duration of positioning, areas requiring attention can include:
Shoulder and scapular region
Hip and greater trochanter
Knee
Ankle
Other bony prominences
Patients who are immobile, have impaired sensation, poor circulation, fragile skin, or existing pressure injuries require particularly careful assessment. Current pressure-injury guidelines emphasize avoiding positioning directly on pressure ulcers and bony prominences and using individualized repositioning and support strategies.
Therefore, proper positioning of patients involves balancing procedural access with pressure protection. A position that provides excellent access but creates unnecessary pressure or discomfort is not necessarily appropriate.
Overall Alignment
Before considering the Sims Position complete, the nurse should look at the patient as a whole rather than checking each body part independently. The final posture should demonstrate:
A stable semi-prone orientation.
Appropriate alignment of the head and neck.
Uncompressed and supported arms.
Comfortable trunk rotation.
Stable pelvic positioning.
Appropriate flexion of the upper hip and knee.
Adequate support beneath the upper leg when required.
No unnecessary pressure on vulnerable areas.
No obvious obstruction or kinking of medical devices.
Sufficient anatomical access for the intended clinical task.
For example, consider a patient requiring an enema who has adequate mobility and no contraindication to left-sided positioning. The patient may be placed in the left lateral Sims position, with the upper right hip and knee flexed, the trunk partially rotated toward the mattress, and the upper leg supported by a pillow. The nurse then checks that the patient’s head and neck are comfortable, the arms are free from compression, the patient’s body is stable, and the equipment required for the procedure remains accessible. This illustrates how the Sims Position combines anatomical positioning with broader principles of patient comfort and safety.
Ultimately, understanding the anatomy of the Sims Position helps explain why the posture is useful. Its characteristic semi-prone orientation is not arbitrary; the combination of lateral placement, forward trunk rotation, and asymmetric lower-extremity positioning creates a posture that can provide posterior access while maintaining substantial body support. Correct patient positioning therefore depends on both recognizing the characteristic shape of the position and adapting it appropriately to the individual receiving care.
Clinical Applications of the Sims Position
The Sims Position has several applications in patient care because its semi-prone, side-lying configuration provides access to the posterior, perineal, and anorectal regions while allowing the patient to remain supported on the side. The position is particularly associated with procedures involving the rectum and lower gastrointestinal tract, although its usefulness extends to selected examinations and situations in which another position may be poorly tolerated. Nursing references commonly identify the Sims Position as a procedure-specific position rather than simply a general resting posture.
The clinical application of the position should always be determined by the purpose of care and the patient’s individual needs. Factors such as mobility, pain, joint range of motion, body habitus, level of consciousness, recent surgery, pregnancy, existing wounds, and medical devices can influence whether the position is appropriate.
For example, a patient who needs an enema and can safely lie on the left side may be placed in the Sims Position to provide access to the anal region. In contrast, a patient with a painful left hip may require a modified approach or a different appropriate patient position. Similarly, although the position can facilitate certain examinations, it should not automatically replace the lithotomy, prone jackknife, or other positions when those provide better exposure or are clinically indicated.
Sims Position in Patient Care
In general nursing practice, the Sims Position is used when a patient’s body needs to be arranged in a semi-prone, side-lying posture to facilitate a particular aspect of care. The position is especially useful when access to the buttocks, anus, rectum, perineum, or selected posterior structures is required.
A major advantage is that the patient does not need to remain completely prone. This can make the position useful for patients who may have difficulty tolerating a prone posture but can safely maintain a side-lying position.
Common applications include:
Rectal and perineal procedures: The position provides access to the anal and perineal regions.
Enema administration: The left-sided Sims posture is commonly used when administering an enema.
Rectal medication administration: Suppositories and selected rectal medications are commonly administered with the patient in the left-sided Sims posture.
Selected rectal examinations: A lateral decubitus or Sims-type posture may be used when another examination position is unsuitable.
Selected vaginal or perineal examinations: The position can provide access in particular circumstances, although other positions may provide superior exposure for many gynecological procedures.
The position also has practical implications for nursing care. When using the Sims Position, the nurse must ensure that the patient is adequately supported and that the posture does not compromise circulation, respiratory function, skin integrity, or the safety of attached equipment.
For example, consider a patient who requires a rectal suppository but has limited mobility. Rather than asking the patient to stand or assume a more demanding examination posture, the nurse may position the patient on the left side with the upper leg flexed, provide appropriate support, and expose only the area required for medication administration. This approach combines procedural access with privacy and patient comfort. Nursing fundamentals specifically describe left-sided Sims positioning for rectal medication administration.
Importantly, the Sims Position is not itself a treatment. It is a means of positioning the body to facilitate another clinical intervention. The nurse should therefore always ask: What is the purpose of the procedure, and does this position provide adequate access while remaining safe for this particular patient?
Sims Position for Enema Administration
One of the best-known uses of the Sims Position is enema administration. An enema involves introducing a liquid preparation into the rectum for therapeutic, diagnostic, or bowel-evacuation purposes. Contemporary nursing literature identifies enemas as interventions that may be used for purposes such as relieving severe constipation, administering medication, or preparing the bowel for certain procedures.
The left lateral Sims Position is commonly used because it provides access to the anal opening while keeping the patient supported on the side. Nursing skills guidance specifically instructs placing the patient on the left side with the upper leg flexed over the lower leg toward the waist when administering an enema.
The positioning serves several practical purposes:
It provides access to the anus without requiring the patient to lie completely prone.
It allows the upper leg to be moved forward, creating room for the procedure.
It can help maintain patient stability during administration.
It facilitates privacy because only the buttocks and anal region need to be exposed.
It can be adapted with pillows and positioning aids according to patient needs.
Before the procedure, the nurse should explain what will happen, provide privacy, assess the patient’s condition, and follow the applicable institutional policy and prescribed procedure. Enema administration is an invasive and highly personal intervention, and professional nursing literature emphasizes competency, patient-centred care, privacy, dignity, and appropriate documentation.
The positioning process should be performed carefully rather than treating the Sims Position as a simple turning maneuver. For example, the nurse may:
Explain the procedure and obtain the necessary consent according to institutional requirements.
Provide privacy and expose only the area required.
Assist the patient onto the left side.
Flex the upper hip and knee while maintaining a comfortable lower leg position.
Place a protective pad beneath the patient as appropriate.
Support the upper leg with a pillow if needed.
Ensure the patient’s head, neck, arms, and spine remain comfortable.
Confirm that the patient’s medical devices are not compressed or displaced.
Proceed according to the prescribed enema procedure and institutional policy.
Reassess the patient after the intervention.
The enema itself must be administered according to the prescribed preparation, manufacturer’s instructions, and local clinical policy. The Sims Position facilitates access; it does not determine the type, volume, temperature, administration rate, or retention time of the enema.
Patient response should also be monitored. Possible problems during or following rectal procedures include cramping, discomfort, bleeding, dizziness, or a vasovagal response. Nursing guidance specifically notes that vagal stimulation can cause a reduction in heart rate and blood pressure during rectal medication administration.
For example, if a patient becomes pale, sweaty, dizzy, or faint during a rectal procedure, the nurse should not simply continue because the patient is already in the correct position. The intervention should be paused as appropriate, the patient’s condition assessed, and appropriate clinical action taken according to the patient’s status and institutional protocol.
Thus, the value of the Sims Position during an enema is not merely that it places the patient on the left side. Its value comes from creating appropriate anatomical access while supporting privacy, stability, and safe delivery of the intervention.
Sims Position for Rectal Examination
The Sims Position can also be used for selected rectal examinations. A rectal examination may involve inspection of the perianal region, assessment of the anal sphincter, and digital examination of structures within reach of the examining finger. Clinical examination references describe the lateral decubitus, or Sims-type, position as particularly useful when a patient is too ill or otherwise unable to assume other examination positions.
A commonly described arrangement places the patient on the left side with the buttocks close to the edge of the examining surface and the right hip and knee flexed. The exact degree of flexion depends on the examination and the patient’s physical capabilities.
This posture can facilitate assessment of:
Perianal skin
Hemorrhoids
Fissures
Fistulous tracts
Rectal prolapse
Masses
Tenderness
Sphincter tone
Other abnormalities of the anorectal region
A rectal examination may begin with external inspection before digital palpation. Clinical examination guidance emphasizes examining the perianal region for abnormalities and assessing findings such as lesions, hemorrhoids, fistulas, blood, and rectal prolapse.
The Sims Position can be particularly valuable when a patient cannot comfortably assume the prone jackknife or lithotomy position. For instance, a patient with severe arthritis, a knee replacement, or certain mobility restrictions may have difficulty flexing both hips and knees or maintaining a more demanding examination posture. A clinical review of rectal bleeding identifies Sims’ modified left lateral decubitus position as one of the options for proctologic examination and notes that it may be particularly useful for patients with arthritis, knee replacements, or pregnancy.
However, the Sims Position is not necessarily the optimal position for every rectal examination. Clinical Methods notes that the prone jackknife position may provide better access for a comprehensive proctologic examination, while the lateral/Sims posture is particularly useful when other positions cannot be assumed.
This distinction is important in clinical decision-making. The appropriate patient position should be selected according to:
The purpose and extent of the examination.
The patient’s mobility and physical limitations.
The degree of anatomical exposure required.
The patient’s tolerance and comfort.
The presence of pain, wounds, or recent surgery.
The clinician’s examination technique.
The need for assistance or a chaperone.
For example, an otherwise mobile patient undergoing a comprehensive anorectal procedure may be appropriately positioned according to the clinician’s preferred examination technique. A patient with severe knee limitations, however, may be unable to tolerate the same posture and may be better served by a modified lateral approach.
The Sims Position therefore functions as an important alternative when patient factors make another examination posture unsuitable. It demonstrates a broader principle of patient care: positioning should be adapted to the individual rather than forcing every patient into a standardized posture.
Sims Position for Vaginal Examination
The use of the Sims Position for vaginal examination requires more clinical nuance than its use for enemas or rectal procedures. Although the posture can provide access to the vaginal and posterior pelvic regions in selected circumstances, gynecological examinations commonly use other positions, particularly lithotomy, depending on the examination and the anatomical structures that need to be visualized.
The choice of position for a vaginal examination depends on several factors:
The purpose of the examination
The anatomical structures requiring visualization
The equipment being used
The clinician’s examination technique
The patient’s mobility and physical condition
Patient comfort and dignity
The degree of exposure required
The Sims posture can be useful when the patient cannot tolerate a standard lithotomy position or when a lateral approach provides adequate access for the particular examination. Its side-lying orientation may also be preferable in certain patients because it avoids requiring the patient to assume a position involving substantial hip abduction and leg elevation.
For example, a patient with significant hip stiffness may find the standard lithotomy position uncomfortable or physically difficult. If the intended examination can be adequately performed from a lateral or semi-prone posture, a clinician may consider a modified approach rather than forcing the patient into a position that causes pain.
At the same time, the Sims Position should not be presented as universally interchangeable with lithotomy. The lithotomy position generally provides greater direct exposure of the vulva, vagina, and cervix for many gynecological procedures. Consequently, the clinician must select the position that provides sufficient access for the specific examination while minimizing unnecessary discomfort.
During any vaginal examination, positioning is only one component of safe care. The patient should receive an explanation of the procedure, appropriate consent should be addressed, privacy should be maintained, and unnecessary exposure should be avoided. Because vaginal examinations are intimate procedures, communication and patient dignity are particularly important.
The term Sims speculum also requires clarification. The Sims speculum is an instrument associated historically with gynecological examination, whereas the Sims Position is a body posture. They should not be treated as the same thing. A clinician’s choice of examination instrument and position depends on the intended procedure and required visualization.
This distinction is especially important when discussing the historical Sims Position. The position and the Sims vaginal speculum share an historical association with James Marion Sims, but the presence of the instrument does not automatically mean that the patient must be placed in the Sims posture. Modern gynecological practice uses multiple instruments and examination positions depending on clinical requirements.
Other Clinical Uses
Beyond enemas, rectal examinations, and selected vaginal procedures, the Sims Position may have additional applications in situations where a semi-prone or side-lying posture provides practical access or improves a patient’s ability to tolerate care.
One such application is rectal medication administration. Nursing skills guidance specifically recommends positioning a patient on the left side in the Sims posture when administering rectal suppositories. The upper leg is flexed over the lower leg, and the patient remains on the side after administration according to the medication’s requirements.
This application illustrates why the Sims Position is useful beyond enemas. The position provides access to the rectum while allowing the patient to remain relatively stable and supported. It may also make the procedure easier to perform while maintaining privacy.
Another potential application is facilitating selected perineal care when access to the posterior or perineal area is necessary. Depending on the patient’s condition and the nature of the care, a lateral or semi-prone posture may provide access without requiring the patient to assume a full prone position.
The position can also be considered when an alternative posture is difficult for a patient to tolerate. For example:
A patient with restricted knee movement may not tolerate certain examination positions.
A patient with limited hip mobility may require a modified lateral approach.
A pregnant patient undergoing selected anorectal assessment may benefit from a lateral approach when another position is less appropriate.
A patient with significant weakness may require a supported side-lying posture rather than a position requiring independent balance or extensive lower-extremity movement.
However, these applications should not lead to the assumption that the Sims Position is a general-purpose position for every patient or every procedure. A position should be selected because it fulfills a specific clinical requirement and can be maintained safely.
The broader principle is appropriate patient positioning. Nurses and other healthcare professionals should match the position to the clinical objective while considering the patient’s individual characteristics. A position that improves procedural access but creates pain, compromises circulation, places excessive pressure on a vulnerable area, or interferes with medical equipment may not be appropriate.
For example, if a patient needs posterior perineal care but has a pressure injury over the hip on the side that would bear the greatest weight in the proposed Sims posture, the nurse should reassess the plan. A modified position, additional support, or an alternative position may be necessary to protect the affected area.
Similarly, if a patient has a recent surgical wound, drain, catheter, or other device located on the side being positioned against the mattress, the nurse should assess whether the Sims Position could cause compression or displacement. The clinical purpose of positioning must always be balanced against potential risks.
Overall, the clinical applications of the Sims Position center on its ability to combine side-lying support with posterior access. Its most established nursing applications include enema administration and rectal medication administration, while its modified forms can be useful during selected rectal examinations, perineal care, and situations where another examination posture is difficult to tolerate.
The key consideration in every case is not simply whether the patient can be placed in the position, but whether the Sims Position is the appropriate patient position for the specific clinical objective and the individual patient’s condition. This approach allows positioning to function as an intentional component of patient care rather than as a routine mechanical task.
How to Position a Patient in the Sims Position
Correctly placing a patient in the Sims Position requires more than simply turning the patient onto one side. The posture is a controlled semi-prone position that combines side-lying with forward rotation of the trunk and flexion of the upper hip and knee. Standard nursing references describe the patient as being positioned between the prone and lateral positions, with the legs flexed and the upper leg supported by a pillow. The arms should remain comfortably positioned rather than being trapped underneath the body.
The exact arrangement can be adjusted according to the patient’s mobility, body size, pain, physical limitations, procedure, and clinical condition. The goal of proper patient positioning is to achieve the required anatomical access while maintaining alignment, stability, comfort, privacy, and safety. Positioning should therefore be treated as an individualized nursing intervention rather than a rigid sequence that must look identical in every patient.
Preparing the Patient
Preparation is an essential part of using the Sims Position safely. Before moving the patient, the nurse should determine why the position is required and whether the patient can safely tolerate it. This is particularly important when the position is being used for an invasive or intimate procedure such as an enema, rectal medication administration, or rectal examination.
The nurse should first explain what will happen and why the patient needs to be repositioned. Clear communication can reduce anxiety and allows the patient to participate as much as their condition permits. The explanation should include what movement the patient can expect, which parts of the body will need to move, and what the patient should do if they experience pain, dizziness, shortness of breath, or other discomfort.
Before positioning, assess factors that could affect the safety of the maneuver, including:
Level of consciousness and ability to follow instructions
Muscle strength and mobility
Range of motion of the hips, knees, shoulders, and spine
Existing pain or musculoskeletal problems
Recent surgery or injury
Skin condition and existing pressure injuries
Presence of wounds, drains, catheters, intravenous lines, or other devices
Ability to maintain the position independently
Need for assistance from another healthcare worker
This assessment is particularly important for patients who cannot reposition themselves. An immobile patient may require additional assistance to prevent falls, shearing, friction, or musculoskeletal injury. Nursing guidance emphasizes assessing mobility and using appropriate positioning devices to maintain alignment and prevent complications associated with immobility.
The environment should also be prepared before the patient is moved. The bed should be positioned at an appropriate working height for the caregiver, and the brakes should be locked. Any unnecessary equipment should be moved out of the way, while necessary equipment should be arranged so that it does not become caught underneath the patient during repositioning.
Privacy is especially important when the Sims Position is being used for an enema, rectal examination, rectal medication, or another procedure involving the perineal area. The patient should be covered appropriately, exposing only the area necessary for the procedure. OpenStax clinical nursing guidance specifically includes privacy and draping as part of preparation for rectal medication administration in the Sims posture.
If the patient is able to participate, encourage them to assist with the movement. For example, a patient with adequate upper-body strength may be able to bend the knees and help rotate the trunk. A patient with weakness or altered consciousness, however, may require a two-person repositioning technique or another appropriate method based on facility policy.
The nurse should also consider whether the left lateral position is appropriate. Although the conventional Sims posture is generally taught on the left side, patient-specific circumstances may require modification. A painful left hip, surgical wound, pressure injury, or medical device on the left side may make the standard arrangement inappropriate.
Preparation should therefore answer three questions:
Why is the patient being positioned?
Can the patient safely tolerate the required posture?
What assistance and positioning aids are necessary to achieve it safely?
Only after these considerations have been addressed should the patient be moved into position.
Step-by-Step Left Lateral Positioning
The conventional left lateral Sims Position places the patient on the left side with the upper, right leg flexed forward. Nursing fundamentals describe Sims positioning as being halfway between the supine and prone positions, with the legs flexed and a pillow supporting the upper leg.
A general sequence for positioning a patient is as follows:
1. Explain the procedure and provide privacy. Tell the patient what position is required and explain how the movement will occur. Close the curtain or door and use a sheet or drape to preserve dignity.
2. Perform hand hygiene and use appropriate protective equipment. The level of protection required depends on the procedure. For procedures involving the rectal area or body fluids, gloves and other appropriate protective equipment should be used according to clinical policy.
3. Assess the patient’s ability to move. Determine whether the patient can turn independently or requires assistance. Do not ask a weak or unstable patient to reposition independently if doing so creates a risk of falling.
4. Adjust the bed appropriately. Lock the bed wheels and place the bed at a safe working height. If the procedure requires access to the rectal or perineal area, position the patient appropriately in relation to the edge of the bed or examination surface while maintaining safety.
5. Begin from a safe starting position. The patient is commonly positioned initially in the supine position before being assisted toward the left side, unless the patient’s condition or procedure requires another starting position.
6. Move the patient toward the left side. Assist the patient to roll so that the left side of the body becomes the dependent side. The trunk should then be rotated slightly forward toward the mattress rather than remaining completely flat on the side.
7. Flex the upper leg. The right hip and knee are flexed forward toward the patient’s waist. The lower left leg remains comparatively less flexed. This asymmetry helps establish the characteristic Sims posture.
8. Position the arms safely. Both arms should be arranged comfortably and should not be trapped underneath the torso. Nursing fundamentals specifically recommend placing the arms comfortably beside the patient rather than underneath the body.
9. Support the upper leg. A pillow can be placed beneath the right leg to support the hip and knee and help maintain the position.
10. Check overall alignment. Look at the patient from the head toward the feet. Confirm that the head and neck are comfortable, the trunk is appropriately rotated, the pelvis is stable, and the legs are supported.
11. Check equipment and pressure areas. Make sure that tubing, catheters, drains, and other equipment are not underneath the patient or being compressed. Nursing guidance emphasizes checking medical devices during repositioning and completing a skin assessment when the patient’s position changes.
12. Reassess the patient. Ask whether the position is comfortable and assess for pain, pressure, dizziness, respiratory difficulty, or other problems.
The final posture should clearly resemble a position between lateral and prone, rather than a completely side-lying posture. OpenStax describes the Sims posture as semiprone, while the lateral position is described separately as side-lying with the upper leg flexed for support.
For example, if a patient is being prepared for an enema, the nurse would generally position the patient on the left side, flex the upper leg forward, support it appropriately, and maintain adequate exposure of the anal region while keeping the remainder of the patient covered. This arrangement provides access without requiring the patient to lie completely prone.
The procedure should never be rushed simply because the patient has already been turned onto the correct side. Each movement should be followed by an alignment and safety check.
Positioning the Head, Arms, Hips, and Legs
Once the patient is on the left side, attention should be given to each major body region. Correct positioning of patients is achieved by coordinating the entire body rather than focusing only on the legs.
Head and Neck
The head should be supported so that the neck remains comfortable and appropriately aligned with the spine. A pillow of suitable height can be used to fill the space between the head and mattress.
An excessively high pillow can force the neck upward and sideways, while inadequate support can allow the head to fall toward the mattress. The appropriate height depends on the patient’s body structure, shoulder width, mattress characteristics, and existing neck conditions.
For example, a patient with broad shoulders may require more head support than a smaller patient because the distance between the head and mattress changes when lying on the side.
Arms
The arms should remain free from compression. The lower arm should not be trapped underneath the patient’s torso, because prolonged pressure can cause discomfort and potentially contribute to nerve or tissue compression.
The upper arm may be placed comfortably in front of the body or supported on a pillow, depending on the patient’s needs and the clinical procedure. The essential principle is that the arm should remain stable without creating excessive shoulder rotation or pressure.
Some traditional descriptions of Sims positioning specify particular arm arrangements, but contemporary nursing resources emphasize comfort and avoiding placement underneath the body.
This distinction is useful in practice because the exact arm position may need to be adapted. A patient with shoulder pain, for example, may not tolerate a position that requires significant shoulder extension or rotation.
Hips and Pelvis
The pelvis should remain stable while the upper hip is flexed forward. The upper hip should not be forced into a position beyond the patient’s comfortable range of motion.
The forward movement of the upper hip helps create the characteristic semi-prone position and contributes to access to the posterior region. However, excessive flexion may produce pain, particularly in patients with hip arthritis, recent orthopedic surgery, or restricted joint movement.
The nurse should therefore distinguish between proper positioning and forced positioning. The goal is not to achieve the greatest possible hip flexion but to obtain sufficient positioning for the intended clinical task.
Upper Leg and Knee
The upper, right leg is typically flexed at the hip and knee and brought forward toward the waist. The lower, left leg remains comparatively extended or less flexed.
This asymmetrical arrangement is one of the features that distinguishes the Sims posture from a simple lateral position. OpenStax describes the Sims position as involving the upper leg flexed over the lower leg toward the waist.
A pillow beneath the upper leg can provide support and reduce the effort required to maintain the posture. The support should extend sufficiently to stabilize the leg without placing excessive pressure behind the knee.
Lower Leg and Ankle
The lower leg should remain in a comfortable position and should not be forced into rotation. The ankle should be free of unnecessary pressure against the mattress or the opposite limb.
In patients who will remain positioned for an extended period, the nurse should assess vulnerable areas such as the ankle and other bony prominences. Positioning devices may be necessary depending on the patient’s pressure-injury risk.
Overall Body Relationship
After positioning individual body parts, the nurse should reassess their relationship with one another. The patient’s:
Head should remain comfortably aligned with the trunk.
Shoulders should be supported without excessive rotation.
Spine should remain appropriately aligned.
Pelvis should be stable.
Upper hip and knee should be flexed sufficiently for the intended posture.
Lower extremity should remain comfortable and supported.
Arms should be free from compression.
Medical equipment should remain accessible and unobstructed.
This whole-body assessment is particularly important in patients with limited mobility. A posture that appears correct at first may gradually deteriorate as the patient relaxes, becomes fatigued, or slides on the mattress.
Using Pillows and Supports
Pillows and other positioning devices are important components of patient positioning because they help maintain alignment, distribute pressure, stabilize the patient, and improve comfort. Nursing fundamentals specifically identify pillows, wedges, sheets, and towels as devices that can assist with alignment and comfortable positioning.
In the Sims Position, the most important support is commonly placed beneath the upper leg. This helps prevent the flexed leg from falling forward and reduces the amount of muscular effort needed to maintain the posture.
A practical arrangement may include:
Head pillow: Supports the head and maintains comfortable neck alignment.
Upper-leg pillow: Supports the flexed upper leg and helps stabilize the hip and knee.
Arm support: A pillow can support the upper arm when needed.
Additional positioning support: Wedges or folded blankets may be used when necessary to prevent excessive rolling or maintain stability.
Pressure-relieving devices: Appropriate cushions or specialized supports may be required for patients at increased risk of pressure injury.
The number and type of supports should not be standardized for every patient. A healthy, mobile adult undergoing a brief procedure may require only a head pillow and upper-leg support. A frail, immobile patient may require substantially more support to maintain alignment and protect vulnerable areas.
Pillows should also be placed carefully. A support that is too small may fail to stabilize the limb, while one that is excessively large can push the hip into an unnatural position. The nurse should reassess the patient’s posture after placing each support rather than assuming that more cushioning is necessarily better.
Pressure management is another important consideration. Immobile patients are vulnerable to pressure injuries, particularly over bony prominences. Nursing guidance recommends individualized pressure-injury prevention strategies, regular repositioning based on the patient’s condition, use of cushions, and assessment of the skin during position changes. It also emphasizes ensuring that IV and catheter tubing is not underneath the patient or pressing against the skin.
For example, a patient with fragile skin who is expected to remain in the Sims Position for an extended period may require careful support around the hip, knee, ankle, and other pressure-prone areas. The nurse should inspect the skin and adjust the supports if redness, discomfort, or excessive pressure is identified.
Supports should also never interfere with medical equipment. Before leaving the patient, verify that:
IV tubing is not trapped beneath the torso.
Urinary catheter tubing is not kinked.
Drainage systems remain positioned appropriately.
Oxygen tubing is not compressed.
Monitoring equipment remains functional.
No device is creating a pressure point.
The purpose of these supports is therefore broader than simply making the patient feel comfortable. They help maintain the proper positioning of patients while reducing preventable mechanical and pressure-related problems.
A useful example is a patient receiving a rectal medication. OpenStax recommends placing the patient on the left side with the upper leg flexed toward the waist and providing a drape beneath the buttocks to protect the linens. Once the patient is positioned, the nurse can use appropriate pillows or supports to maintain the posture without compromising access to the treatment area.
Ultimately, effective patient positioning in nursing involves continuous adjustment. The nurse should not position the patient, add pillows, and then assume the task is complete. The patient’s comfort, alignment, skin condition, circulation, respiratory status, and tolerance should be reassessed throughout care. A correctly positioned patient is one whose posture is appropriate for the clinical objective and whose body is adequately supported, protected, and monitored.
Comparing the Sims Position With Other Common Patient Positions
Understanding how the Sims Position differs from other common patient positions is essential because positioning is selected according to the clinical purpose, the anatomical area that needs to be accessed, and the patient’s ability to tolerate the posture. The Sims Position lies between the supine and prone positions, combining a side-lying orientation with partial forward rotation of the trunk. In contrast, supine positioning places the patient flat on the back, prone positioning places the patient on the abdomen, and lithotomy positions the patient supine with the hips and knees flexed and the legs supported.
These differences are clinically significant rather than merely descriptive. A position that is appropriate for a rectal examination may not provide the best exposure for a gynecological procedure, and a posture that facilitates surgery may not be appropriate for routine repositioning or a patient with limited mobility. Safe patient positioning therefore requires the nurse or clinician to match the position to the specific objective while considering comfort, mobility, anatomical access, pressure, circulation, respiratory function, and potential positioning injuries.
Sims Position vs. Supine Position
The supine position places the patient flat on the back, generally with the face directed upward. It is one of the most frequently used positions in healthcare because it provides relatively easy access to the anterior surface of the body and can be used for numerous assessments, procedures, and treatments. Pillows or other supports may be used beneath the head, arms, or lower extremities to improve alignment and comfort.
The Sims Position, by comparison, shifts the patient’s weight toward one side and partially toward the prone direction. The patient is therefore neither flat on the back nor completely on the abdomen. The upper leg is flexed, and a pillow may be placed beneath it to maintain the posture. This arrangement provides greater access to posterior structures than the supine posture while maintaining more side support than a fully prone position.
The major differences include:
Feature
Sims Position
Supine Position
Basic orientation
Side-lying and partially forward-facing
Flat on the back
Trunk
Partially rotated toward the mattress
Generally aligned with the back against the surface
Lower extremities
Upper leg flexed more prominently
Usually positioned more symmetrically
Primary access
Posterior, perineal, and anorectal areas
Anterior body and many abdominal/pelvic structures
Common procedural application
Enemas and selected rectal examinations
Numerous examinations and procedures
Relationship to prone
Intermediate between side-lying and prone
Opposite orientation from prone
The difference becomes particularly relevant when a procedure requires access to the rectum. A patient lying supine does not ordinarily provide the same direct access to the anal region as a patient in the Sims Position. Consequently, when an enema or rectal medication is being administered, the left-sided Sims posture is commonly selected because it provides access to the anus while allowing the patient to remain supported on the side.
The supine posture may nevertheless be preferable for many other clinical activities. For example, routine assessment of the anterior chest, abdomen, peripheral pulses, or many surgical sites can be performed more conveniently with the patient supine. Some procedures involving the pelvis may also require a variation of supine positioning, including the lithotomy position.
There are also differences in how the two positions affect pressure distribution. In supine positioning, pressure is concentrated over posterior structures such as the occiput, scapular region, sacrum, and heels. Prolonged pressure over these areas can contribute to pressure injury, particularly in patients with immobility, poor nutrition, impaired sensation, or reduced tissue perfusion. Patient repositioning and appropriate support are therefore important aspects of care.
The Sims Position changes the distribution of pressure because the patient is no longer lying directly on the back. However, this does not eliminate pressure-related risk. The dependent shoulder, hip, knee, ankle, and other bony areas still require assessment, particularly when the patient remains in the position for an extended period.
For example, a patient who has been lying supine for several hours may be repositioned into a supported Sims posture to redistribute pressure and provide comfort. The nurse should not assume that the new position is automatically safer; the new pressure points should also be assessed and supported appropriately.
Sims Position vs. Prone Position
The prone position places the patient on the abdomen, generally with the head turned to one side and the anterior surface of the body facing downward. It provides substantial exposure to the posterior surface and can have specific physiological applications. For example, prone positioning has been used to improve oxygenation in selected patients with severe respiratory disorders.
The Sims Position differs because the patient remains primarily on one side rather than directly on the abdomen. The trunk is partially rotated forward, and the upper hip and knee are flexed. This creates a semi-prone posture that provides some of the posterior access associated with prone positioning without requiring the patient to lie completely face-down.
The distinction can be understood through the orientation of the patient’s body:
Supine: back against the surface.
Sims: side with partial rotation toward prone.
Prone: abdomen against the surface.
The Sims Position may therefore be useful when posterior or anorectal access is needed but a fully prone posture would be uncomfortable, impractical, or inappropriate.
For example, consider a patient requiring a rectal examination who has severe knee arthritis. A prone jackknife position may provide excellent exposure but could be difficult for the patient to tolerate. A modified left lateral or Sims posture may provide adequate access while requiring less demanding positioning. Clinical literature specifically identifies the modified left lateral Sims posture as an option for patients with arthritis or knee replacements and for some pregnant patients undergoing proctologic examination.
The prone position, however, can provide better exposure for certain procedures. In proctologic practice, the prone jackknife position is often preferred when comprehensive visualization of the perineum and rectum is required. Clinical Methods notes that the prone jackknife posture may provide easier access for additional anorectal procedures, while the lateral/Sims approach can be particularly useful when the patient cannot assume another position.
This means that the Sims Position should not be considered a less important version of prone positioning. The two serve different purposes and may be selected according to the patient’s needs.
There are also important safety differences. Maintaining a prone posture may require careful attention to the airway, eyes, face, chest, abdomen, and pressure points. In perioperative settings, positioning-related injuries can include pressure, stretching, and compression injuries, with risk influenced by factors such as procedure duration and patient characteristics.
The Sims Position generally allows easier observation of the patient’s face and may be more convenient when ongoing communication is necessary. However, it still requires careful protection of dependent pressure areas and appropriate support of the limbs.
For instance, if a patient becomes anxious during a procedure, the side-lying Sims posture may allow the nurse to communicate more easily with the patient than a fully prone position. Conversely, if extensive posterior surgical exposure is necessary and the patient can safely tolerate it, a prone or prone jackknife position may be more appropriate.
The decision therefore depends on the clinical objective rather than simply choosing whichever position provides the greatest exposure.
Sims Position vs. Lithotomy Position
The lithotomy position is fundamentally different from the Sims Position. In lithotomy, the patient begins in a supine posture, with the hips and knees flexed and the legs supported, commonly with the feet or lower legs placed in stirrups. This position is widely used for gynecological, urological, and some rectal procedures.
The Sims Position, in contrast, is side-lying and semi-prone. It does not require the patient’s legs to be elevated in stirrups. This difference substantially changes the areas that are accessible and the physical demands placed on the patient.
Feature
Sims Position
Lithotomy Position
Starting orientation
Side-lying
Supine
Trunk
Partially rotated toward prone
Remains primarily supine
Legs
Upper leg flexed forward
Both hips and knees flexed
Leg support
Usually pillow or positioning aid
Leg supports or stirrups
Common use
Rectal procedures, enemas, selected examinations
Gynecological, urological, and selected rectal procedures
Vaginal access
Possible in selected circumstances
Generally provides broad access for many vaginal procedures
Patient movement
Primarily lateral rotation
Requires coordinated elevation and positioning of both legs
The lithotomy position often provides excellent access to the vulva, vagina, cervix, and pelvic structures. For this reason, it is frequently used for vaginal examination and many gynecological procedures. The Sims Position may provide an alternative in selected patients or procedures but does not provide identical exposure.
For example, if a clinician needs extensive visualization of the cervix for a procedure, lithotomy may be preferred because it provides direct access and allows the legs to be positioned to optimize the examination. If the objective is a rectal examination in a patient who cannot comfortably assume lithotomy, the lateral/Sims posture may be more appropriate. Clinical examination references recognize both positions as options for rectal assessment, with the choice depending on the clinical situation and the patient’s ability to assume the required posture.
Lithotomy also carries distinctive positioning considerations. During prolonged procedures, excessive or poorly supported hip and leg positioning can contribute to nerve compression, impaired lower-extremity perfusion, and other positioning-related complications. StatPearls notes that the legs should be raised and lowered together to reduce spinal torsion and muscular injury, while adequate padding is important to reduce nerve compression.
This makes the Sims Position potentially advantageous for certain patients because it avoids the need to elevate both legs into stirrups. A patient with significant hip stiffness, for example, may find lateral positioning easier than sustained lithotomy. However, the patient’s condition must always be assessed before choosing an alternative.
The choice is therefore not simply Sims versus lithotomy. Instead, the clinician should consider which posture provides the necessary anatomical access with the least unnecessary physical burden for that particular patient.
Stepwise Sims Positioning Guide
Selecting the Appropriate Position for Patient Care
Selecting an appropriate patient position requires clinical judgment. No single position is ideal for every procedure or every patient. The Sims Position, supine, prone, lateral, and lithotomy positions each have specific applications, advantages, and limitations.
The selection process should begin with the purpose of the care or procedure. Ask what anatomical area must be accessed and what degree of exposure is necessary.
For example:
Enema administration: The left-sided Sims posture is commonly used because it provides access to the rectal area.
Selected rectal examination: Sims/lateral decubitus may be appropriate, particularly when the patient cannot tolerate other positions.
Comprehensive anorectal procedures: A prone jackknife or lithotomy position may provide better exposure depending on the procedure and pathology.
Many anterior assessments: Supine positioning may provide the most straightforward access.
Selected respiratory conditions: Prone positioning may be used therapeutically in appropriately selected patients to improve oxygenation.
Many gynecological procedures: Lithotomy commonly provides the required pelvic and vaginal exposure.
The second consideration is the patient’s physical condition. A position should be feasible for the individual rather than selected solely according to the procedure.
Consider:
Mobility: Can the patient move independently?
Range of motion: Can the hips, knees, shoulders, and spine tolerate the required movement?
Pain: Will the position worsen an existing painful condition?
Skin integrity: Are there pressure injuries or vulnerable areas?
Neurological status: Does the patient have altered sensation or weakness that increases injury risk?
Respiratory status: Will the posture interfere with adequate ventilation?
Circulation: Could the position impair venous or arterial circulation?
Medical devices: Could movement compress, kink, or dislodge a catheter, drain, intravenous line, or other device?
Body habitus: Does the patient’s size or body configuration affect stability or access?
Procedure duration: Will the patient need to maintain the position briefly or for an extended period?
These factors are particularly important because positioning injuries can result from pressure, stretching, compression, or prolonged immobilization. AORN guidance emphasizes that the type and location of positioning injuries vary with the position, procedure duration, and individual patient risk factors such as age, weight, and frailty.
Patient comfort should also influence the decision. Comfort does not mean choosing the easiest position for the patient at the expense of the procedure, but it does mean avoiding unnecessary discomfort when equivalent clinical alternatives exist.
For example, suppose two positions can provide adequate access for a brief rectal examination. If the patient has severe knee stiffness that makes lithotomy painful but can comfortably tolerate the left lateral Sims posture, the lateral approach may be a reasonable choice. Clinical literature specifically recognizes the Sims position as useful for patients with arthritis or knee replacements when other proctologic examination positions are difficult to assume.
The clinical objective must nevertheless remain central. If a procedure requires extensive exposure that cannot be achieved adequately in the Sims posture, selecting it solely because it is more comfortable would be inappropriate. In such circumstances, the clinician may need to use another position and provide additional support, analgesia, assistance, or other measures to promote safety and tolerance.
A practical decision-making approach
A useful way to approach patient positioning in nursing is to consider the following sequence:
1. Identify the clinical purpose. Determine what examination, treatment, procedure, or care activity needs to be performed.
2. Identify the required anatomical access. Determine whether the anterior, posterior, perineal, pelvic, rectal, or another region needs exposure.
3. Consider available positions. Compare the Sims, supine, prone, lithotomy, and other appropriate options.
4. Assess the patient. Consider mobility, pain, range of motion, skin integrity, circulation, respiratory status, cognition, and existing medical devices.
5. Select the safest effective position. Choose the posture that provides adequate access while minimizing unnecessary risk.
6. Support the position appropriately. Use pillows, padding, positioning aids, and assistance as required.
7. Reassess continuously. Check comfort, alignment, circulation, respiratory status, pressure areas, and equipment after positioning and throughout prolonged procedures.
This approach prevents the common error of thinking that the “correct” position is determined only by the name of a procedure. In reality, the appropriate patient position is the one that allows the clinical objective to be achieved safely, effectively, and with appropriate consideration of the patient’s individual circumstances.
The Sims Position is particularly valuable because it provides an intermediate option between more distinctly lateral and prone postures. It can offer practical posterior access without requiring the patient to lie completely prone, and it may be preferable to lithotomy in selected patients who have difficulty with hip or knee positioning. At the same time, supine, prone, and lithotomy positions remain essential components of clinical practice because each provides anatomical or physiological advantages that the Sims posture cannot reproduce.
For safe patient positioning, the most important principle is therefore to match the position to the procedure, the anatomy being accessed, and the patient’s condition, while continually balancing procedural requirements with comfort, dignity, alignment, and prevention of positioning-related injury.
Patient Positioning Guidelines and Safety
Safe patient positioning is an essential component of nursing care because the way a patient is positioned can influence comfort, skin integrity, circulation, respiratory function, mobility, and the safety of medical devices. The Sims Position can be highly useful for procedures involving the rectal and perineal areas, but placing a patient into the position correctly is only the beginning of safe care. The nurse must also ensure that the patient’s body remains supported and aligned and that the position does not create preventable complications.
The principles of safe positioning of patients apply whether the patient will remain in the posture for a few minutes during a procedure or for a longer period as part of ongoing care. Individual factors such as age, mobility, nutritional status, sensory impairment, level of consciousness, existing wounds, body habitus, and comorbidities can influence positioning-related risks.
When using the Sims Position, nurses should consider five major safety priorities:
Maintaining anatomical alignment.
Reducing pressure and protecting vulnerable skin.
Preventing displacement or compression of tubes, drains, and other devices.
Monitoring comfort, circulation, and respiratory status.
Reassessing the patient after the position has been established.
These principles are interconnected. A pillow used to improve alignment, for example, may also redistribute pressure and improve comfort. Conversely, poorly placed support may create a new pressure point or compress a medical device. Therefore, proper patient positioning requires ongoing assessment rather than a one-time adjustment.
Maintaining Proper Body Alignment
Maintaining proper alignment is one of the fundamental patient positioning guidelines in nursing. Body alignment refers to arranging the head, neck, spine, pelvis, and extremities in a position that minimizes unnecessary strain on muscles, joints, nerves, and supporting tissues.
In the Sims Position, alignment differs from a completely lateral posture because the patient is partially rotated toward the prone direction. The upper leg is flexed at the hip and knee, while the lower leg remains less flexed. Appropriate support helps maintain this arrangement without forcing the patient’s joints beyond their comfortable range of motion.
The nurse should assess the patient’s alignment from head to toe rather than focusing only on the legs.
Head and neck
The head should be supported at a height that allows the neck to remain comfortable and reasonably aligned with the rest of the spine. A pillow that is too high can cause excessive lateral neck flexion, while insufficient support can allow the head to fall toward the mattress.
For example, a patient with broad shoulders may require a different pillow height from a smaller patient because the distance between the head and mattress changes when the patient assumes a left lateral position.
Shoulders and arms
The shoulders should remain in a comfortable position without excessive rotation or compression. The dependent arm should not be trapped beneath the patient’s torso.
The upper arm can be placed in front of the body or supported with a pillow when appropriate. The precise arrangement may be adapted to the patient’s comfort and the purpose of the procedure.
A patient with a painful shoulder, for instance, may require additional support rather than being asked to place the arm in an uncomfortable position simply to reproduce a textbook posture.
Spine and trunk
The trunk should be appropriately rotated so that the patient maintains the characteristic semi-prone configuration. Excessive twisting should be avoided.
The Sims Position should not be confused with simply rolling the patient completely onto the side. The forward rotation of the trunk contributes to the posture and facilitates access to the posterior and perineal regions.
Pelvis and hips
The pelvis should remain stable, while the upper hip is flexed forward to create the characteristic posture. The degree of hip flexion should be based on the patient’s range of motion and the requirements of the procedure.
Forcing the hip into excessive flexion can cause pain and place unnecessary stress on the joint. This is particularly relevant in patients with arthritis, recent hip surgery, or restricted mobility.
Knees and lower extremities
The upper knee is generally flexed forward and supported, commonly with a pillow. The lower leg should remain in a comfortable position without excessive rotation.
A pillow beneath the upper leg can help prevent the limb from falling forward and reduce muscular effort required to maintain the position. It can also help stabilize the pelvis.
Good alignment should therefore produce a stable posture rather than one in which the patient has to continuously contract muscles to prevent the upper leg or trunk from moving.
Preventing Pressure Injuries
Pressure injury prevention is another major component of safe patient positioning guidelines. Pressure injuries can develop when prolonged pressure, particularly over bony prominences, interferes with tissue perfusion. Shear and friction can further contribute to tissue damage.
The risk is not determined by position alone. Patients who are immobile, older, nutritionally compromised, incontinent, unable to sense discomfort, or experiencing impaired circulation may be particularly vulnerable.
The Sims Position changes the locations exposed to pressure compared with the supine or prone positions, but it does not eliminate pressure-related risk. The dependent shoulder, hip, knee, ankle, and other prominent areas should be assessed according to the patient’s condition and duration of positioning.
Important preventive measures include:
Assessing skin condition before and after positioning.
Identifying existing pressure injuries or areas of redness.
Using appropriate pillows, cushions, and pressure-redistributing devices.
Avoiding direct pressure on an existing wound whenever possible.
Keeping skin clean and dry.
Avoiding unnecessary friction and shearing during repositioning.
Repositioning the patient according to the individualized care plan.
Ensuring that wrinkles, tubing, and objects are not trapped beneath the patient.
For example, imagine a patient who requires the left lateral Sims Position for an extended procedure but has an existing wound over the left hip. Placing the patient directly on that area could increase tissue damage. The nurse should communicate the concern and determine whether a modified position or alternative posture can achieve the clinical objective while protecting the wound.
Pressure assessment should also continue during prolonged positioning. A patient may initially report no discomfort but later develop pain or numbness as pressure accumulates.
It is important to remember that visible skin changes are not the only indication of a positioning problem. Pain, numbness, tingling, or unusual sensitivity may signal excessive pressure or nerve compression and should prompt reassessment.
For patients at high risk, the nurse may need to use specialized support surfaces or additional pressure-redistributing equipment according to institutional policy and the patient’s individualized plan of care.
Protecting Tubes, Drains, and Medical Devices
Medical devices introduce another important consideration when positioning patients. Turning a patient into the Sims Position can unintentionally kink, compress, pull, or dislodge equipment if the nurse does not inspect the devices before and after the movement.
Potentially affected equipment includes:
Intravenous lines.
Urinary catheters.
Enteral feeding tubes.
Surgical drains.
Oxygen tubing.
Tracheostomy equipment.
Wound drainage systems.
Monitoring cables.
Epidural or other specialized catheters.
Before repositioning, the nurse should identify where each device is located and determine how it will move with the patient’s body.
For example, a patient with a urinary catheter should not be turned in a manner that causes the catheter tubing to become trapped underneath the hip. The tubing should remain free of kinks, and the drainage system should remain appropriately positioned.
Similarly, if a patient has a surgical drain near the hip or abdomen, turning toward that side could place pressure on the drain or alter its position. The nurse should account for the device before selecting the direction of rotation.
When the patient has multiple devices, repositioning may require assistance from another healthcare professional. One person can stabilize the patient while another monitors tubing and equipment.
After positioning, the nurse should verify:
The device remains in its intended location.
Tubing is not kinked.
Lines are not pulled tightly.
Drainage systems remain functional.
Connections remain secure.
No device is underneath a pressure-bearing part of the body.
Equipment remains accessible for monitoring.
This is especially important for patients who cannot communicate discomfort or device-related problems, such as patients who are sedated, unconscious, cognitively impaired, or mechanically ventilated.
For example, if a patient is turned into the Sims Position and subsequently develops an unexpected change in drainage, resistance in an infusion line, or altered oxygen delivery, the nurse should consider whether repositioning has affected the equipment.
The principle is straightforward: medical devices should move with the patient safely rather than becoming obstacles beneath or around the patient.
Monitoring Comfort, Circulation, and Respiratory Status
Patient comfort should be assessed throughout the positioning process. A patient who is uncomfortable may develop muscle tension, attempt to move independently, or be unable to maintain the required posture. Discomfort can also be an early indication that a joint is positioned incorrectly or that excessive pressure is occurring.
The nurse can assess comfort by asking questions such as:
“Are you comfortable in this position?”
“Are you experiencing pain anywhere?”
“Do you feel numbness or tingling?”
“Does anything feel too tight or under pressure?”
“Are you having any difficulty breathing?”
Communication should be adapted to the patient’s condition. A patient who cannot speak may communicate discomfort through facial expressions, agitation, withdrawal, changes in vital signs, or other behavioral indicators.
Circulation
Circulation should be considered whenever a patient’s limbs or joints are maintained in a particular posture. Excessive pressure or extreme joint positioning can interfere with blood flow.
The nurse should observe for signs such as:
Pallor or unusual discoloration.
Coolness of an extremity.
Swelling.
Numbness or tingling.
Weakness.
New pain.
Changes in peripheral pulses when clinically indicated.
The patient should not be left in a position that produces persistent numbness, severe pain, or evidence of impaired circulation.
For example, if the upper leg is positioned excessively or a support is pressing behind the knee, the patient may experience discomfort or circulatory compromise. The nurse should remove or reposition the support and reassess the extremity.
Respiratory status
Respiratory assessment is particularly important in patients with underlying respiratory disease, obesity, reduced consciousness, neuromuscular weakness, or other conditions that can make repositioning more physiologically demanding.
Although the Sims Position can be easier to tolerate than a completely prone posture for many patients, it can still alter chest and abdominal mechanics. The nurse should observe respiratory rate, depth, effort, oxygen saturation when indicated, and the patient’s subjective experience of breathing.
Signs requiring attention include:
Increased work of breathing.
Shortness of breath.
Decreased oxygen saturation when monitored.
Abnormal respiratory pattern.
Cyanosis.
Anxiety associated with difficulty breathing.
For example, if a patient is comfortable before positioning but becomes short of breath after being placed in a semi-prone posture, the nurse should not assume that the respiratory change is unrelated. The position should be reassessed and modified as clinically appropriate.
The same principle applies to circulation and comfort: a technically correct position is not safe if the patient is showing signs of physiological compromise.
Reassessing the Patient After Positioning
Reassessment completes the positioning process. After the patient has been placed in the Sims Position, the nurse should confirm that the position accomplishes its intended clinical purpose without creating new risks.
A useful post-positioning assessment includes the following:
1. Confirm the intended posture. Determine whether the patient is sufficiently rotated and whether the upper leg is appropriately flexed for the procedure.
2. Check body alignment. Assess the head, neck, shoulders, spine, pelvis, hips, and legs.
3. Assess support. Make sure pillows and positioning aids are providing stability without creating excessive pressure.
4. Assess skin and pressure areas. Look for redness, blanching abnormalities, discomfort, or other concerning findings according to the patient’s risk level.
5. Check medical devices. Inspect IV lines, catheters, drains, oxygen tubing, monitoring equipment, and other devices.
6. Assess comfort. Ask the patient whether the position causes pain, numbness, pressure, or anxiety.
7. Assess circulation. Observe extremities for changes in color, temperature, sensation, swelling, or other clinically relevant findings.
8. Assess respiratory status. Confirm that the patient is breathing comfortably and that monitoring parameters remain appropriate.
9. Confirm privacy and dignity. Ensure that unnecessary areas of the body remain covered, particularly when the Sims Position is being used for a rectal or perineal procedure.
10. Continue observation when the position is maintained. A patient who is expected to remain in the position should be reassessed according to their condition, procedure requirements, and facility policy.
Reassessment is particularly important because positioning-related problems can develop after the initial placement. A patient may gradually slide, rotate, become fatigued, or develop pressure as the procedure continues.
For example, a patient undergoing an extended rectal procedure may initially tolerate the left lateral position well. After several minutes, however, the patient may report increasing hip discomfort. The nurse should reassess the pillow placement and body alignment rather than simply encouraging the patient to tolerate the discomfort.
Similarly, if the patient begins reporting numbness in the dependent arm, the nurse should inspect the arm for compression and adjust the posture or support.
Reassessment should also occur whenever there is a significant change in the patient’s condition or whenever the patient is moved again. For patients with limited mobility or impaired sensation, objective assessment becomes particularly important because they may not reliably recognize or communicate early signs of pressure or nerve compression.
A simple way to conceptualize safe patient positioning in nursing is:
Assess → Prepare → Position → Support → Monitor → Reassess
This sequence emphasizes that positioning is a continuous nursing responsibility rather than a single physical maneuver. The Sims Position should provide the access required for care while preserving body alignment, protecting skin and medical equipment, supporting physiological stability, and maintaining patient dignity.
Comparing Sims Position with Other Common Patient Positions
Sims Position for Vaginal Procedures
The Sims Position has an established historical association with gynecological examination and vaginal procedures, although its use today is more selective than its use for procedures such as enemas and rectal examinations. The position places the patient in a lateral, partially rotated posture that can provide access to the vagina, cervix, and posterior vaginal structures without requiring the patient to assume the traditional dorsal lithotomy position. Historical and contemporary literature describes the left lateral decubitus approach as a useful alternative for selected pelvic examinations and procedures.
The choice of position for a vaginal procedure should be based on the specific examination, the anatomical structures that need to be visualized, the equipment being used, and the patient’s physical condition. Although dorsal lithotomy remains a commonly taught and widely used position for gynecological examinations, lateral positioning can be valuable in selected circumstances, including situations in which lithotomy is poorly tolerated or does not provide adequate visualization.
It is also important to distinguish the Sims Position from the Sims vaginal speculum. They are related historically but are not interchangeable terms. The position describes how the patient’s body is arranged, whereas the speculum is an examination instrument. The historical development of both is associated with J. Marion Sims, but modern clinicians select the position and instrument according to the requirements of the procedure rather than simply using them as a fixed combination.
Positioning for Vaginal Examination
A vaginal examination performed in the Sims Position requires careful attention to patient preparation, positioning, anatomical exposure, privacy, and communication. The lateral approach can be particularly useful when the patient cannot comfortably assume the standard lithotomy position or when a lateral approach offers better visualization for the particular examination.
In a typical lateral decubitus approach, the patient lies on the side with the knees flexed, while the upper leg is elevated or supported sufficiently to expose the perineal region. A published case series involving patients with severe obesity described a lateral examination in which the patient faced away from the examiner, the knees were bent, and an assistant elevated the upper leg to improve perineal exposure before speculum insertion.
The exact arrangement should be individualized rather than treated as a rigid formula. Before the examination, the clinician should explain the procedure and ensure that the patient understands what will happen. Because a vaginal examination is an intimate procedure, communication is particularly important.
Appropriate preparation includes:
Explaining the examination and the reason for performing it.
Addressing consent according to applicable clinical and institutional requirements.
Providing privacy while the patient undresses and is positioned.
Maintaining appropriate draping, exposing only the area required.
Assessing mobility and range of motion before asking the patient to assume the position.
Checking for pain or conditions that may make lateral positioning difficult.
Preparing the examination equipment before the procedure begins.
Ensuring adequate lighting for visualization.
Using appropriate infection-prevention measures and sterile or appropriately disinfected equipment according to the procedure.
The patient should also be encouraged to communicate throughout the examination. WHO guidance for speculum examinations emphasizes explaining the procedure beforehand and stopping the procedure if the patient experiences significant discomfort or pain.
The Sims Position may be especially helpful when the usual dorsal position is difficult to tolerate. For example, a patient with restricted hip mobility may experience considerable discomfort when asked to abduct both hips for lithotomy. A lateral approach may allow the clinician to obtain adequate access without placing the patient’s hips in the same degree of abduction.
Another example involves a patient with severe obesity in whom visualization of the cervix was unsuccessful in dorsal lithotomy. In a small case series, switching to the lateral decubitus position allowed successful cervical visualization in 10 of 11 patients and permitted the intended intrauterine procedures to be completed. The authors noted, however, that the evidence was based on a small series and should not be interpreted as proof that lateral positioning is superior for all patients.
This illustrates an important clinical principle: patient positioning can sometimes be modified when the standard approach does not provide adequate visualization. The alternative position should still provide sufficient access and should be appropriate for the particular procedure.
The examiner must also recognize that the lateral position may require assistance. An assistant may need to support the upper leg, maintain the patient’s stability, or help with equipment. This is particularly relevant when the patient has limited strength or cannot independently maintain the posture.
Vaginal and Posterior Access
One of the distinctive features of the Sims Position is the access it can provide to the vaginal canal and posterior pelvic structures from a lateral direction. Unlike a completely supine posture, the patient’s body is rotated so that the examiner approaches the perineal region from a different angle.
Historically, the lateral Sims posture was associated with attempts to improve visualization of the vagina and cervix during gynecological procedures. A 2021 review of the history of the position and speculum notes that J. Marion Sims popularized the left lateral decubitus position for gynecological examination and treatment and used the position and speculum in the treatment of vesicovaginal fistula.
Modern clinical experience demonstrates that lateral positioning can sometimes provide useful cervical visualization when the conventional approach is unsuccessful. In the severe-obesity case series discussed above, the examiner used the lateral position with the upper leg elevated and directed the posterior blade of the speculum toward the anus. This approach permitted visualization of the cervix in nearly all of the patients studied.
The concept of posterior access is important because the vagina is not simply a straight tube oriented vertically upward. The orientation of the vaginal canal and the position of the uterus and cervix vary among individuals. Factors such as uterine position, pelvic anatomy, body habitus, and previous surgery can influence the ease with which the cervix is visualized.
For example, a retroverted uterus may result in the cervix being oriented differently from that of a patient with an anteverted uterus. Standard pelvic examination guidance notes that uterine position can affect the location and orientation of the cervix during speculum examination.
Consequently, changing the patient’s position can sometimes change the relationship between the vaginal canal, speculum, and cervix.
However, improved access does not mean that the Sims Position should automatically be selected for every vaginal examination. The clinician must determine whether the lateral approach provides adequate visualization for the intended procedure.
The position may be particularly useful when:
The patient cannot comfortably tolerate lithotomy.
Hip or knee mobility is restricted.
A lateral approach provides better visualization.
Previous attempts at examination in lithotomy have been unsuccessful.
The patient’s body habitus makes conventional positioning difficult.
A particular vaginal or cervical procedure can be performed effectively from the lateral approach.
Patient dignity remains central. Because the position exposes an intimate anatomical region, the patient should remain appropriately covered until the examination begins, and only the necessary area should be exposed. Research examining women’s experiences with gynecological examinations has found that positioning without stirrups can reduce physical discomfort and feelings of vulnerability in some settings.
This does not mean that the lateral position is universally more comfortable. Patient preferences vary, and some patients may feel more stable in another posture. The clinician should therefore explain why a particular position is being recommended and allow the patient to communicate discomfort or concerns.
Sims Position vs. Lithotomy Position for Vaginal Procedures
The Sims Position and lithotomy position provide vaginal access in fundamentally different ways. The Sims approach uses a lateral or semi-prone orientation, whereas lithotomy begins with the patient supine and uses flexion and elevation of the legs to provide access to the perineum and vagina.
Dorsal lithotomy is commonly taught as the standard position for gynecological pelvic examination. Contemporary clinical guidance describes dorsal lithotomy with foot supports as the usual position for many gynecologic examinations.
The difference can be summarized as follows:
Feature
Sims Position
Lithotomy Position
Body orientation
Lateral and partially rotated toward prone
Supine
Legs
Upper leg flexed and supported
Both legs flexed and supported
Use of stirrups
Generally unnecessary
Commonly used
Vaginal access
Lateral/posterior approach
Direct perineal approach
Common clinical role
Selected examinations and procedures
Many routine pelvic and gynecological procedures
Useful when
Lithotomy is difficult or inadequate
Broad pelvic exposure is required
Patient movement
Primarily lateral
Requires coordinated positioning of both lower extremities
The lithotomy position can provide excellent exposure of the external genitalia, vaginal canal, and cervix. It is therefore appropriate for many procedures in which broad access is required.
The Sims Position, however, can serve as a useful alternative in selected situations. A published case series specifically examined patients whose cervix could not be visualized in dorsal lithotomy and found that lateral decubitus positioning improved visualization in nearly all of the patients studied.
This can be particularly relevant when patient anatomy or physical limitations make lithotomy challenging.
For example, imagine a patient with significant hip stiffness. Placing both legs into stirrups and maintaining substantial hip flexion and abduction may produce considerable pain. If the planned examination can be adequately performed from a lateral position, the Sims Position may reduce the mechanical demands placed on the hips.
Similarly, a patient with a previous lower-extremity injury may have difficulty assuming symmetrical lithotomy. A lateral approach can sometimes provide an alternative that requires less movement of the affected limb.
There is also evidence that examination without stirrups can influence how patients perceive gynecological examinations. A randomized clinical trial found that women undergoing examinations without stirrups reported less physical discomfort and a reduced sense of vulnerability compared with women examined using stirrups.
However, these findings should not be interpreted as evidence that the Sims Position should replace lithotomy. The study examined examination techniques without stirrups and did not establish that Sims positioning is universally superior. The clinical objective, provider experience, available equipment, and patient preference all remain important.
The choice can therefore be approached in practical terms:
Choose lithotomy when:
Broad vaginal and pelvic exposure is required.
The planned procedure is designed for dorsal positioning.
The patient can safely tolerate the required hip and knee positioning.
Appropriate leg supports are available.
The clinician requires the direct access provided by the position.
Consider a lateral/Sims approach when:
The patient cannot comfortably tolerate lithotomy.
Hip or knee limitations make symmetrical leg elevation difficult.
A previous examination in lithotomy has failed to provide adequate cervical visualization.
Patient-specific anatomical or physical factors favor a lateral approach.
The planned procedure can be safely and effectively performed from the lateral position.
The position should therefore be selected according to the clinical requirements and the individual patient, rather than assuming that one posture is inherently better than another.
Struggling with your nursing paper?
We’ll write a thorough, well-researched draft for you.”
The Sims Position and the Sims vaginal speculum are historically connected, but they represent two distinct components of gynecological practice. The Sims Position refers to the patient’s body posture, whereas the Sims speculum is a vaginal examination instrument.
The historical literature describes the development of the Sims speculum as an evolution from a bent pewter spoon to a lever-type instrument and eventually to the familiar two-bladed design. A 2021 review specifically examined the historical development of the instrument and the associated position.
The Sims speculum differs from the more commonly encountered bivalve speculum in its design and method of use. The two-bladed Sims speculum consists of blades that can be used to retract the vaginal walls and improve visualization. Its design has historically been particularly associated with visualization of the vaginal canal during gynecological procedures.
The historical association is significant because Sims used the position and speculum together during his work on vesicovaginal fistula repair. However, it would be inaccurate to conclude that a Sims speculum must always be used when a patient is in the Sims Position, or that every procedure involving a Sims speculum requires the patient to assume the Sims posture. Modern clinical practice selects instruments and positioning methods according to the examination or procedure being performed.
This distinction is particularly important for understanding modern vaginal examination.
A vaginal speculum is used to separate the vaginal walls so that the clinician can visualize structures such as the vaginal mucosa and cervix. Contemporary pelvic examination guidance describes speculum insertion as a controlled process in which the instrument is introduced gently, positioned appropriately, and opened carefully to visualize the cervix.
Regardless of the type of speculum used, the principles of safe examination remain important:
Explain the procedure before beginning.
Ensure appropriate consent.
Provide privacy and appropriate draping.
Use appropriate infection-prevention practices.
Select an appropriately sized instrument.
Use gentle insertion techniques.
Avoid unnecessary pressure on sensitive structures.
Communicate with the patient throughout the examination.
Stop or modify the examination if significant pain or distress occurs.
Document clinically relevant findings according to professional and institutional requirements.
WHO guidance similarly emphasizes patient explanation, privacy, appropriate preparation, equipment sterilization or appropriate single-use practices, and stopping the examination when the patient experiences significant discomfort.
The relationship between the instrument and the Sims Position can be understood through an example. Suppose a clinician needs to visualize the cervix in a patient whose cervix was difficult to visualize during a conventional examination. A lateral approach may alter the anatomical relationship sufficiently to improve visualization. In the published case series involving patients with severe obesity, the clinician used a vaginal speculum while the patients were positioned laterally, demonstrating that a lateral approach can be combined with speculum examination when clinically appropriate.
At the same time, a standard dorsal lithotomy examination may still be the better choice when it provides adequate visualization and the patient can comfortably and safely assume that posture.
The historical name attached to the position and instrument also deserves careful interpretation. Modern scholarship recognizes J. Marion Sims’ contributions to gynecological instrumentation and surgical techniques while also examining the serious ethical controversies surrounding his experimentation on enslaved women. Understanding this history is relevant when discussing why both the position and the instrument carry the Sims name, but historical recognition should not obscure the modern clinical principles of informed consent, patient autonomy, dignity, and ethical care.
In contemporary practice, the important lesson is not simply knowing that the Sims Position and Sims speculum share a historical origin. It is understanding that positioning and instrumentation are separate clinical decisions. The appropriate posture and examination instrument should be selected according to the patient’s anatomy, the purpose of the examination, the required visualization, the patient’s physical condition, and accepted clinical standards.
Nursing Considerations for the Sims Position
The Sims Position is not simply a technique for placing a patient on their side. In nursing practice, positioning is an intentional clinical intervention that requires assessment, preparation, communication, safety measures, and follow-up. Before placing a patient in the position, the nurse should determine whether the posture is appropriate for the planned procedure and whether the patient can safely tolerate the required movement of the hips, knees, shoulders, and spine.
Although the Sims Position is frequently associated with enemas and rectal procedures, it may also be used for selected examinations and procedures involving the perineal or vaginal region. Regardless of the indication, patient positioning in nursing should be individualized. The nurse must consider the patient’s mobility, pain, skin condition, respiratory status, circulation, level of consciousness, body habitus, existing medical conditions, and presence of tubes or other devices.
Good nursing care also extends beyond physically positioning the patient. Respect for autonomy, privacy, informed consent, infection prevention, communication, and accurate documentation are equally important components of proper patient positioning.
Patient Assessment and Preparation
Assessment should occur before the patient is moved into the Sims Position. The nurse needs to establish whether the patient can safely tolerate the movement and whether modifications are necessary.
A focused assessment should include:
Mobility and range of motion
Determine whether the patient can move independently.
Assess the hips, knees, shoulders, and spine for limitations.
Identify conditions such as arthritis, joint replacement, recent orthopedic surgery, or musculoskeletal pain that could make lateral positioning difficult.
Skin integrity
Inspect areas that may become pressure points.
Identify existing wounds, redness, bruising, or fragile skin.
Consider whether positioning the patient on one particular side could worsen an existing injury.
Neurological status
Assess sensation and ability to communicate discomfort.
Patients with impaired sensation may not recognize pressure or nerve compression as readily as other patients.
Cardiovascular and respiratory status
Determine whether the patient can tolerate the change in posture.
Pay particular attention to patients with significant respiratory compromise or cardiovascular instability.
Pain and comfort
Ask about existing pain before repositioning.
Identify painful joints or body regions that may require additional support.
Medical devices
Identify IV lines, urinary catheters, drains, oxygen tubing, feeding tubes, wound systems, and monitoring equipment.
Plan how each device will be protected during movement.
Level of consciousness and cooperation
Determine whether the patient understands instructions.
A patient who cannot reposition independently may require assistance from another healthcare professional.
Preparation should also include explaining what will happen before the movement begins. A simple explanation such as, “I am going to help you turn onto your side and bend your upper leg forward. I will use pillows to support you and will check that you are comfortable” can help reduce anxiety and encourage cooperation.
The nurse should prepare the environment before moving the patient. This may include:
Locking the bed wheels.
Adjusting the bed to an appropriate working height.
Ensuring adequate lighting.
Removing unnecessary obstacles.
Having pillows and positioning aids available.
Preparing procedural equipment in advance.
Ensuring that privacy measures are in place.
Determining whether additional assistance is required.
For example, a patient requiring the Sims Position for an enema may be able to turn independently with verbal guidance. A weak, sedated, obese, or mobility-impaired patient may require one or more staff members to assist with repositioning. Attempting to reposition such a patient alone could place both the patient and healthcare worker at risk of injury.
Preparation should also account for the purpose of the procedure. If the position is required for a rectal or vaginal examination, the equipment should be prepared before exposing the patient. This minimizes unnecessary exposure and helps maintain dignity.
Consent, Privacy, and Dignity
Consent, privacy, and dignity are particularly important when the Sims Position is used for procedures involving the rectal, perineal, or vaginal region. These procedures involve intimate areas of the body and can make patients feel vulnerable.
Consent should be obtained according to the type of procedure and applicable institutional requirements. The patient should understand:
Why the examination or procedure is necessary.
What positioning will be required.
What the procedure will involve.
What sensations or discomfort might occur.
Who will be present.
That they can communicate discomfort or ask questions during the procedure.
The patient should be given an opportunity to ask questions before positioning begins.
For an intimate procedure, consent should not be treated as a single conversation that occurs only at the beginning. Communication should continue throughout the examination. If the patient expresses significant pain, distress, or a desire to stop, the healthcare team should respond appropriately.
Privacy is equally important. The patient should be exposed only to the extent necessary for the clinical procedure. Curtains, doors, screens, gowns, and drapes should be used appropriately.
For example, if a patient is being positioned for a rectal examination, the nurse should avoid leaving the patient’s entire body uncovered while preparing equipment. The patient can remain covered until exposure of the relevant anatomical area is required.
When the Sims Position is used for vaginal examination, appropriate draping is especially important because the positioning itself can increase the patient’s sense of vulnerability. The nurse should explain each step before it occurs rather than unexpectedly moving the patient’s leg or exposing the perineum.
Maintaining dignity also involves how the healthcare team communicates.
Professional communication should:
Use respectful and neutral language.
Avoid unnecessary comments about the patient’s body.
Explain movements before touching the patient.
Avoid unnecessary personnel in the room.
Maintain appropriate draping.
Provide privacy during undressing and dressing.
Allow the patient to express concerns.
Use a chaperone when clinically appropriate and according to policy.
For example, instead of abruptly saying, “Turn over and bend your leg,” the nurse can say, “I will help you turn onto your left side. Once you are comfortable, I will help position your upper leg so the clinician can perform the examination.”
This small difference can make the patient feel more informed and respected.
The nurse should also consider cultural, psychological, and personal factors that may influence how the patient experiences intimate patient positioning. Some patients may feel particularly anxious about being exposed or touched during an examination. Providing clear explanations and allowing the patient reasonable control over the process can promote trust.
Dignity should be maintained even when the patient is unconscious or unable to communicate. A lack of consciousness does not eliminate the obligation to provide respectful care.
Infection Prevention
Infection prevention is essential whenever the Sims Position is used for a procedure involving contact with body fluids or mucous membranes. The exact precautions depend on the procedure, institutional policy, and whether the procedure involves an intact skin surface, mucous membrane, or potentially infectious material.
Hand hygiene remains a fundamental component of infection prevention. The nurse should perform hand hygiene at the appropriate points before and after patient contact and before and after relevant procedures.
When performing an enema, rectal examination, or vaginal procedure, appropriate personal protective equipment should be selected according to the anticipated exposure. Gloves are commonly required when contact with mucous membranes, non-intact skin, feces, vaginal secretions, or other body fluids is anticipated.
Important infection-prevention practices include:
Performing appropriate hand hygiene.
Using gloves when indicated.
Using additional PPE when exposure to body fluids is anticipated.
Preparing a clean procedural field.
Using appropriately cleaned, disinfected, sterilized, or single-use equipment as required.
Avoiding contamination of clean supplies.
Disposing of contaminated materials appropriately.
Performing hand hygiene after removing gloves.
Following facility-specific infection-control procedures.
The type of instrument used also matters. A reusable speculum, for example, requires appropriate reprocessing according to institutional and manufacturer requirements. Single-use devices should not be reused.
When the Sims Position is used for a vaginal examination, the nurse should ensure that the examination equipment is appropriately prepared before the procedure. The same principle applies to rectal examinations and enemas.
For example, consider an enema procedure. The nurse should prepare the prescribed solution and equipment, perform appropriate hand hygiene, apply gloves, position the patient, administer the treatment according to the prescribed procedure, dispose of contaminated supplies appropriately, and perform hand hygiene afterward.
The positioning itself can also influence infection-control practices. A disposable or clean protective pad may be placed beneath the patient’s buttocks when exposure to fecal matter, vaginal secretions, or other fluids is anticipated. This protects the bed surface and facilitates appropriate cleanup.
Infection prevention should also be balanced with patient comfort. Excessive manipulation of the patient or unnecessary exposure increases discomfort without improving clinical care. Efficient preparation helps minimize the time required to perform the procedure.
Special Patient Considerations
Not every patient can safely assume a standard Sims Position. Certain conditions require modifications, additional assistance, closer monitoring, or selection of an alternative position.
Patients with limited mobility
Patients with arthritis, neurological impairment, muscle weakness, or recent surgery may have difficulty bending the hip or knee required for the posture.
The nurse should never force a joint into a predetermined angle. Instead, the position can be modified within the patient’s available range of motion.
For example, a patient with severe knee stiffness may require a pillow between or beneath the legs rather than being asked to flex the upper knee excessively.
Patients with recent surgery
Patients recovering from hip, abdominal, spinal, pelvic, or other surgery may have restrictions on movement.
Before positioning, the nurse should review applicable postoperative restrictions. A patient who has undergone hip replacement, for example, may have specific precautions concerning hip flexion, adduction, or rotation depending on the surgical approach and provider instructions.
The nurse should not assume that a position commonly considered safe is appropriate for every postoperative patient.
Pregnant patients
Pregnancy can alter comfort, respiratory mechanics, circulation, and positioning requirements. The appropriate posture depends on gestational age, the reason for the procedure, and maternal and fetal considerations.
A lateral position may sometimes be preferable to prolonged flat supine positioning during pregnancy, but the exact positioning decision should follow the clinical situation and applicable obstetric guidance.
Patients with respiratory problems
Patients with respiratory disease may experience changes in breathing when moved into a semi-prone or lateral posture.
The nurse should monitor respiratory effort and oxygenation as clinically indicated. If the patient develops respiratory distress after positioning, the position should be reassessed immediately.
Patients with impaired sensation
Patients with peripheral neuropathy, spinal cord injury, altered consciousness, or other sensory impairment may not recognize pressure or discomfort.
These patients require particularly careful inspection of pressure areas and frequent reassessment when the position is maintained.
Patients with fragile skin
Older adults and patients with poor nutrition, dehydration, edema, vascular disease, or existing skin injury may have increased vulnerability to pressure and shear.
Additional padding and careful handling may be required. The nurse should avoid dragging the patient across the mattress because friction and shear can damage vulnerable tissue.
Patients with obesity
Body habitus can affect stability, access, equipment requirements, and the number of staff needed for safe repositioning.
A patient with severe obesity may require additional staff, a wider bed, specialized positioning equipment, or mechanical assistance. The Sims Position may sometimes provide useful access when conventional positioning is difficult, but the patient’s safety and ability to maintain the posture must be considered.
Patients with tubes, drains, or other devices
Patients with multiple medical devices require careful planning before lateral repositioning. The nurse should identify which side the devices are located on and determine whether turning could cause traction, compression, obstruction, or dislodgment.
For example, a patient with a drain exiting near the hip may require a modified posture or additional padding to prevent direct pressure on the insertion site.
Patients unable to communicate
Nonverbal patients, sedated patients, and patients with altered consciousness require objective observation for signs of discomfort or physiological instability.
The nurse may need to rely on:
Facial expressions.
Protective movements.
Restlessness.
Changes in heart rate.
Changes in respiratory rate.
Changes in oxygen saturation.
Changes in blood pressure.
Muscle tension.
The absence of verbal complaints should never be interpreted as proof that the patient is comfortable.
Nursing Documentation
Documentation provides a clinical record of the positioning intervention, the patient’s response, and relevant findings. The amount and type of documentation depend on the reason for positioning, the patient’s condition, the procedure performed, and institutional policy.
Routine repositioning may not require the same level of narrative documentation as positioning for an invasive procedure. However, clinically significant findings and interventions should be recorded accurately.
When documentation is required, relevant information may include:
The reason for positioning.
The position used.
The side used, such as left or right lateral.
Assistance required.
Positioning devices or pillows used.
Patient tolerance.
Skin condition or pressure-area findings when relevant.
Presence and condition of tubes, drains, and other devices.
Relevant comfort or pain findings.
The procedure performed.
Patient response.
Any complications or unexpected findings.
Repositioning or corrective interventions.
For example, documentation following an enema might indicate that the patient was assisted into the left lateral Sims Position, tolerated the position, received the prescribed treatment, and was reassessed afterward. The nurse should document actual findings rather than simply recording that the patient was “comfortable” if comfort was not assessed.
Similarly, if a patient required modification because of hip pain, the documentation should reflect the clinically relevant intervention. For example:
Patient assisted into modified left lateral Sims position for prescribed rectal procedure. Pillow placed between knees for support. Patient reported mild left hip discomfort; upper leg repositioned and additional support provided. Patient subsequently reported improved comfort. Skin intact over observed pressure areas. Procedure tolerated without apparent complication.
The documentation should remain objective and concise. It should not contain unnecessary personal commentary or assumptions about the patient’s behavior.
For a vaginal examination, documentation should focus on the clinical aspects of the examination and the patient’s response. Depending on the setting and procedure, this may include the type of examination performed, relevant findings, specimens obtained, patient tolerance, and any complications.
If a patient cannot tolerate the Sims Position, that information may also be clinically relevant. For example, if the patient develops significant pain or respiratory difficulty and the position must be discontinued, the nurse should document the observed problem, intervention, patient response, and appropriate notification according to facility policy.
Accurate documentation is particularly important when positioning contributes to a procedure or when an unexpected event occurs. It creates continuity of care by allowing subsequent clinicians to understand what position was used, what support was required, how the patient responded, and whether any positioning-related concerns were identified.
A useful principle is to document what was done, why it was done when clinically relevant, what was observed, and how the patient responded. This keeps documentation focused on patient care rather than simply recording that the patient was placed in a particular posture.
Across all of these considerations, the nurse’s responsibility extends beyond knowing how to place a patient in the Sims Position. Safe patient positioning in nursing requires an individualized assessment, clear communication, protection of privacy and dignity, appropriate infection prevention, adaptation for special circumstances, and accurate documentation. These measures help ensure that the position serves its intended clinical purpose while minimizing avoidable discomfort, injury, and disruption of care.
Advantages and Limitations of the Sims Position
The Sims Position is a versatile patient positioning technique that can provide useful access to the posterior, perineal, and anorectal regions while avoiding some of the demands associated with supine, prone, or lithotomy positioning. Its value comes from the combination of lateral and semi-prone alignment: the patient is supported primarily on one side while the upper hip and knee are flexed and the trunk is partially rotated forward.
In clinical practice, the usefulness of the Sims Position depends on the purpose of care and the individual patient’s condition. It can be particularly practical for enema administration and selected rectal examinations, while a lateral approach may also be considered for certain vaginal procedures when conventional positioning is difficult. However, it should not be viewed as universally preferable. Every patient position has advantages, limitations, and potential risks.
The decision to use the Sims Position should therefore consider four central questions:
Does the position provide adequate access for the intended procedure?
Can the patient safely tolerate the required posture?
Can the patient be maintained in appropriate alignment and supported adequately?
Would another position provide better access or lower risk for this particular patient?
Benefits in Clinical Practice
One of the principal benefits of the Sims Position is its ability to provide access to areas that are difficult to reach when the patient is lying completely supine. The lateral and semi-prone orientation exposes the perineal and anorectal region while allowing the patient to remain supported on one side.
This makes the position particularly useful for several aspects of patient care.
Access for enema administration
The left-sided Sims posture is commonly used when administering an enema because it provides convenient access to the anus while allowing the patient to remain in a relatively stable lateral posture. Standard nursing references identify the left lateral or Sims posture as a commonly used position for rectal procedures and enemas.
For example, a patient requiring a prescribed cleansing enema can be assisted onto the left side with the upper leg flexed and supported. This provides the necessary access while allowing the nurse to maintain the patient’s privacy and comfort.
The position also allows the nurse to observe the patient during administration and respond if cramping, discomfort, dizziness, or other symptoms occur.
Access for rectal examination
The Sims Position can facilitate a digital rectal examination in selected circumstances. The lateral orientation provides access to the anus and rectum without requiring the patient to assume lithotomy or a fully prone posture.
This can be particularly useful for patients who have difficulty bending or elevating both legs. For example, a patient with restricted hip movement may tolerate a lateral approach better than lithotomy.
Clinical references recognize lateral decubitus positioning as an option for rectal examination, particularly when other positions are unsuitable. The choice depends on the patient’s condition, the purpose of the examination, and the clinician’s assessment.
Alternative access for selected vaginal procedures
Although the Sims Position is not the routine choice for every vaginal examination, lateral positioning can provide an alternative approach when conventional dorsal positioning does not provide adequate access or is poorly tolerated.
For example, published clinical experience has demonstrated that lateral positioning may help visualize the cervix in some patients in whom visualization was difficult in dorsal lithotomy. This has particular relevance when body habitus or anatomical factors make conventional positioning challenging.
The lateral posture can therefore serve as a useful alternative rather than replacing the standard approach.
Useful for selected patients with mobility limitations
Another benefit is that the Sims Position can sometimes be easier to achieve than positions requiring symmetrical elevation or abduction of both legs.
A patient with:
Limited hip mobility.
Knee stiffness.
Certain orthopedic conditions.
Difficulty maintaining lithotomy.
Reduced lower-extremity strength.
may tolerate a modified lateral posture better.
The position can be adjusted with pillows and other supports to accommodate individual limitations rather than requiring the patient to conform to a rigid posture.
Facilitates repositioning and pressure redistribution
The Sims Position can also be used as part of a broader repositioning strategy for patients who spend prolonged periods in bed. Moving a patient away from the supine posture redistributes pressure to different areas of the body.
However, this does not mean that the Sims posture eliminates pressure injury risk. The dependent shoulder, hip, knee, ankle, and other vulnerable areas still require assessment and protection.
Its usefulness in pressure redistribution is therefore best understood as part of individualized repositioning rather than as a therapeutic position that is automatically safe for prolonged periods.
Allows ongoing patient observation
Compared with a completely prone posture, the Sims Position can make communication and observation more straightforward in many circumstances. The nurse can generally maintain visual access to the patient’s face while the posterior region is exposed for the intended procedure.
This may be beneficial when the patient needs continuous reassurance or when the nurse needs to monitor symptoms during a procedure.
For example, during an enema, the nurse can observe the patient’s facial expression and ask about abdominal cramping or discomfort while maintaining the necessary procedural access.
Benefits for Patient Comfort and Procedural Access
The clinical usefulness of a position cannot be separated from the patient’s experience. A technically effective posture may still be inappropriate if it produces unnecessary pain, anxiety, instability, or embarrassment.
The Sims Position can provide comfort advantages for selected patients because it does not require the symmetrical leg elevation associated with lithotomy.
Reduced demands on the hips and legs
Lithotomy requires both legs to be flexed and supported, often in stirrups. Some patients may find this uncomfortable because of hip stiffness, knee problems, muscle weakness, or limited range of motion.
A lateral posture can reduce the need for symmetrical elevation of both legs.
For example, consider a patient with severe knee arthritis who requires a rectal examination. Maintaining lithotomy may cause substantial discomfort, whereas a supported lateral posture may allow the examination to be completed with less stress on the knees.
This does not mean that every patient will find the Sims Position comfortable. Comfort is individual, and the nurse should assess rather than assume.
May reduce feelings of vulnerability in selected circumstances
Intimate examinations can create anxiety and feelings of vulnerability. The position selected, the degree of exposure, communication style, and presence of unnecessary personnel can all influence the patient’s experience.
Some patients may prefer a lateral posture because it does not require the same degree of leg elevation and exposure associated with lithotomy. Research examining pelvic examinations has found that examination approaches without stirrups may reduce physical discomfort and feelings of vulnerability for some patients.
The benefit, however, should not be generalized to every patient. Some individuals may feel more secure in another position.
Supports procedural access
A useful patient position must provide sufficient exposure for the clinician to perform the intended procedure safely.
The semi-prone orientation of the Sims Position can expose the posterior and perineal regions while maintaining enough stability for procedures such as:
Enema administration.
Rectal examination.
Selected perineal procedures.
Selected vaginal examinations.
For example, during a rectal examination, the position allows the examiner to approach the anus without requiring the patient to lie completely prone.
Can be modified
One of the practical advantages of the Sims Position is that it can be adapted to the patient’s physical needs.
Pillows can be placed:
Beneath the head.
Between the knees.
Beneath the upper leg.
In front of the chest or upper extremity when additional support is needed.
The degree of hip and knee flexion can also be adjusted according to the patient’s mobility and the requirements of the procedure.
A modified posture may be particularly helpful for patients with orthopedic restrictions. The goal is not to reproduce a textbook image perfectly but to achieve the required clinical access while maintaining safe alignment and minimizing discomfort.
May facilitate care when conventional positioning is unsuccessful
Clinical positioning should be flexible. If a conventional position does not provide adequate exposure, an appropriately selected alternative may solve the problem.
For instance, in a small published case series involving patients with severe obesity, lateral decubitus positioning allowed successful cervical visualization in most patients whose cervix could not be visualized using dorsal lithotomy. This illustrates how changing the position can sometimes improve procedural access when anatomy or body habitus makes the standard approach difficult.
The evidence from such small studies should be interpreted cautiously, however. A successful alternative in selected patients does not establish that the Sims approach is superior for all vaginal procedures.
Limitations and Potential Risks
Despite its usefulness, the Sims Position has limitations. Understanding these limitations is essential because inappropriate positioning can cause discomfort, compromise physiological function, or make the intended procedure more difficult.
It does not provide optimal access for every procedure
The most important limitation is that the Sims Position does not provide the same anatomical exposure as every other position.
For example, a procedure requiring broad visualization of the vagina, cervix, or pelvic structures may be easier in lithotomy. Similarly, some posterior surgical procedures may require prone or jackknife positioning.
Choosing the Sims posture when it does not provide sufficient exposure can make the procedure unnecessarily difficult and potentially increase procedural time.
Maintaining stability can be difficult
Because the patient is partially rotated rather than completely supported on the back or abdomen, the body may tend to shift if the position is not supported appropriately.
An unsupported upper leg may fall forward. The trunk may rotate excessively. The shoulder may become uncomfortable, or the patient may gradually slide.
Pillows and other supports should therefore be selected according to the patient’s body size, mobility, and procedure.
Risk of pressure-related injury
The Sims Position redistributes pressure but does not remove it.
Areas of concern can include:
Dependent shoulder.
Hip.
Knee.
Ankle.
Other bony prominences.
Patients with impaired mobility, reduced sensation, poor nutritional status, fragile skin, vascular impairment, or prolonged positioning may have increased risk.
For example, an immobile patient maintained in the same lateral posture for an extended period may develop pressure over the dependent hip if the area is not appropriately protected and monitored.
Risk of nerve compression
Poor positioning can place pressure or stretch on peripheral nerves. Excessive flexion, rotation, or direct pressure from positioning equipment can contribute to nerve-related complications.
The patient should therefore be monitored for:
Numbness.
Tingling.
Weakness.
Burning sensations.
New or unexplained pain.
A patient reporting new numbness in the dependent arm, for example, may require immediate reassessment of the arm’s placement and the amount of pressure being applied.
May be difficult for patients with restricted mobility
Although the lateral posture can benefit some patients with limited mobility, it may be difficult for others.
Patients with severe hip contractures, spinal instability, recent orthopedic surgery, or significant musculoskeletal pain may not tolerate the required rotation and flexion.
The nurse should review any movement restrictions before attempting to position the patient.
May affect respiratory comfort
A semi-prone or lateral posture can influence respiratory mechanics. Patients with significant respiratory disease, reduced consciousness, severe obesity, or other conditions affecting ventilation require closer monitoring.
If the patient develops shortness of breath, increased respiratory effort, anxiety associated with breathing difficulty, or other concerning changes, the position should be reassessed.
Can interfere with medical devices
Turning the patient laterally may place tension on:
IV lines.
Urinary catheters.
Drains.
Feeding tubes.
Oxygen tubing.
Monitoring cables.
Surgical devices.
Failure to account for these devices can lead to kinking, obstruction, traction, or accidental dislodgment.
A patient with a surgical drain near the dependent hip, for example, may require a modified position or additional padding to prevent direct pressure on the insertion site.
May require additional personnel
Some patients cannot safely move into the Sims Position independently. Attempting to reposition a dependent patient without adequate assistance may increase the risk of falls, skin injury, device displacement, and musculoskeletal injury to staff.
The nurse should determine whether additional personnel or specialized equipment is required before moving the patient.
When to Choose an Alternative Position
The decision to use an alternative position should be based on clinical need rather than habit. The Sims Position is appropriate when it provides the required access and can be maintained safely. When it cannot meet those requirements, another posture should be selected.
An alternative may be appropriate when:
The intended procedure requires broader anatomical exposure.
The patient cannot tolerate lateral rotation.
The patient has a contraindication to the required hip or knee position.
The position causes significant pain.
Respiratory status deteriorates.
Circulation appears compromised.
Pressure injury risk cannot be adequately controlled.
Medical devices cannot be safely accommodated.
The procedure requires equipment designed for another posture.
Another position provides substantially better access.
Choosing supine
The supine position may be preferable when the procedure primarily requires access to the anterior surface of the body or when the patient cannot safely assume a lateral posture.
For many routine assessments, supine provides straightforward access and allows the patient to remain symmetrically supported.
Choosing prone
The prone position may be appropriate when extensive posterior access is required or when a specific therapeutic or surgical indication calls for it.
For certain anorectal procedures, a prone jackknife arrangement may provide greater exposure than the Sims posture. The decision should take into account the procedure, patient condition, and institutional protocol.
Choosing lithotomy
The lithotomy position is frequently selected for procedures requiring broad access to the vagina, cervix, perineum, or pelvic structures.
For example, when a gynecological procedure requires stable, symmetrical elevation of the legs and extensive pelvic exposure, lithotomy may be more appropriate than a lateral approach.
However, the nurse should assess whether the patient can safely tolerate the required hip and knee positioning and ensure appropriate leg support.
Choosing another lateral modification
A standard Sims Position is not the only possible lateral posture. A modified lateral position may be appropriate when the patient can tolerate side-lying but cannot assume the full degree of hip or knee flexion normally associated with the posture.
For example, a patient with a painful knee may require less flexion and additional pillow support. The position can be adjusted while still providing the necessary access.
The key consideration is whether the modification continues to achieve the intended clinical objective safely.
Applying Clinical Judgment
Selecting a patient position should involve a balance between procedural access and patient safety. A useful clinical framework is:
Procedure → Patient assessment → Position selection → Support → Monitoring → Reassessment
Consider a patient who requires a rectal examination but has severe bilateral knee pain. A rigid approach would place the patient in a conventional position without considering the patient’s limitations. A patient-centered approach would evaluate whether a supported lateral/Sims posture could provide adequate access with less joint stress.
Conversely, consider a patient requiring a gynecological procedure in which extensive visualization is essential. If the Sims posture does not provide sufficient access, the clinician should not continue simply because the patient finds it more comfortable. A properly supported lithotomy position or another clinically appropriate posture may be necessary.
The Sims Position is therefore best understood as one component of a broader set of patient positioning options. Its strengths include useful posterior and perineal access, adaptability, and potential comfort advantages for selected patients. Its limitations include restricted procedural exposure for some interventions, positioning-related pressure and nerve risks, possible difficulty in patients with certain mobility restrictions, and the need for careful management of medical devices.
For nurses, the most important principle is to avoid treating any position as universally correct. Using the Sims Position safely requires matching the posture to the clinical purpose, assessing the individual patient, providing appropriate support, protecting vulnerable anatomical areas, and changing the approach when the patient’s condition or procedural requirements indicate that another position would be safer or more effective.
Common Errors in Sims Positioning
Correctly placing a patient in the Sims Position requires more than turning the patient onto one side and flexing the upper leg. Small positioning errors can affect comfort, procedural access, circulation, skin integrity, respiratory function, and the safety of tubes or other medical devices. For this reason, nurses should view patient positioning as an active clinical intervention that requires assessment before movement, careful placement, and reassessment afterward.
Errors may occur because the nurse is unfamiliar with the posture, is working quickly, does not adequately assess the patient’s individual limitations, or assumes that a position that appears correct is necessarily safe. A patient’s body proportions, mobility, pain level, existing injuries, skin condition, and medical devices can all influence how the Sims Position should be established.
Common problems include poor alignment of the head and trunk, excessive or inadequate hip and knee flexion, insufficient use of pillows and positioning aids, failure to protect pressure-prone areas, and inadequate communication with the patient. These problems are particularly important when the position is maintained for an extended period or used during an intimate examination or procedure.
Incorrect Body Alignment
Incorrect body alignment is one of the most common problems when positioning patients in the Sims Position. The posture involves a controlled combination of lateral and forward rotation, so simply rolling the patient onto the side without paying attention to the head, shoulders, spine, pelvis, and legs may result in an unstable or uncomfortable posture.
Proper alignment helps distribute body weight appropriately and reduces unnecessary stress on muscles, joints, and nerves. It also helps maintain the intended anatomical access for the procedure.
Common alignment errors include:
Excessive rotation of the trunk toward the prone direction.
Allowing the head to tilt excessively.
Placing the shoulder in an uncomfortable or compressed position.
Allowing the pelvis to rotate excessively.
Allowing the patient to slide forward or backward.
Leaving the dependent arm trapped beneath the body.
Failing to maintain reasonable alignment between the head, neck, and spine.
For example, a patient may initially be placed in the left lateral position, but the upper body may rotate substantially more than the pelvis. This creates twisting through the spine rather than the controlled semi-prone alignment intended by the position.
The nurse should assess the patient from head to toe after positioning rather than focusing only on the legs.
The head should be comfortably supported, and the neck should not be forced into excessive flexion or extension. The dependent shoulder should not bear unnecessary pressure, and the dependent arm should be placed where it is protected from compression.
The trunk and pelvis should also remain reasonably aligned. If the pelvis is excessively rotated while the shoulders remain lateral, the patient may experience discomfort and muscular strain.
Example: A patient is placed in the left lateral Sims Position for a rectal examination. The upper leg is appropriately flexed, but the patient’s torso has rotated too far forward and the lower shoulder is compressed against the mattress. Although the legs appear correctly positioned, the overall posture is not safe or comfortable. The nurse should reposition the trunk, protect the shoulder, and reassess the patient before the examination continues.
Alignment should also be considered in relation to the patient’s individual anatomy. A pillow height that works for one patient may not work for another. For example, a patient with broad shoulders may require different head support from a smaller patient to maintain a comfortable neck position.
The goal is not to force every patient into an identical textbook posture. Proper patient positioning means achieving the intended clinical purpose while maintaining safe and comfortable anatomical alignment.
Improper Leg and Hip Placement
The legs and hips are central to the Sims Position because their placement helps establish the characteristic semi-prone posture. Incorrect positioning can reduce stability, restrict circulation, increase joint stress, and interfere with procedural access.
A common error is failing to flex the upper hip and knee sufficiently. If the upper leg remains relatively straight, the patient may not achieve the intended semi-prone posture, and the upper leg may become unstable.
Another error is excessive hip and knee flexion. Nurses should not force the patient’s joints into a predetermined angle when the patient has restricted mobility or pain.
Common leg and hip errors include:
Excessive hip flexion.
Excessive knee flexion.
Insufficient flexion of the upper leg.
Allowing the upper leg to fall forward without support.
Allowing the knees to press directly against one another.
Excessive internal or external rotation of the hip.
Failing to account for orthopedic restrictions.
Positioning a painful or recently operated limb without appropriate precautions.
For example, a patient with severe osteoarthritis may have limited hip mobility. Attempting to reproduce a standard Sims Position by aggressively flexing the upper hip could cause pain and place unnecessary stress on the joint.
In this situation, a modified lateral posture with appropriate support may be safer. The purpose of positioning is to facilitate care, not to force the patient’s body into an arbitrary configuration.
Leg placement can also affect the patient’s stability. The upper leg should generally be supported so that the patient does not have to use continuous muscular effort to keep it in place.
A pillow between or beneath the legs can help maintain alignment and reduce pressure between bony surfaces. The exact placement should depend on the patient’s anatomy and the purpose of the procedure.
The nurse should also check that the support is not pressing against the back of the knee or another area where prolonged pressure could affect circulation or nerves.
Example: A patient is placed in a modified Sims position for an enema. The upper knee is flexed forward, but it is left unsupported. As the patient relaxes, the leg falls forward, causing the pelvis to rotate and the patient to report hip discomfort. Adding appropriate support beneath the upper leg stabilizes the posture and improves comfort.
The patient’s ability to tolerate the position should also be considered before movement. Patients with recent hip replacement, spinal surgery, fractures, joint contractures, or other orthopedic restrictions may require an alternative posture or specific modifications.
Inadequate Support
Inadequate support is another frequent positioning error. Even when the patient is initially aligned correctly, the posture may deteriorate if pillows or other positioning aids are not used appropriately.
The Sims Position is inherently asymmetrical, meaning that the patient’s weight is distributed differently between the two sides of the body. Appropriate support can help maintain stability and reduce unnecessary pressure.
Depending on the patient and procedure, support may be required for:
The head.
Upper arm.
Upper leg.
Knees.
Ankles.
Back or trunk.
Other vulnerable areas.
However, more support does not automatically mean better support. Excessive pillows can push the body into an unnatural position, while poorly placed supports can create pressure points.
For example, placing a very thick pillow between the legs may elevate the upper hip excessively and rotate the pelvis. Conversely, providing no support between the legs may allow the upper knee to rest directly against the lower knee.
The nurse should assess whether each support device has a specific purpose.
A useful approach is to ask:
Does the support improve alignment, reduce pressure, increase stability, or improve comfort?
If it does none of these things, it may not be necessary.
Support should also be stable. A pillow that slides during the procedure may cause the patient to gradually lose alignment.
For patients who are unable to maintain their posture independently, additional assistance may be necessary. This is particularly relevant for patients with weakness, altered consciousness, sedation, neurological impairment, or severe obesity.
Example: A patient is positioned laterally for a rectal examination, but the upper arm is left unsupported. The patient begins to experience shoulder discomfort and repeatedly tries to move the arm. Supporting the arm with a pillow may reduce the strain and allow the patient to remain stable.
The nurse should also avoid placing objects beneath the patient that can create unnecessary pressure. Positioning aids should complement the patient’s natural alignment rather than forcing the body into an unnatural posture.
Failure to Protect Pressure Areas
A frequent mistake in patient positioning is assuming that changing from supine to the Sims Position eliminates pressure-related risk. It does not.
Every position creates areas where pressure may develop. In the Sims posture, particular attention should be paid to dependent bony areas and any location where the patient’s weight is concentrated.
Potentially vulnerable areas include:
Shoulder.
Hip.
Knee.
Ankle.
Other bony prominences.
Areas already affected by skin damage.
Patients with increased risk of pressure injury require particular attention. Risk can be influenced by immobility, age, poor nutrition, impaired sensation, moisture, reduced perfusion, and other patient-specific factors.
The nurse should inspect the skin before and after positioning when clinically indicated and monitor the patient during prolonged positioning.
Signs requiring attention may include:
Persistent redness or discoloration.
Localized warmth.
Swelling.
Pain or tenderness.
Blistering or skin breakdown.
Numbness or altered sensation.
The nurse should also consider friction and shear. Dragging a patient across the mattress during repositioning can damage the skin, particularly in vulnerable patients. Appropriate repositioning techniques and assistance should therefore be used.
Example: An older, immobile patient is placed in the left lateral Sims Position for a prolonged procedure. A pillow supports the upper leg, but the dependent hip is left under concentrated pressure. After the procedure, localized redness is observed. The finding should be assessed and managed according to the patient’s condition and applicable pressure-injury protocols.
Pressure protection should be individualized. A patient with an existing wound over the dependent hip may need a modified position or alternative patient position rather than simply adding more padding.
The nurse should also consider medical devices as potential pressure sources. A catheter, drain, monitoring cable, or tubing trapped beneath the patient can create localized pressure and contribute to skin injury.
Failure to Communicate and Reassess
One of the most significant errors is treating positioning as a task that ends as soon as the patient’s body has been placed.
Communication should begin before the patient is moved and continue throughout the procedure. The patient should understand what is happening and should be encouraged to report pain, pressure, numbness, dizziness, shortness of breath, or other concerns.
Before positioning, the nurse can explain:
“I will help you turn onto your left side. Your upper leg will be bent forward, and I will use pillows to support you. Please tell me if you experience pain or pressure at any point.”
This explanation establishes expectations and encourages the patient to participate.
Communication is especially important during vaginal and rectal procedures because the patient may feel vulnerable or embarrassed. The nurse should explain movements before touching the patient and maintain appropriate privacy and draping.
Failure to communicate can result in unnecessary anxiety. A patient who does not understand why the upper leg is being moved, for example, may interpret the movement as unexpected or intrusive.
Failure to reassess comfort
A patient may initially tolerate the Sims Position but develop discomfort later. The nurse should therefore reassess after positioning rather than assuming that the initial assessment remains accurate.
Ask about:
Pain.
Pressure.
Numbness.
Tingling.
Muscle strain.
Breathing difficulty.
General comfort.
If the patient reports new discomfort, the nurse should identify the cause rather than simply telling the patient to remain still.
Failure to reassess circulation
The nurse should observe for changes that may suggest impaired circulation, particularly when the patient remains in the position for an extended period.
Findings such as unusual pallor, coolness, swelling, numbness, or new pain should prompt further assessment and, where appropriate, adjustment of the posture.
Failure to reassess respiratory status
Patients with respiratory disease, reduced consciousness, severe obesity, or other conditions affecting ventilation may require closer monitoring after repositioning.
If the patient becomes short of breath after being placed in the Sims Position, the nurse should reassess the posture rather than assuming that the symptom is unrelated.
Failure to reassess medical devices
After the patient has been turned, the nurse should inspect IV lines, urinary catheters, drains, oxygen tubing, feeding tubes, and monitoring equipment.
A device that was unobstructed before positioning may become kinked or compressed afterward.
Example: A patient is turned into the right lateral Sims posture while receiving intravenous therapy. After positioning, the IV tubing is trapped beneath the patient’s arm. Although the patient’s body appears correctly aligned, the positioning is incomplete because the medical device has not been checked. The tubing should be repositioned and the infusion assessed according to clinical requirements.
Failure to reassess after the procedure
Reassessment should also occur when the patient is returned to another position. The nurse should assess the patient’s condition after the procedure, particularly if the patient has been in the Sims Position for an extended period.
The nurse should confirm that:
The patient is comfortable.
Skin condition remains acceptable.
Medical devices are intact and functioning appropriately.
No new pain or neurological symptoms are present.
Respiratory status is stable.
The patient has been returned to an appropriate resting position.
Avoiding Common Positioning Errors
A practical way to prevent errors is to use a structured check whenever the Sims Position is required:
Before positioning:
Assess the patient’s mobility, pain, skin, circulation, and respiratory status.
Identify movement restrictions.
Check tubes, drains, and other medical devices.
Explain the procedure.
Obtain appropriate consent where required.
Prepare pillows and positioning aids.
During positioning:
Move the patient carefully.
Protect the dependent arm and shoulder.
Position the upper hip and knee appropriately.
Avoid excessive joint rotation or flexion.
Maintain privacy and dignity.
Use assistance when necessary.
After positioning:
Check head-to-toe alignment.
Confirm that pillows and supports are stable.
Inspect pressure-prone areas as appropriate.
Check tubes, drains, and other equipment.
Ask about pain, pressure, numbness, and comfort.
Assess circulation and respiratory status.
Reposition or modify the posture if problems are identified.
These steps help distinguish proper positioning from merely achieving the appearance of a textbook posture. A patient can look correctly positioned while experiencing excessive pressure, pain, restricted circulation, or device compression.
For example, a patient undergoing a rectal examination may appear to be in the correct Sims Position, but if the upper hip is excessively flexed, the shoulder is compressed, and the urinary catheter is trapped underneath the patient, the position is not clinically safe. Correcting these issues is part of the nurse’s responsibility.
The safest approach is therefore to treat the Sims Position as an individualized clinical intervention. Correct alignment, appropriate leg placement, adequate support, pressure protection, communication, and reassessment work together to ensure that the position provides the intended procedural access without creating avoidable harm.
Practical Nursing Examples
Understanding the Sims Position becomes more meaningful when it is applied to realistic clinical situations. In practice, nurses must do more than place a patient in a particular posture. They must determine why the position is needed, assess whether the patient can safely tolerate it, protect privacy and dignity, maintain appropriate alignment, and monitor the patient’s response.
The following examples demonstrate how using the Sims Position may differ depending on the procedure. They also illustrate an important principle of patient positioning in nursing: the same position may require different modifications depending on the patient’s condition, the procedure being performed, and the equipment involved.
Sims Position for Enema Administration
The Sims Position is commonly associated with enema administration because the lateral posture provides convenient access to the rectal area while allowing the patient to remain supported. In many clinical settings, the patient is placed in a left-sided Sims posture, with the upper hip and knee flexed while the lower leg remains relatively extended.
Before an enema, the nurse should verify the prescription or order, assess the patient’s condition, explain the procedure, provide privacy, and prepare the necessary equipment according to facility policy.
A typical clinical sequence may include:
Assess the patient. Determine the reason for the enema, assess relevant bowel history, abdominal symptoms, pain, mobility, and ability to tolerate the required position. The nurse should also identify conditions that may require additional assessment or modification of the procedure.
Explain the procedure. Explain why the enema is being administered, what positioning will be required, what the patient may experience, and how the patient can communicate discomfort.
Provide privacy. Close the door or curtain and expose only the area necessary for the procedure.
Assist the patient into the lateral posture. The patient is generally assisted onto the left side when clinically appropriate. The upper leg is flexed forward to establish the characteristic posture.
Support the patient. Pillows can be used to support the head and upper leg and to improve stability and comfort.
Check alignment and equipment. Ensure that the patient is stable and that tubing, catheters, and other devices are not trapped beneath the body.
Perform the enema according to the prescribed procedure and institutional protocol. Appropriate hand hygiene, PPE, lubrication, administration technique, and infection-prevention practices should be followed.
Monitor the patient’s response. Ask about cramping, abdominal discomfort, dizziness, urgency, or other symptoms during the procedure.
Complete post-procedure care. Assist the patient as necessary, provide hygiene, dispose of contaminated materials appropriately, and reassess the patient’s condition.
For example, consider an adult patient who has a prescribed cleansing enema for bowel preparation. The nurse explains the procedure and assists the patient into a left lateral Sims Position. The patient’s upper knee is flexed and supported with a pillow. During administration, the patient reports mild abdominal cramping. The nurse pauses or adjusts the procedure according to the applicable protocol, assesses the patient, and continues only when appropriate.
This example demonstrates that the position itself is not the entire intervention. Patient positioning must be combined with ongoing assessment and communication.
The nurse should also avoid assuming that the patient must remain in an exact textbook posture if doing so causes pain. If a patient has restricted hip mobility, for example, a modified lateral position may be necessary.
Sims Position for Rectal Examination
The Sims Position may also be used for selected rectal examinations because it provides access to the anus and rectal region without requiring the patient to assume lithotomy.
The position can be particularly useful when the patient cannot comfortably maintain another examination posture.
Before the examination, the nurse should assess the patient’s physical condition and explain the procedure. Because a rectal examination involves an intimate area, privacy, dignity, communication, and appropriate consent are especially important.
A practical example involves a patient presenting with symptoms that require a digital rectal examination.
The process may include:
Explain the examination. The patient should understand the purpose of the examination and what positioning will be required.
Provide privacy and appropriate draping. Only the area necessary for the examination should be exposed.
Assist with positioning. The patient is helped into a lateral or semi-prone posture, commonly with the left side down and the upper leg flexed.
Check comfort and alignment. The nurse ensures that the head, shoulder, spine, pelvis, and legs are supported appropriately.
Assist the clinician as required. Depending on the clinical setting, the nurse may prepare examination supplies, provide gloves or other equipment, assist with lighting, or help maintain patient comfort.
Monitor the patient. The nurse should remain attentive to pain, anxiety, dizziness, or other changes.
Provide post-examination care. The patient should be assisted back into an appropriate resting position and provided with hygiene supplies if needed.
For example, an older adult with limited knee mobility requires a rectal examination. A standard lithotomy position would require substantial flexion and elevation of both legs, which the patient cannot comfortably tolerate. A supported left lateral position provides adequate access while reducing the demands placed on the knees.
The important point is that positioning should be adapted to the patient’s physical limitations rather than forcing the patient into a posture that could cause unnecessary pain or injury.
The nurse should also monitor for problems that may arise from prolonged or poorly supported positioning. If the patient reports numbness in the dependent arm, significant hip pain, or difficulty breathing, the position should be reassessed immediately.
Sims Position for Vaginal Examination
The Sims Position can be used as an alternative approach for selected vaginal examinations, although it is not the standard position for every gynecological procedure. Lithotomy is commonly used when broad and symmetrical pelvic exposure is required, while a lateral approach may be useful in selected circumstances.
The decision should be based on the patient’s anatomy, clinical indication, procedural requirements, mobility, comfort, and the clinician’s ability to obtain adequate visualization.
A lateral approach can be particularly useful when conventional positioning does not provide satisfactory cervical visualization. Published clinical reports have described the use of lateral positioning in patients for whom cervical visualization was difficult in dorsal lithotomy, including some patients with obesity or challenging anatomy.
For example, imagine a patient who requires cervical visualization but whose cervix cannot be adequately visualized in the standard lithotomy posture. After assessing the patient and determining that a lateral approach is clinically appropriate, the clinician may request a Sims Position.
The nurse’s responsibilities may include:
Explaining the positioning procedure.
Providing privacy and appropriate draping.
Assisting the patient into the lateral posture.
Supporting the upper leg and maintaining alignment.
Preparing the required examination equipment.
Monitoring patient comfort.
Assisting the clinician during the examination.
Maintaining infection-prevention practices.
Helping the patient return to a comfortable position afterward.
Documenting relevant nursing care and patient response.
The patient’s upper leg may need to be positioned so that the clinician can obtain the necessary vaginal or cervical access. However, the leg should not be forced beyond the patient’s comfortable range of motion.
The nurse should communicate throughout the process. For example:
“I will help you turn onto your left side and position your upper leg so the clinician can perform the examination. Please let me know immediately if you experience pain or discomfort.”
This is especially important because vaginal examinations can create anxiety or embarrassment. Respectful communication helps the patient understand what is happening and preserves dignity.
The Sims Position should not automatically be selected simply because it can provide vaginal access. If the clinician requires extensive visualization or instrumentation that is better accomplished in lithotomy, another position may be more appropriate.
Likewise, if the patient cannot safely tolerate lateral rotation because of an orthopedic condition, the clinical team should consider an alternative.
The term Sims vaginal may also appear in clinical discussions because of the relationship between lateral positioning and the Sims speculum. A Sims speculum is designed to retract the posterior vaginal wall and is distinct from a standard bivalve speculum. The instrument and the patient’s position should therefore be considered together when planning selected vaginal procedures.
Example of Nursing Documentation
Documentation of the Sims Position should accurately reflect what the nurse did, why it was clinically relevant when appropriate, and how the patient responded. Documentation requirements vary by facility and clinical setting, so nurses should follow the applicable documentation standards and electronic health record procedures.
A strong nursing note should avoid vague statements such as:
“Patient positioned in Sims. Tolerated well.”
Although this communicates the basic intervention, it provides little information about the patient’s actual condition or the support provided.
A more useful entry might state:
“Patient assisted into left lateral Sims Position for prescribed enema. Privacy maintained and patient instructed to report discomfort, cramping, dizziness, or other concerns. Head and upper leg supported with pillows. Alignment maintained and urinary catheter tubing checked to ensure it was free of tension and compression. Patient reported mild abdominal cramping during administration; procedure adjusted according to protocol. Patient subsequently reported improved comfort. No acute distress observed. Patient assisted with hygiene following procedure and returned to a comfortable resting position.”
This example demonstrates several important elements of nursing documentation:
The position used.
The reason for positioning.
Assistance provided.
Positioning supports used.
Protection of medical equipment.
Patient-reported symptoms.
Nursing response.
Patient response.
Post-procedure care.
For a rectal examination, documentation might read:
“Patient assisted into left lateral Sims Position for rectal examination. Privacy maintained and appropriate draping provided. Pillow placed beneath upper leg for support. Patient reported mild discomfort with positioning but denied pain after support was adjusted. Examination completed by provider. Patient assisted to a comfortable resting position following examination and provided hygiene supplies.”
The nurse should document objective observations and relevant patient statements rather than making assumptions.
For a vaginal examination, documentation might include:
“Patient assisted into lateral Sims Position for vaginal examination. Procedure explained and privacy maintained throughout. Upper leg supported with pillow to facilitate examination. Patient remained alert and cooperative and reported no significant discomfort. Examination completed without positioning-related complication. Patient assisted to a comfortable position following the procedure.”
The exact content should reflect what actually occurred. Nurses should not document findings they did not personally observe or procedures they did not perform.
Documentation should also capture unexpected events when clinically significant. For example, if a patient develops pain, numbness, respiratory difficulty, skin changes, or another problem while in the Sims Position, the nurse should document the relevant assessment findings, intervention, patient response, and notifications or escalation performed according to policy.
A useful documentation framework is:
Position → Purpose → Support → Assessment → Intervention → Response
For example:
Position: Left lateral Sims Position Purpose: Prescribed enema Support: Head and upper leg supported with pillows Assessment: Patient reported mild cramping Intervention: Procedure adjusted according to protocol and patient reassessed Response: Cramping improved; patient remained stable
This approach keeps the nursing note focused on clinically meaningful information rather than simply stating that the patient was placed in a particular posture.
Across these scenarios, the central nursing principle remains the same: the Sims Position should be selected and modified according to the procedure and the patient’s individual needs. Whether it is being used for an enema, rectal examination, or selected vaginal examination, safe patient positioning involves preparation, privacy, appropriate support, continuous assessment, and accurate documentation.
Struggling with your nursing paper?
We’ll write a thorough, well-researched draft for you
The Sims Position is an important positioning technique in nursing because it provides a practical balance between patient stability, procedural access, and comfort. Its lateral and semi-prone orientation makes it particularly useful for procedures involving the posterior and perineal regions, including enema administration and rectal examination, while selected vaginal procedures may also benefit from a lateral approach. However, its usefulness depends on the individual clinical situation rather than on the assumption that one position is appropriate for every patient.
Safe use of the Sims Position requires more than achieving the correct physical posture. Nurses must assess mobility, pain, skin integrity, circulation, respiratory status, and existing medical devices before positioning. Proper alignment of the head, trunk, hips, and legs, combined with appropriate pillows and other supports, helps minimize pressure, discomfort, instability, and positioning-related complications. Continuous communication is equally important, particularly during intimate procedures where privacy, consent, dignity, and patient autonomy must remain central to care.
The Sims Position should also be considered in relation to alternative positions such as supine, prone, and lithotomy. While it may provide valuable access and comfort in selected circumstances, another position may be more appropriate when greater anatomical exposure is required, when the patient cannot tolerate lateral rotation, or when existing medical conditions create additional positioning risks. Clinical judgment therefore remains essential when selecting and modifying a patient position.
For nurses, understanding the principles behind the Sims Position supports safer and more individualized patient care. When positioning is combined with careful assessment, infection prevention, appropriate support, ongoing monitoring, and accurate documentation, it becomes an intentional nursing intervention rather than a simple physical task. The goal is not merely to place the patient in the correct position, but to ensure that the chosen position effectively supports the procedure while preserving safety, comfort, dignity, and quality of care.
Frequently Asked Questions
What is the Sims position good for?
The Sims Position is commonly used for enema administration, rectal examinations, suppository insertion, and selected perineal or vaginal procedures. Its lateral, semi-prone posture provides access to the posterior and anorectal areas while allowing the patient to remain supported.
What is the difference between Sims position and left lateral position?
The left lateral position generally means the patient is lying on the left side with the body relatively straight. The Sims Position is a modified lateral posture in which the patient is partially rotated toward the abdomen, with the upper hip and knee flexed. Thus, the Sims posture is more semi-prone and asymmetrical than a basic left lateral position.
Why would you put a patient in Sims position?
A patient may be placed in the Sims Position to provide access to the rectal or perineal area while promoting stability and, in selected patients, greater comfort than other positions. It is particularly useful for enemas and rectal examinations and can serve as an alternative position for certain procedures when supine or lithotomy is unsuitable.
What is the Sims position during pregnancy?
During pregnancy, a lateral position may be used to improve comfort and avoid prolonged flat supine positioning. A modified left lateral Sims Position may be used for certain procedures when clinically appropriate, but positioning should be individualized according to gestational age, maternal condition, fetal considerations, and the purpose of the procedure.
44,500+ practice questionsNCLEX · HESI · ATI · 30 certifications
▦
4 item formatssingle-select · SATA · cloze · ordering
“Every question is reviewed by a licensed nurse before it publishes. If the rationale doesn’t teach you something, it doesn’t ship.”
✎
A rationale on every answer — right or wrong, you learn why.
⚕
Reviewed before it publishes — licensed-nurse editorial review.
↻
Missed questions come back — the Challenge Bank until you own them.
Our Nursing Exam Prep Q bank at a glance
Drawn from a 44,500-question bank, organized by the exam you’re preparing for.
44,500+
Questions in the bank — released by exam as each set completes nurse review
By exam source
ATI28,270
HESI5,355
NCLEX-PN5,000+
NCLEX-RN4,819
Top specialties
Medical-Surgical9,400+
Maternal-Newborn7,300+
Fundamentals6,600+
Pharmacology3,800+
What makes them different
✓Full rationale on every choice
✓Reviewed by a licensed nurse
✓Next Gen item formats
Choose your exam
Every exam below is live today. Question counts verified from our content database, July 2026.
Try 5 real practice questions — free
Pick your exam and work a mixed-format set. Every answer opens the full teaching rationale — the same depth behind every question we publish. Sign up at the end to see your analytics.
Built for nurses. Reviewed by nurses.
No scraped question dumps. Real explanations a licensed nurse has read.
Proof, not promises
A rationale on every choice
Every answer — right or wrong — teaches the clinical reasoning behind it. You learn why, not just what.
How to Pass the NCLEX in 2026: Your Complete Practice Questions Guide
The current test plan, decoded — every item format you will face, all 8 client-needs categories, and the study system that turns missed questions into mastered ones.
4,819 RN questions5,000+ PN questionsNGN item formatsFull rationalesChallenge Bank
*Pass Guarantee: if you complete the program requirements and don’t pass, we refund you. Full terms published before purchase.
Trusted since 2019
2019
Serving nursing students
24,000+
Nursing students
44,500+
Practice questions
12.1K+
Instagram community
@studyingnurse.co
12.1K+ followers
Daily practice questions, memory tricks, and study motivation from our nurse educators. Student reviews and success stories are collected here — publishing them on this page once each reviewer’s written consent is on file.
Real reviews from real students — published only with written consent. That’s a promise, not a placeholder policy.
Slot reserved — real review“
A real student review appears here once the student’s written consent is on file. We don’t publish invented testimonials — every quote on this page will come from a named student who agreed to share it.
— Student name · exam passed · with written consent
Slot reserved — real review“
Real reviews are being collected from recent NCLEX, HESI, and ATI students now. Have one? Send it with the student’s consent and it goes live in this slot.
— Student name · exam passed · with written consent
Slot reserved — real review“
In the meantime: 24,000+ nursing students have prepped with us since 2019, and our Instagram community of 12.1K+ shares real wins every week — those are public, so you can verify them yourself.
— @studyingnurse.co on Instagram
Frequently asked questions
Yes. Every NCLEX question, case study, and simulator exam is mapped to the current 2023–2026 NCSBN NCLEX-RN and NCLEX-PN test plans — including all eight Client Needs categories (Management of Care, Safety and Infection Control, Health Promotion and Maintenance, Psychosocial Integrity, Basic Care and Comfort, Pharmacological and Parenteral Therapies, Reduction of Risk Potential, and Physiological Adaptation) and the NCSBN Clinical Judgment Measurement Model (recognize cues, analyze cues, prioritize hypotheses, generate solutions, take action, evaluate outcomes). We re-map the bank every time NCSBN publishes a test-plan update.
44,500+ in total, organized by exam: ATI (28,270), HESI (5,355), NCLEX-PN (5,000+), and NCLEX-RN (4,819), plus specialty banks such as Medical-Surgical, Maternal-Newborn, Fundamentals, and Pharmacology. Counts are verified against our content database and updated as new sets clear nurse review.
Next Generation NCLEX questions are the item types NCSBN introduced in April 2023 to measure clinical judgment more directly. They include unfolding case studies, extended multiple response, cloze (drop-down) items, drag-and-drop/ordered response, and highlight items. StudyingNurse includes 1,000+ NGN items, including 453 unfolding case studies that walk you through a patient scenario exactly the way the real exam does.
Yes. Every question in the bank — whether you answer it correctly or not — opens a full teaching rationale that explains the correct answer, why each distractor is wrong, and the clinical-judgment step the question was testing. You can see five real examples in the free practice section above before you pay anything.
The Challenge Bank is built-in spaced repetition. Every question you answer incorrectly is saved to your personal Challenge Bank and automatically re-served in later study sessions until you answer it correctly. Your weak spots stop being weak because the system never lets you skip them.
Yes. Our NCLEX Premium plans include a computer-adaptive testing (CAT) style simulator that adjusts item difficulty as you answer — the same mechanism the real NCLEX uses — and produces a readiness score by category so you know when you are actually prepared to sit the exam.
Preparing for the NCLEX-RN or NCLEX-PN? Choose NCLEX Premium (30 or 90 days). Studying for course exams or an exit exam (ATI or HESI)? Choose Test Banks & Exit Exams. Applying to nursing school? Choose ATI TEAS 7 or HESI A2. The 90-day options are the best value if your exam is more than a month away.
Yes — if you complete the program requirements and do not pass your exam, we refund your purchase. The full terms and eligibility requirements are published before checkout so you can read them before you buy.
Practicing nurses write our questions, and a licensed nurse reviews every question before it publishes — stem, options, correct answer, and rationale. Nothing ships without that sign-off. It is the standard behind the free practice set above.
Yes. The free practice set on this page gives you five real questions with full rationales — no account required. Creating a free account unlocks additional preview questions, timed sets, and topic-level analytics so you can judge the depth before you subscribe.
Yes. ATI TEAS 7 covers Reading, Math, Science, and English with timed practice exams in the real format; HESI A2 covers Math, Reading Comprehension, Vocabulary, Grammar, Anatomy & Physiology, Biology, and Chemistry. Both include answer explanations on every question and section-level score tracking.
One-time payment. You pay once for 30 or 90 days of access — there is no auto-renewing subscription and nothing to cancel. When your access ends, you simply choose whether to extend it.
Instantly. Your account is active the moment payment completes — most students start their first practice set within two minutes of checkout.
Yes. The app is fully responsive — practice sets, case studies, the simulator, and the Challenge Bank all work on phones, tablets, and desktops, and your progress syncs across devices.
No. Your login, orders, and writer flow are completely untouched, at the same address as always. Use the Client Login link in the header or footer whenever you need it.
The 2026 NCLEX, explained
Free guide from our nurse educators — format, scoring, and what actually works.
Read: How the 2026 NCLEX actually works — format, scoring, and what to expect
How many questions are on the NCLEX in 2026?
The 2026 NCLEX-RN and NCLEX-PN are variable-length computer adaptive tests. Depending on how you answer, your exam can end after as few as 85 questions or stretch to the maximum of 150. There is no fixed number and no way to predict your length from how the questions feel — the computer decides when it has enough evidence about your ability.
A portion of what you answer does not count toward your result. Every exam includes 15 unscored pretest items that NCSBN is trialing for future tests. They look and feel exactly like scored questions, so treat every item as if it counts.
What the 2026 NCLEX is really testing
Content knowledge is the entry ticket, not the exam. Both NCLEX versions are built around the NCSBN Clinical Judgment Measurement Model — recognize cues, analyze cues, prioritize hypotheses, generate solutions, take action, and evaluate outcomes. That is why so many items are built from patient scenarios: the exam is measuring whether you can think through a clinical situation the way a practicing nurse does, not whether you can recite a fact.
Next Gen NCLEX items make that explicit. You will see unfolding case studies (a scenario that develops over several linked questions), extended multiple response, cloze (drop-down) items, drag-and-drop ordered response, and highlight items. These are no longer a novelty — they carry a meaningful share of your score, and they reward practiced clinical reasoning over memorization.
How computer adaptive testing (CAT) actually works
The NCLEX has no fixed passing percentage. Instead, the computer estimates your ability after every answer and selects the next question to be maximally informative. Answer correctly and it gets harder; answer incorrectly and it eases off. The exam ends when the computer is 95% confident your ability is clearly above — or clearly below — the passing standard, or when you reach the maximum length and your final estimate is used.
The practical consequences: you cannot tell how you are doing from question difficulty, and you should not try. A hard question can mean you are doing well. Your only job is to answer the item in front of you.
Time and structure on exam day
You have up to five hours, including a tutorial and optional breaks. Between 85 and 150 questions, the pacing that matters is not speed but consistency — most candidates finish with time to spare. Fatigue is the real opponent: a five-hour adaptive exam punishes anyone who has only ever practiced in short, untimed bursts. Full-length timed practice is not optional preparation; it is preparation for the exam’s actual format.
What this means for how you should prepare
Practice in the exam’s formats. Reading rationales about case studies is not the same as working through them. Use a bank with real NGN items and a CAT-style simulator.
Train clinical judgment, not just recall. For every question, ask what the nurse should notice, decide, and do — the six clinical-judgment steps — instead of memorizing the answer.
Let your misses lead. A question you got wrong is a map to a weak spot. Re-serve missed questions until you own them (our Challenge Bank automates this).
Rehearse the full distance. At least once before exam day, sit a full-length timed adaptive exam so the fifth hour feels familiar.
Key points, 2026 NCLEX: 85 to 150 questions, decided adaptively · 15 unscored pretest items · up to 5 hours · pass/fail is a 95% confidence decision, not a percentage · clinical judgment and NGN formats are the exam, not an add-on.
Start practicing today
44,500+ questions · a rationale on every answer · trusted by 24,000+ nursing students since 2019
Third Space in Nursing: Understanding Third-Spacing, Fluid Physiology, and Ascites
Third Space in Nursing is a fundamental concept in nursing and medicine that explains how fluid can move from the normal circulating intravascular compartment into spaces where it is no longer available to support adequate tissue perfusion and organ function. Although this fluid remains within the body, it becomes effectively “trapped,” making it unavailable for normal circulation. As a result, patients may simultaneously exhibit signs of fluid accumulation, such as edema or ascites, and signs of hypovolemia, including hypotension, decreased urine output, and poor peripheral perfusion. This seemingly contradictory presentation often challenges healthcare providers and underscores the importance of understanding the physiological mechanisms behind third-spacing.
The concept of Third Space in Nursing extends far beyond memorizing a definition. It integrates principles of fluid physiology, cardiovascular function, renal regulation, and inflammatory responses to explain why critically ill patients often deteriorate rapidly when normal fluid balance is disrupted. Whether caring for a patient with sepsis, severe burns, liver cirrhosis, pancreatitis, heart failure, or major trauma, nurses frequently encounter conditions where abnormal fluid shifts contribute significantly to disease progression and influence treatment decisions. Understanding how and why these shifts occur enables healthcare professionals to recognize subtle changes in patient status before serious complications develop.
To fully appreciate Third Space in Nursing, it is essential to first understand how the body normally distributes and regulates its fluids. The human body contains several interconnected fluid compartments, each serving a distinct physiological purpose. Under healthy conditions, water continuously moves between these compartments to maintain homeostasis, support cellular metabolism, deliver oxygen and nutrients, remove metabolic waste products, and preserve adequate blood pressure. This dynamic equilibrium depends on multiple physiological mechanisms working together, including:
Hydrostatic pressure, which pushes fluid out of the blood vessels.
Oncotic pressure, primarily maintained by albumin, which draws fluid back into the circulation.
Capillary permeability, which regulates how easily water and proteins cross the capillary wall.
The lymphatic system, which returns excess interstitial fluid to the bloodstream and prevents excessive fluid accumulation within tissues.
When one or more of these regulatory mechanisms becomes impaired, the normal distribution of body fluids changes dramatically. Instead of remaining within the intravascular space, fluid moves from the intravascular compartment into the interstitial space or other potential body cavities, where it contributes little to effective circulation. Consequently, patients may experience inadequate organ perfusion despite having an overall increase in total body water. This redistribution of fluid, rather than an absolute loss of fluid from the body, is the defining characteristic of third-spacing and forms the foundation for understanding its clinical significance.
The physiological disturbances associated with Third Space in Nursing have widespread consequences that affect nearly every organ system. Reduced circulating plasma volume decreases cardiac preload and ultimately lowers cardiac output, compromising oxygen delivery to tissues. At the same time, increasing amounts of interstitial fluid may compress surrounding tissues, impair oxygen diffusion, delay wound healing, and interfere with normal organ function. In advanced cases, persistent intravascular depletion may progress to hypovolemic shock, acute kidney injury, respiratory compromise, or multiple organ dysfunction if appropriate interventions are delayed. These complex physiological changes illustrate why third-spacing is considered both a symptom of underlying disease and a potentially life-threatening clinical condition requiring prompt recognition.
Several disease processes and clinical situations can trigger third-spacing by disrupting normal vascular integrity or altering fluid dynamics. Common examples include:
Sepsis, where widespread inflammation increases capillary permeability, allowing plasma and proteins to leak into surrounding tissues.
Major surgery and anesthesia, which trigger inflammatory responses and temporary changes in vascular permeability.
Severe trauma and extensive burns, resulting in massive fluid redistribution and significant intravascular depletion.
Liver disease, where reduced albumin production and portal hypertension promote the development of ascites.
Heart failure and kidney disorders, which alter fluid regulation and contribute to abnormal extracellular fluid accumulation.
Allergic emergencies such as anaphylaxis, where rapid inflammatory mediator release causes widespread vascular leakage.
Although these conditions differ considerably in their underlying pathology, they all share a common feature: disruption of normal fluid physiology, leading to abnormal movement of fluid between body compartments.
Effective management of third-spacing requires more than simply replacing lost fluids. Because the underlying problem involves fluid redistribution rather than true dehydration, treatment must address both the patient’s hemodynamic instability and the disease process responsible for the abnormal fluid shifts. Healthcare providers must carefully evaluate the patient’s fluid volume, laboratory findings, vital signs, and clinical presentation before deciding whether to administercrystalloid solutions, colloid therapy such as albumin, blood products, vasopressors, or diuretic medications. Appropriate fluid management therefore depends not only on restoring intravascular volume but also on identifying and treating the underlying cause responsible for the third-spacing process.
This guide provides a comprehensive exploration of Third Space in Nursing, beginning with the fundamental concepts of third space, normal physiology, and body fluid compartments before examining how third spacing occurs at the capillary level. It then discusses the major causes, clinical manifestations, nursing assessment, diagnostic evaluation, evidence-based treatment strategies, and essential nursing interventions required to care for patients experiencing third-spacing. Throughout the discussion, emphasis is placed on linking physiological principles with clinical practice so that readers develop a deeper understanding of why these fluid disturbances occur, how they affect patient outcomes, and how evidence-based nursing care can restore fluid balance, improve tissue perfusion, and reduce the risk of life-threatening complications.
What Is Third Space in Nursing?
Third Space in Nursing refers to the abnormal movement and sequestration of fluid into areas where it is no longer readily available to support normal circulation or cellular function. Although the fluid remains inside the body’s, it becomes functionally unavailable because it leaves the intravascular space and becomes trapped within the interstitial space or other potential body cavities. As a result, the patient may experience reduced effective circulating blood volume despite having an increase in total body extracellular fluid.
To understand this concept, it is helpful to first recognize how body fluids are normally distributed. Under healthy physiological conditions, the body’s water is divided into distinct fluid compartments, each with a specialized role in maintaining homeostasis. These compartments include:
Intracellular fluid, which is the fluid inside the body’s cells and accounts for approximately two-thirds of total body water.
Extracellular fluid, which surrounds cells and includes:
Intravascular fluid, or the plasma circulating within the blood vessels.
Interstitial fluid, which occupies the spaces between cells and supplies tissues with nutrients and oxygen.
Small amounts of transcellular fluid, including cerebrospinal fluid, synovial fluid, pleural fluid, pericardial fluid, and peritoneal fluid.
Normally, fluid moves continuously between these compartments through processes such as diffusion, filtration, and reabsorption. These movements are tightly regulated by hydrostatic pressure, oncotic pressure, capillary integrity, and the lymphatic system. Together, these mechanisms maintain appropriate fluid balance, ensuring that tissues receive adequate oxygen and nutrients while metabolic waste products are efficiently removed.
In Third Space in Nursing, however, this finely balanced system becomes disrupted. Instead of remaining within the circulation or moving back and forth in a controlled manner, fluid moves from the intravascular compartment into the interstitial tissues or body cavities where it becomes sequestered. Because this fluid no longer contributes to effective circulation, the patient develops a reduction in intravascular volume even though total body water has not necessarily decreased.
A useful way to think about third-spacing is to imagine a city’s water distribution system. Suppose a city’s water supply is adequate, but a major pipeline ruptures and allows large amounts of water to collect in abandoned underground tunnels instead of reaching homes and hospitals. Although the total amount of water within the city remains unchanged, the usable water available to residents becomes critically reduced. Similarly, in Third Space in Nursing, fluid accumulates in locations where it cannot effectively participate in circulation, creating a functional rather than an absolute fluid loss.
This distinction explains why patients experiencing third-spacing often display two seemingly contradictory findings:
Evidence of fluid accumulation, such as generalized edema, ascites, or pleural effusions.
Simultaneous signs of inadequate circulating volume, including:
Hypotension
Tachycardia
Reduced urine output
Poor tissue perfusion
Cool extremities
Delayed capillary refill
Although these findings may appear inconsistent at first, they reflect one of the defining characteristics of third-spacing: fluid is present within the body but unavailable where it is needed most.
Third-spacing may involve several anatomical locations depending on the underlying cause, including:
The interstitial space surrounding tissues.
The peritoneal cavity, producing ascites.
The pleural cavity, causing pleural effusions.
The pericardial space.
Damaged soft tissues following burns or severe trauma.
In each case, the problem is not simply excess fluid but rather abnormal redistribution of fluid away from the circulation.
Feeling stressed about writing a detailed nursing paper?
Understanding Third Space in Nursing is essential because it connects foundational knowledge of anatomy and physiology with real-world patient care. Rather than being an isolated physiological concept, third-spacing influences assessment findings, clinical decision-making, medication administration, and the prioritization of nursing interventions across virtually every healthcare setting.
Recognizing the early signs of abnormal fluid shifts enables prompt intervention before patients deteriorate into life-threatening conditions.
For example, consider the following clinical scenario.
A patient develops septic shock following abdominal surgery. Within several hours, inflammatory mediators increase capillarypermeability, allowing proteins and plasma to leak into surrounding tissues. Although the patient receives several liters of intravenous fluids, blood pressure continues to fall, urine output decreases, and generalized swelling develops. The patient’s overall body water has increased, yet effective circulating plasma volume continues to decline because large quantities of fluid have entered the third space.
Without an understanding of Third Space in Nursing, this patient’s condition may appear confusing. However, knowledge of third-spacing allows nurses to recognize that additional assessment and targeted interventions are needed rather than assuming the patient simply requires more fluids.
Third-spacing also plays a critical role in understanding numerous disease processes, including:
Sepsis
Extensive burns
Major surgery
Severe pancreatitis
Liver cirrhosis with ascites
Heart failure
Kidney disease
Anaphylaxis
Severe inflammatory disorders
Each of these conditions affects normal vascular integrity or alters the forces controlling fluid movement, leading to abnormal redistribution of extracellular fluid.
For nurses, understanding third-spacing supports several critical responsibilities, including:
Identifying early signs of deteriorating circulation.
Monitoring fluid volume using intake and output records, body weight, and hemodynamic assessment.
Safely administer prescribed crystalloid, colloid, blood products, or diuretic therapy.
Evaluating treatment effectiveness.
Recognizing complications before irreversible organ injury develops.
Communicating significant assessment findings promptly to the healthcare team.
These responsibilities highlight why mastery of Third Space in Nursing is fundamental to safe, evidence-based nursing practice.
The Difference Between Third Space and Third-Spacing
Although the terms “third space” and “third-spacing” are often used interchangeably in clinical practice, they describe different aspects of the same physiological phenomenon. Appreciating this distinction provides a clearer understanding of disease mechanisms and helps avoid confusion when interpreting clinical literature.
The third space refers to the anatomical location where fluid becomes trapped outside the normal circulating compartment. This is not a single physical structure but rather a functional concept describing areas where fluid no longer contributes to effective circulation. Examples include:
The interstitial space
The peritoneal cavity (ascites)
Pleural spaces
Damaged tissues after burns or trauma
In contrast, third-spacing refers to the physiological process through which fluid leaves the vascular compartment and enters these abnormal locations. In other words:
Third space = the destination where fluid becomes sequestered.
Third-spacing = the process by which fluid moves into that destination.
This distinction can be summarized as follows:
Term
Meaning
Third space
The location where fluid abnormally accumulates and becomes functionally unavailable.
Third-spacing
The physiological process in which fluid leaves the circulation and enters the third space.
An everyday analogy helps illustrate this difference.
Imagine rainwater flowing through a city’s drainage system. If water leaves the streets and collects in a large underground reservoir where it cannot return to circulation, the reservoir represents the third space, while the movement of water into that reservoir represents third-spacing.
In clinical practice, third spacing occurs when one or more physiological mechanisms become disrupted. Common contributing factors include:
Increased capillary permeability during inflammation.
Reduced oncotic pressure caused by low albumin levels.
Lymphaticobstruction preventing removal of excess interstitial fluid.
Severe inflammatory responses that damage the vascular barrier.
Because the specific treatment depends on the underlying cause, management strategies vary considerably between patients. For example:
A patient with septic shock may require aggressive isotoniccrystalloid resuscitation followed by vasopressors to restore tissue perfusion.
A patient with cirrhosis and severe ascites may benefit from albumin replacement, sodium restriction, therapeutic paracentesis, and carefully monitored diuretic therapy.
A burn patient may require large volumes of intravenous fluids during the initial resuscitation phase because massive fluid shifts occur soon after injury.
Understanding the distinction between third space and third-spacing provides the conceptual framework for the remainder of this discussion. As the following sections explore normal fluid physiology, the mechanisms of abnormal fluid redistribution, and evidence-based fluid management, this distinction will help explain why patients can simultaneously exhibit widespread edema, reduced circulatory volume, and impaired organ perfusion despite retaining large quantities of fluid within the body.
Understanding Fluid Physiology and Body Fluid Compartments
A thorough understanding of Third Space in Nursing begins with understanding normal fluid physiology. Before exploring how third-spacing develops, it is essential to understand how fluid is distributed throughout the body, how it normally moves between different fluid compartments, and which physiological mechanisms maintain fluid balance. Third-spacing is fundamentally a disorder of normal fluid distribution. Therefore, nurses must first understand what “normal” looks like before they can recognize when pathological fluid shifts occur.
Water is the largest component of the human body, accounting for approximately 50% to 60% of total body weight in healthy adults, although this percentage varies according to age, sex, and body composition (Hall, 2021). This water is not randomly dispersed. Instead, it is carefully organized into specialized fluid compartments, each performing unique physiological functions while continuously exchanging water, electrolytes, nutrients, gases, and waste products.
The body’s ability to maintain life depends on preserving the proper amount of fluid within each compartment. Even relatively small changes in fluid volume can impair circulation, cellular metabolism, oxygen delivery, and organ function. This explains why diseases that disrupt normal fluid distribution, such as sepsis, extensive burns, severe trauma, and liver cirrhosis, can rapidly become life-threatening.
The major body fluid compartments include:
Intracellular fluid (ICF) – the fluid inside the body’s cells.
Extracellular fluid (ECF) – the fluid outside the cells, which includes:
Intravascular fluid (plasma)
Interstitial fluid
Transcellular fluid
Each compartment is separated by selectively permeable membranes that regulate the movement of water and dissolved substances. These barriers ensure that fluid remains appropriately distributed while allowing essential exchange between compartments.
One of the most important concepts in Third Space in Nursing is that third-spacing does not increase the total amount of body water. Instead, it changes where that water is located. When fluid moves from the intravascular compartment into the interstitial space or other abnormal locations, the total body fluid remains largely unchanged, but the circulating volume decreases significantly. Consequently, patients may develop impaired tissue perfusion despite appearing fluid overloaded.
Intravascular, Interstitial Space, and Intracellular Fluid
Understanding the individual characteristics of each fluid compartment is essential because third-spacing primarily involves abnormal redistribution between these compartments rather than an actual loss of water from the body.
Intravascular Fluid
The intravascular compartment consists of the plasma contained within the blood vessels. Although it represents only about 20–25% of the extracellular fluid, it is arguably the most clinically important compartment because it directly supports circulation.
The primary functions of intravascular fluid include:
Maintaining adequate blood pressure.
Supporting cardiac output.
Transporting oxygen and nutrients to tissues.
Carrying hormones throughout the body.
Removing carbon dioxide and metabolic waste.
Maintaining tissue perfusion.
Delivering immune cells to sites of infection.
Because this compartment supports circulation, relatively small reductions in intravascular volume can produce significant physiological consequences. When third spacing occurs, plasma leaks through the capillary walls into surrounding tissues. Although total body water remains unchanged, effective circulating volume falls, placing patients at risk for hypotension and eventually hypovolemic shock if the process continues unchecked.
A patient with severe septic shock illustrates this concept well. During widespread inflammation, increased vascular permeability allows large quantities of plasma to escape from the circulation. The patient may receive several liters of intravenous fluids yet continue to demonstrate hypotension because much of the administered fluid also leaves the vascular compartment.
Interstitial Space
The interstitial space occupies the spaces between cells and contains interstitial fluid, which surrounds nearly every cell within the body. This compartment serves as the primary exchange area between blood and tissues.
The interstitial compartment performs several essential functions:
Delivers oxygen from the circulation to tissues.
Supplies nutrients to cells.
Removes metabolic waste products.
Allows immune cells to migrate toward sites of injury.
Provides structural support through surrounding connective tissue.
Under normal conditions, only a small amount of fluid remains within this compartment because excess interstitial fluid is continuously removed by the lymphatic system and returned to the bloodstream.
However, numerous disease processes can overwhelm this protective mechanism. Increased capillary permeability, reduced albumin, elevated venous pressure, or lymphatic obstruction may all cause excessive accumulation of fluid within the interstitial tissues. As fluid continues to accumulate, patients develop visible edema, tissue swelling, impaired oxygen diffusion, delayed wound healing, and reduced tissue perfusion.
For example, a patient recovering from extensive burns often develops profound tissue swelling because damaged capillaries allow proteins and water to enter the interstitial compartment faster than the lymphatic system can remove them.
Intracellular Fluid
The largest fluid compartment is intracellular fluid, representing approximately two-thirds of total body water. This is the fluid inside the cells themselves.
Intracellular fluid is essential for:
Cellular metabolism.
Protein synthesis.
Enzyme activity.
Energy production.
Maintenance of normal electrolyte gradients.
Cell growth and repair.
Unlike third-spacing, which primarily involves the extracellular compartment, intracellular fluid generally remains relatively stable unless major electrolyte disturbances alter osmotic gradients.
For example:
Severe hyponatremia causes water to move into cells, leading to cellular swelling.
Hypernatremia draws water out of cells, causing cellular dehydration.
Although these conditions involve abnormal water movement, they differ from third-spacing because they primarily affect the intracellular compartment rather than causing fluid sequestration within the interstitial tissues or body cavities.
Transcellular Fluid
A smaller portion of extracellular fluid exists as transcellular fluid. Although this compartment normally represents only a small percentage of total body water, it performs highly specialized functions.
Examples include:
Cerebrospinal fluid surrounding the brain and spinal cord.
Synovial fluid within joints.
Pleural fluid.
Pericardial fluid.
Peritoneal fluid.
Under pathological conditions, fluid may abnormally accumulate within these spaces. For example, patients with liver cirrhosis may develop ascites, in which large volumes of fluid collect within the peritoneal cavity. Likewise, severe inflammation may produce pleural or pericardial effusions that impair respiratory or cardiac function.
How Fluid Normally Moves Through the Body
The movement of fluid between body compartments is a highly regulated physiological process. Rather than remaining stationary, water continuously shifts between the intravascular, interstitial, and intracellular compartments in response to changing physiological demands.
Several mechanisms contribute to this movement.
1. Diffusion
Diffusion refers to the movement of dissolved particles from areas of higher concentration toward areas of lower concentration.
Examples include:
Oxygen diffusing from capillaries into tissues.
Carbon dioxide diffusing from tissues into blood.
Electrolytes moving across cell membranes according to concentration gradients.
Although diffusion primarily involves solutes rather than water itself, it contributes significantly to maintaining normal tissue homeostasis.
2. Filtration
Filtration occurs when fluid is pushed through the capillary wall into the surrounding interstitial tissues.
This process is primarily driven by hydrostatic pressure, which is generated by the pumping action of the heart.
Filtration allows:
Delivery of nutrients.
Distribution of oxygen.
Removal of waste products.
Under healthy conditions, filtration is carefully balanced with fluid returning to the circulation.
3. Reabsorption
Reabsorption refers to the movement of fluid back into the circulation after it has entered the interstitial tissues.
This process is largely influenced by plasma proteins, especially albumin, which create osmotic forces that pull water back into the bloodstream.
Not all filtered fluid returns directly to the bloodstream.
Instead, excess interstitial fluid enters the lymphatic vessels before eventually returning to the venous circulation.
The lymphatic system therefore serves several vital functions:
Removes excess tissue fluid.
Returns leaked plasma proteins to the circulation.
Prevents persistent edema.
Supports immune surveillance.
When lymphatic drainage becomes impaired because of surgery, malignancy, infection, or congenital abnormalities, fluid progressively accumulates within tissues, producing chronic swelling.
The Role of Hydrostatic and Oncotic Pressure
The normal distribution of body fluids depends primarily on the balance between hydrostatic pressure and oncotic pressure across the capillary membrane. Together, these forces regulate the continuous exchange of water between the circulation and surrounding tissues.
Hydrostatic Pressure
Hydrostatic pressure is the force exerted by circulating blood against the walls of the blood vessels.
Its primary function is to push fluid outward from the capillary into the interstitial space.
Hydrostatic pressure increases under several conditions, including:
Hypertension.
Venous congestion.
Heart failure.
Excessive intravenous fluid administration.
When hydrostatic pressure becomes excessively elevated, more fluid leaves the circulation than can be reabsorbed, increasing the likelihood of edema and third-spacing.
Oncotic Pressure
Oncotic pressure, also known as colloid osmotic pressure, is generated primarily by albumin and other plasma proteins.
Unlike hydrostatic pressure, oncotic pressure pulls water back into the circulation, maintaining adequate intravascular volume.
Conditions that reduce plasma protein concentrations decrease oncotic pressure and promote third-spacing. Examples include:
Liver cirrhosis.
Severe malnutrition.
Nephrotic syndrome.
Extensive burns.
In patients with liver cirrhosis, impaired albumin synthesis reduces plasma oncotic pressure, allowing increasing amounts of fluid to leave the circulation and collect as ascites within the abdominal cavity.
Maintaining the Balance
Healthy fluid distribution depends on maintaining equilibrium between these opposing forces.
Under normal physiological conditions:
Hydrostatic pressure pushes fluid outward.
Oncotic pressure draws fluid inward.
The lymphatic system removes excess interstitial fluid.
When one or more of these mechanisms fails because of inflammation, increased vascular permeability, reduced albumin, elevated venous pressure, or lymphatic dysfunction, normal fluid balance is disrupted. The resulting abnormal fluid shifts form the physiological basis of Third Space in Nursing and explain why patients may simultaneously develop widespread edema, reduced intravascular volume, impaired tissue perfusion, and progressive circulatory instability. Understanding these normal physiological processes provides the essential foundation for the next section, which examines exactly how third-spacing develops and why fluid becomes trapped outside the vascular compartment.
How Third-Spacing Develops
Understanding Third Space in Nursing requires more than knowing where fluid is located—it also requires understanding how third-spacing develops. Third-spacing is not a disease itself but rather a pathophysiological process that occurs when the normal mechanisms regulating fluid balance become disrupted. During this process, fluid moves from the intravascular compartment into the interstitial space or other body cavities, where it becomes functionally unavailable for circulation.
Under normal physiological conditions, only small amounts of fluid leave the blood vessels at any given time. This fluid nourishes surrounding tissues before returning to the circulation through reabsorption and lymphatic drainage. The balance between filtration and reabsorption ensures that tissues remain hydrated while preserving adequate intravascular volume for effective circulation.
When this balance is disturbed, however, fluid begins to leave the circulation faster than it can be returned. As the process continues, fluid accumulates within the interstitial tissues or transcellular spaces, resulting in reduced circulating blood volume despite little or no reduction in the body’s total water content. This abnormal redistribution of extracellular fluid is the hallmark of third-spacing.
Several physiological mechanisms contribute to this process, including:
Increased capillary permeability.
Altered hydrostatic pressure.
Reduced oncotic pressure resulting from decreased albumin.
Impaired lymphatic drainage.
Persistent inflammatory responses.
Although these mechanisms often occur simultaneously, understanding each one individually provides a clearer picture of why third spacing occurs in so many disease processes.
The development of third-spacing generally follows a predictable sequence:
An injury, infection, or disease disrupts normal vascular function.
The capillary wall becomes more permeable or abnormal pressure gradients develop.
Water, electrolytes, and plasma proteins leave the intravascular space.
Fluid accumulates within the interstitial space or other body compartments.
Effective circulating volume decreases.
Tissue perfusion becomes impaired.
Compensatory mechanisms attempt to preserve blood pressure and organ function.
Without appropriate treatment, progressive circulatory failure may occur.
A clinical example illustrates this sequence.
A patient admitted with severe pancreatitis develops widespread inflammation shortly after admission. Inflammatory mediators increase vascular permeability, allowing protein-rich plasma to leak into surrounding tissues. Over the next several hours, generalized swelling develops, blood pressure falls, heart rate increases, and urine output decreases. Although several liters of intravenous fluid have been administered, much of the fluid has redistributed into the interstitial space, leaving the patient functionally hypovolemic. This scenario demonstrates the classic development of third-spacing.
Movement of Fluid into the Interstitial Space
The most important event in Third Space in Nursing is the abnormal movement of fluid out of the circulation and into the interstitial space. This process represents a failure of the body’s normal mechanisms for regulating fluid compartments.
Under healthy conditions, fluid moves continuously between the intravascular and interstitial compartments. At the arterial end of the capillary, hydrostatic pressure pushes a small amount of fluid into surrounding tissues. At the venous end, oncotic pressure, generated primarily by albumin, draws much of that fluid back into the circulation. The remaining fluid is collected by the lymphatic system and eventually returned to the bloodstream.
This delicate balance ensures that:
Cells receive oxygen and nutrients.
Waste products are removed.
Tissue hydration is maintained.
Adequate intravascular fluid volume is preserved.
When this balance becomes disrupted, fluid moves from the intravascular compartment into the interstitial space in much larger quantities than normal. Instead of being rapidly reabsorbed, the fluid begins to accumulate within surrounding tissues.
Several factors contribute to this excessive filtration:
Increased capillary leakage.
Reduced plasma protein concentration.
Elevated vascular pressure.
Impaired lymphatic drainage.
As more fluid enters the interstitial tissues, the body experiences two simultaneous problems:
Local Effects
Within affected tissues, excessive interstitial fluid causes:
Tissue swelling.
Edema.
Increased diffusion distance for oxygen.
Reduced nutrient delivery.
Delayed wound healing.
Compression of surrounding structures.
Systemic Effects
Throughout the body, loss of circulating plasma results in:
Reduced intravascular volume.
Decreased venous return.
Lower cardiac output.
Reduced organ perfusion.
Compensatory tachycardia.
Progressive hypotension.
For example, a patient with extensive burns often loses large quantities of plasma through damaged capillary walls. Although the skin appears markedly swollen because fluid has entered the surrounding tissues, the patient simultaneously develops hypotension because effective circulating volume has fallen dramatically.
Another common example is liver cirrhosis. Reduced albumin synthesis decreases plasma oncotic pressure, allowing increasing amounts of fluid to move into the peritoneal cavity, producing ascites. Despite visible abdominal distension, the patient may still exhibit signs of reduced circulating volume.
These examples emphasize an important clinical principle:
Third-spacing is characterized by redistribution rather than true fluid loss. The fluid remains within the body but is no longer available to support adequate circulation.
Increased Capillary Permeability and Inflammation
One of the most important mechanisms responsible for third-spacing is increased capillary permeability. Under normal conditions, the capillary wall functions as a selective barrier, allowing water and small dissolved substances to pass while retaining larger plasma proteins within the circulation.
During inflammatory states, this protective barrier becomes disrupted.
Inflammation is the body’s natural response to injury, infection, or tissue damage. Although essential for healing, inflammation also produces profound changes in vascular function that contribute directly to third-spacing.
When inflammatory mediators such as histamine, bradykinin, prostaglandins, cytokines, and leukotrienes are released, they produce several important effects:
Relaxation of vascular smooth muscle.
Widening of spaces between endothelial cells.
Increased permeability of capillary walls.
Leakage of water into surrounding tissues.
Leakage of plasma proteins, including albumin.
Activation of immune cells.
Because proteins escape together with water, the remaining plasma loses much of its ability to generate oncotic pressure. Consequently, even more fluid leaves the circulation, accelerating third-spacing.
This creates a self-perpetuating cycle:
Inflammation increases capillary permeability.
Plasma proteins leak into tissues.
Oncotic pressure falls.
More fluid leaves the circulation.
Edema worsens.
Tissue perfusion decreases.
Continued inflammation further damages the vascular barrier.
Several clinical conditions illustrate this process.
Sepsis
Sepsis is among the most common causes of severe third-spacing. During systemic infection, inflammatory mediators affect capillaries throughout the body rather than within a single organ. As vascular leakage becomes widespread, patients rapidly develop hypotension despite receiving aggressive crystalloid resuscitation.
Severe Trauma
Following severe trauma, damaged tissues release inflammatory mediators that increase vascular permeability around injured areas. Large amounts of plasma enter surrounding tissues, contributing to extensive swelling and reduced circulating volume.
Major Surgery
Even uncomplicated major surgery triggers a temporary inflammatory response. Tissue manipulation, surgical stress, and anesthesia all contribute to transient increases in capillary permeability, explaining why postoperative patients often require careful monitoring of fluid volume and urine output.
Anaphylaxis
In anaphylaxis, inflammatory mediators are released almost instantaneously. Massive vasodilation and increased vascular permeability cause rapid plasma leakage, producing hypotension, airway swelling, and circulatory collapse if not treated immediately.
Understanding the relationship between inflammation and capillary permeability helps explain why patients with inflammatory disorders often require close hemodynamic monitoring even before visible edema develops.
The Role of the Lymphatic System
Although much attention is given to blood vessels during discussions of Third Space in Nursing, the lymphatic system is equally important for maintaining normal fluid balance. Without an effective lymphatic system, even healthy individuals would develop significant edema because small amounts of filtered fluid continually leave the capillaries during normal circulation.
The lymphatic system serves several essential functions:
Returns excess interstitial fluid to the bloodstream.
Removes leaked plasma proteins from tissues.
Supports immune surveillance.
Filters microorganisms through lymph nodes.
Helps maintain normal fluid compartments.
Under normal conditions, only a small amount of fluid remains within the interstitial space because lymphatic vessels continuously collect excess fluid and transport it back to the venous circulation.
However, when the amount of filtered fluid exceeds lymphatic capacity, or when obstruction impairs lymphatic drainage, fluid progressively accumulates within tissues.
Common causes of lymphatic dysfunction include:
Cancer involving lymph nodes.
Surgical removal of lymph nodes.
Radiation therapy.
Severe infection.
Congenital lymphatic abnormalities.
Extensive tissue injury.
A familiar example is a patient who develops chronic arm swelling after breast cancer surgery involving axillary lymph node removal. Although blood circulation remains intact, impaired lymphatic drainage prevents adequate removal of excess interstitial fluid, resulting in persistent lymphedema.
During severe inflammatory illnesses such as septic shock or extensive burns, lymphatic drainage often becomes overwhelmed. The enormous volume of fluid escaping from the circulation exceeds the lymphatic system’s capacity to return it to the bloodstream. As a result, fluid accumulates rapidly throughout the tissues despite an intact lymphatic network.
Fortunately, third-spacing is not always permanent. As the underlying cause improves and inflammation resolves, capillary permeability gradually returns to normal. The lymphatic system begins removing excess interstitial fluid, allowing fluid to mobilize and eventually shifts back into the circulation. This recovery phase requires careful monitoring because rapid movement of fluid back into the vascular compartment can increase cardiac output and intravascular volume, potentially precipitating pulmonary edema or worsening heart failure in susceptible patients.
For this reason, ongoing assessment of body weight, vital signs, urine output, electrolyte status, and overall clinical response remains essential throughout both the acute third-spacing phase and the recovery period. Appreciating the dynamic relationship between capillary function, inflammation, and lymphatic drainage provides the physiological foundation for understanding why patients develop third-spacing and prepares nurses to recognize the diverse clinical conditions in which this phenomenon occurs.
Common Causes of Third-Spacing
Understanding the common causes of third-spacing is essential because Third Space in Nursing is not considered a disease itself but rather a physiological response to an underlying pathological condition. In clinical practice, third-spacing develops when normal mechanisms responsible for maintaining fluid balance fail, allowing fluid to leave the intravascular space and accumulate within the interstitial space or other body cavities.
Although the underlying diseases vary considerably, they all share one or more pathophysiological mechanisms that promote abnormal fluid shifts, including:
Increased capillary permeability
Reduced oncotic pressure due to decreased albumin
Elevated hydrostatic pressure
Impaired lymphatic drainage
Systemic inflammatory responses
Changes in vascular integrity
The severity of third-spacing often depends on:
The extent of vascular injury
The patient’s baseline health
The amount of fluid leaving the circulation
The speed at which the process develops
How quickly the underlying cause is identified and treated
For nurses, identifying the condition responsible for third-spacing is just as important as recognizing the fluid imbalance itself. Management strategies differ significantly depending on the underlying disease. For example, the treatment approach for a patient with sepsis differs substantially from that of a patient with cirrhosis and ascites, even though both conditions may produce extensive third-spacing.
The following sections discuss the most common clinical conditions that contribute to Third Space in Nursing and explain the physiological mechanisms responsible for abnormal fluid redistribution.
Sepsis and Severe Infection
Sepsis is one of the most important and frequently encountered causes of third-spacing, particularly in emergency departments and intensive care units. It represents a dysregulated response to infection in which the body’s immune system triggers widespread inflammation, affecting nearly every organ system.
Unlike localized infections, septic patients develop systemic inflammation that profoundly alters vascular function. One of the earliest and most significant changes is increased capillary permeability. Normally, capillary walls selectively regulate the movement of water and dissolved substances between the bloodstream and surrounding tissues. During sepsis, inflammatory mediators such as cytokines, histamine, nitric oxide, and tumor necrosis factor disrupt this barrier, allowing plasma, proteins, and water to escape into the interstitial tissues.
The progression of third-spacing during sepsis generally follows this sequence:
A severe infection activates the immune system.
Large quantities of inflammatory mediators are released into the bloodstream.
Capillary walls become increasingly permeable.
Fluid moves from the intravascular compartment into the interstitial space.
Albumin and other plasma proteins also leak into surrounding tissues.
Reduced oncotic pressure allows even more fluid to leave the circulation.
This explains why patients with septic shock often exhibit two seemingly contradictory findings:
Generalized edema resulting from accumulation of fluid within tissues.
Clinical signs of hypovolemic circulation, including hypotension, tachycardia, cool extremities, and decreased urine output.
Clinical Example
A 68-year-old patient is admitted with severe bacterial pneumonia. Within several hours, blood pressure decreases to 82/50 mmHg despite receiving multiple liters of isotoniccrystalloid solution. The patient’s arms and legs become noticeably swollen, and laboratory studies reveal elevated serum lactate, indicating poor tissue oxygenation. In this situation, additional fluid alone may not completely restore circulation because much of the administered fluid continues to leak into the interstitial space due to ongoing inflammation.
This example demonstrates why fluid management in septic patients requires continuous reassessment. Nurses must carefully monitor:
Blood pressure
Heart rate
Oxygen saturation
Urine output
Mental status
Serum lactate
Electrolyte levels
Response to intravenous fluids
Early recognition of third-spacing during sepsis is essential because delayed treatment significantly increases the risk of hypovolemic shock, acute kidney injury, respiratory failure, and multiple organ dysfunction.
Burns, Trauma, and Surgery
Extensive burns, severe trauma, and major surgery are among the most common noninfectious causes of third-spacing. Although each condition has a different origin, all trigger significant inflammatory responses that disrupt normal vascular integrity.
Burns
Burn injuries produce some of the most dramatic examples of third-spacing encountered in clinical practice. Thermal injury damages the skin’s protective barrier while simultaneously increasing capillary permeability throughout the affected tissues.
Within hours of a major burn:
Fluid rapidly leaves the blood vessels.
Plasma proteins leak into surrounding tissues.
Fluid accumulates within damaged skin and subcutaneous tissues.
Massive edema develops.
Effective circulating volume declines.
Patients with extensive burns may lose large quantities of intravascular fluid during the first 24 hours after injury. This is why burn resuscitation protocols emphasize aggressive intravenouscrystalloid replacement during the initial phase of treatment.
Without adequate resuscitation, progressive third-spacing can result in:
Severe hypotension
Reduced tissue perfusion
Acute kidney injury
Hypovolemic shock
Severe Trauma
Traumatic injuries trigger a similar inflammatory cascade. Tissue damage stimulates the release of inflammatory mediators that increase vascular permeability, allowing fluid to enter surrounding tissues.
Examples include:
Multiple fractures
Crush injuries
Blunt abdominal trauma
Penetrating injuries
Large hematomas may further contribute to third-spacing because blood and plasma become trapped outside the normal circulation.
Major Surgery
Even uncomplicated major surgery causes temporary physiological changes that promote third-spacing. Surgical tissue manipulation, anesthesia-induced vasodilation, and postoperative inflammation all influence vascular function.
During the postoperative period:
Capillary permeability temporarily increases.
Fluid shifts into injured tissues.
Surgical sites become swollen.
Temporary reductions in circulating volume may occur.
Patients undergoing extensive abdominal, cardiac, or vascular procedures often require careful monitoring because postoperative third-spacing may persist for 24–72 hours before fluid gradually shifts back into the circulation as healing progresses.
For nurses caring for postoperative patients, monitoring should include:
Vital signs
Surgical wound assessment
Daily body weight
Intake and output
Signs of worsening edema
Hemodynamic stability
Liver Disease and Ascites
Chronic liver disease is another major cause of Third Space in Nursing, particularly in patients with advanced cirrhosis. Unlike sepsis or burns, where increased vascular permeability is the dominant mechanism, liver disease primarily promotes third-spacing through reduced albumin production and altered portal circulation.
The liver synthesizes most of the body’s albumin, the primary protein responsible for maintaining oncotic pressure. When liver function declines, albumin production decreases significantly.
As plasma albumin falls:
Oncotic pressure decreases.
Less fluid is pulled back into the circulation.
More fluid remains within the interstitial space.
Fluid progressively enters the peritoneal cavity.
Ascites develops.
Portal hypertension further worsens the problem by increasing hydrostatic pressure within abdominal blood vessels, forcing additional fluid into surrounding tissues.
Clinical Manifestations
Patients with cirrhosis commonly present with:
Progressive abdominal enlargement
Ascites
Peripheral edema
Reduced intravascular volume
Muscle wasting
Fatigue
Hypotension
Decreased urine output
Despite carrying several liters of excess abdominal fluid, these patients frequently demonstrate signs of poor circulatory volume because much of their fluid has entered the third space.
Clinical Example
A patient with decompensated cirrhosis presents with a tense, distended abdomen and bilateral lower-extremity edema. Ultrasound confirms several liters of ascitic fluid within the abdominal cavity. Although the patient appears fluid overloaded, laboratory studies reveal low serum albumin, and blood pressure remains borderline low due to reduced effective circulating volume.
Management focuses not only on removing ascitic fluid but also on correcting the physiological disturbances contributing to third-spacing. Depending on the patient’s condition, treatment may include:
Sodium restriction
Diuretic therapy
Albumin infusion
Therapeutic paracentesis
Ongoing monitoring of renal function and electrolyte balance
Heart Failure, Kidney Disease, and Other Conditions
Several additional medical conditions may contribute to third-spacing by altering hydrostatic pressure, vascular integrity, renal regulation, or protein balance.
Heart Failure
In heart failure, reduced cardiac pumping ability decreases forward blood flow while increasing venous pressure behind the failing heart.
Elevated venous pressure raises hydrostatic pressure, forcing increasing amounts of fluid into surrounding tissues.
Patients commonly develop:
Peripheral edema
Pulmonary edema
Weight gain
Reduced exercise tolerance
Elevated jugular venous pressure
Although heart failure primarily causes fluid overload, prolonged elevations in hydrostatic pressure may contribute to third-spacing, particularly during acute decompensation.
Kidney Disease
The kidneys play a central role in regulating fluid volume, sodium balance, and electrolyte homeostasis.
Several renal disorders contribute to third-spacing through different mechanisms.
For example:
Nephrotic syndrome causes massive urinary protein loss, reducing plasma albumin and lowering oncotic pressure.
Acute kidney injury decreases the kidneys’ ability to regulate fluid and electrolyte balance.
Chronic kidney disease promotes sodium and water retention, increasing extracellular fluid volume.
These disturbances often produce generalized edema while simultaneously impairing effective circulation.
Pancreatitis
Acute pancreatitis produces profound inflammation within the abdomen.
Digestive enzymes and inflammatory mediators increase vascular permeability, allowing large volumes of fluid to enter retroperitoneal tissues and surrounding spaces.
Patients frequently require aggressive fluid management because significant third-spacing develops during the early stages of the disease.
Anaphylaxis
Anaphylaxis represents one of the fastest forms of third-spacing encountered in clinical practice.
Following exposure to an allergen:
Histamine is released rapidly.
Blood vessels dilate.
Capillary permeability increases dramatically.
Plasma leaks into surrounding tissues.
Blood pressure falls abruptly.
Without immediate treatment, profound third-spacing can rapidly progress to circulatory collapse.
Other Conditions
Additional conditions associated with third-spacing include:
Severe inflammatory disorders
Bowel obstruction
Intestinal ischemia
Extensive soft tissue infections
Malignancies causing lymphatic obstruction
Massive blood transfusion reactions
Prolonged mechanical ventilation in critically ill patients
Although these conditions differ in their pathophysiology, they all disrupt normal fluid physiology, allowing abnormal fluid shifts that reduce effective circulating volume.
A key principle for nurses is that treatment depends on the underlying cause. While restoring intravascular volume with appropriate crystalloid, colloid, or blood products may be necessary during the acute phase, definitive management requires addressing the disease process responsible for third-spacing. Accurate assessment, continuous monitoring, and early recognition of changes in patient status remain essential nursing responsibilities, as timely intervention can prevent progression to shock, organ dysfunction, and other life-threatening complications associated with Third Space in Nursing.
Clinical Manifestations of Third Space
Recognizing the clinical manifestations of Third Space in Nursing is one of the most important nursing competencies because patients often deteriorate rapidly once significant fluid shifts occur. Unlike many conditions that present with a single, obvious symptom, third-spacing produces a combination of findings that may initially appear contradictory. For example, a patient may have generalized edema and ascites, suggesting excess fluid, while simultaneously exhibiting hypotension, tachycardia, and poor tissue perfusion, indicating reduced effective circulating volume.
This apparent contradiction occurs because the problem is not the total amount of body water but rather its distribution. As fluid moves from the intravascular compartment into the interstitial space or other body cavities, the intravascular volume decreases while fluid accumulates elsewhere. Consequently, the body attempts to compensate for reduced circulating blood volume by activating several physiological mechanisms, including increased heart rate, vasoconstriction, and hormonal responses that promote sodium and water retention.
The severity of clinical manifestations depends on several factors, including:
The amount of fluid that has shifted into the third space
The speed at which third spacing occurs
The patient’s age and overall health
The underlying cause, such as sepsis, burns, liver disease, or heart failure
The body’s ability to compensate for declining circulation
Patients with mild third-spacing may initially exhibit only subtle findings, whereas those with severe intravascular depletion may develop life-threatening circulatory compromise within hours. Because these changes often occur progressively, frequent nursing assessment is essential for early recognition and timely intervention.
A useful way to understand the manifestations of third-spacing is to divide them into three categories:
Early signs of reduced intravascular volume
Visible evidence of fluid accumulation
Progressive organ dysfunction caused by impaired perfusion
Understanding how these findings relate to the underlying physiology enables nurses to identify deterioration before irreversible complications develop.
Signs and Symptoms
The signs and symptoms of third-spacing reflect the body’s response to decreasing intravascular fluid volume and worsening tissue hypoperfusion. As more fluid leaves the circulation, the cardiovascular system activates multiple compensatory mechanisms to maintain blood pressure and preserve blood flow to vital organs.
Early Clinical Manifestations
During the early stages, patients commonly develop subtle signs that may easily be overlooked if careful assessment is not performed.
These early findings include:
Mild tachycardia
Slight reduction in urine output
Increasing thirst
Fatigue
Weakness
Delayed capillary refill
Mild hypotension or orthostatic hypotension
Cool extremities
Dry mucous membranes in some patients
These findings occur because the body attempts to preserve circulation by constricting peripheral blood vessels and increasing heart rate to maintain cardiac output.
Progressive Manifestations
As fluid shifts continue and intravascular volume declines further, compensatory mechanisms become insufficient.
Patients may then develop:
Persistent tachycardia
Marked hypotension
Narrow pulse pressure
Tachypnea
Dizziness
Confusion
Reduced level of consciousness
Oliguria (markedly decreased urine output)
Poor skin perfusion
Weak peripheral pulses
At this stage, oxygen delivery to tissues becomes increasingly inadequate because reduced circulating plasma limits effective blood flow.
Hemodynamic Changes
The cardiovascular system undergoes several important physiological changes during third-spacing.
These include:
Reduced venous return
Decreased preload
Lower stroke volume
Reduced cardiac output
Declining tissue perfusion
Unless appropriate fluid management restores adequate circulation, these changes continue to worsen and may ultimately progress to circulatory collapse.
Clinical Example
Consider a patient admitted with severe abdominal sepsis.
During the first several hours:
Heart rate increases from 82 to 122 beats per minute.
Blood pressure gradually falls.
Urine output decreases below 0.5 mL/kg/hour.
Skin becomes cool despite a rising body temperature.
Mild swelling develops in both hands and lower extremities.
Although generalized swelling is becoming apparent, the patient’s primary physiological problem is declining intravascular volume caused by widespread third-spacing. Recognizing these early findings allows nurses to intervene before hypovolemic shock develops.
Edema, Ascites, and Organ Dysfunction
The most recognizable manifestations of Third Space in Nursing are edema and ascites, both of which occur because excessive interstitial fluid accumulates outside the vascular compartment. While these findings are often visually obvious, they should never be interpreted in isolation. Instead, nurses must understand that visible swelling frequently coexists with reduced effective circulating volume.
Edema
Edema refers to the abnormal accumulation of fluid within the interstitial tissues. It develops when filtration of fluid from the capillaries exceeds the body’s ability to remove it through reabsorption and lymphatic drainage.
Several mechanisms contribute to edema formation during third-spacing:
Increased capillary permeability
Reduced oncotic pressure due to low albumin
Elevated hydrostatic pressure
Lymphatic obstruction
Persistent inflammatory responses
Edema may present in different ways depending on the underlying cause.
Examples include:
Peripheral edema involving the feet and ankles
Generalized edema (anasarca)
Facial swelling
Dependent edema in bedridden patients
Localized swelling surrounding injured tissues
Although edema represents excess extracellular fluid, it should not be interpreted as evidence of adequate circulation.
Ascites
Ascites is another classic manifestation of third-spacing and refers to abnormal accumulation of fluid within the peritoneal cavity.
Ascites commonly develops in:
Liver cirrhosis
Portal hypertension
Advanced malignancy
Severe pancreatitis
Some cases of heart failure
Patients with ascites may present with:
Progressive abdominal distension
Increased abdominal girth
Weight gain
Early satiety
Shortness of breath caused by diaphragmatic elevation
Abdominal discomfort
Despite carrying several liters of excess abdominal fluid, these patients often remain intravascularly depleted because much of their plasma has entered the third space.
Organ Dysfunction
As third-spacing progresses, declining tissue perfusion begins affecting multiple organ systems.
The kidneys are highly sensitive to reduced blood flow.
When renal perfusion declines, patients develop:
Reduced urine output
Rising serum creatinine
Elevated blood urea nitrogen
Acute kidney injury if prolonged
The kidneys also activate hormonal systems that retain sodium and water, further complicating fluid balance.
Respiratory System
Respiratory complications may develop through several mechanisms.
Large ascites can:
Restrict diaphragmatic movement.
Reduce lung expansion.
Increase the work of breathing.
Extensive edema or pleural effusions may also impair oxygen exchange.
Chest x-ray findings may reveal:
Pleural effusions
Pulmonary congestion
Reduced lung expansion
Gastrointestinal System
Reduced intestinal perfusion may cause:
Decreased bowel motility
Abdominal discomfort
Nausea
Delayed gastrointestinal recovery after surgery
In severe inflammatory disorders, intestinal edema may further worsen third-spacing by impairing nutrient absorption and increasing abdominal pressure.
Neurological System
As cerebral perfusion decreases, patients may experience:
Anxiety
Restlessness
Confusion
Difficulty concentrating
Reduced consciousness
These findings often indicate worsening circulatory compromise and require immediate evaluation.
Potential Complications
Without prompt recognition and appropriate treatment, the physiological disturbances associated with Third Space in Nursing may lead to serious complications affecting multiple organ systems.
Although total body water may be normal or even increased, severe loss of intravascular fluid results in inadequate tissue perfusion and circulatory collapse.
Clinical manifestations include:
Severe hypotension
Rapid tachycardia
Cold, clammy skin
Minimal urine output
Altered mental status
Elevated serum lactate
Multiple organ dysfunction
Immediate intravenous resuscitation and treatment of the underlying cause are essential to prevent death.
Acute Kidney Injury
Persistent reductions in renal blood flow decrease glomerular filtration, eventually causing acute kidney injury.
Nurses should closely monitor:
Urine output
Serum creatinine
Blood urea nitrogen
Daily body weight
Electrolyte abnormalities
Early intervention may prevent permanent renal damage.
Electrolyte Imbalances
Abnormal fluid shifts, aggressive fluid replacement, and diuretic therapy may all contribute to disturbances in electrolyte balance.
Common abnormalities include:
Hyponatremia
Hypernatremia
Hypokalemia
Hyperkalemia
Metabolic acidosis
Careful laboratory monitoring is essential throughout treatment.
Respiratory Complications
Fluid redistribution may contribute to:
Pleural effusions
Pulmonary edema after fluid shifts back into the circulation
Respiratory distress
Reduced oxygenation
Patients receiving aggressive fluid management, especially those with heart failure, require close respiratory assessment.
Delayed Wound Healing
Persistent tissue edema increases the distance oxygen and nutrients must travel to reach injured cells.
Consequently:
Surgical wounds heal more slowly.
Infection risk increases.
Tissue repair becomes less efficient.
This is particularly important following major surgery or extensive burns.
Multiple Organ Dysfunction
When third-spacing remains untreated, prolonged impairment of tissue perfusion may affect multiple organs simultaneously.
Potential consequences include:
Cardiovascular failure
Respiratory failure
Acute kidney injury
Hepatic dysfunction
Neurological deterioration
This progression highlights why early recognition of third-spacing is a critical nursing responsibility.
Key Nursing Considerations
When assessing patients with suspected third-spacing, nurses should remember the following principles:
Visible swelling does not necessarily indicate adequate circulating volume.
Declining urine output may be an early indicator of worsening intravascular depletion.
Hypotension often develops after significant fluid redistribution has already occurred.
Frequent reassessment is essential because clinical status can change rapidly.
Effective treatment depends on the underlying cause rather than simply replacing fluid.
Recognizing the clinical manifestations described above enables nurses to identify third-spacing early, prioritize appropriate interventions, and prevent progression to life-threatening complications. This understanding also provides the foundation for the next step in patient care—systematic assessment and diagnosis, where physical examination findings, laboratory results, and ongoing monitoring are integrated to confirm the presence of third-spacing and guide evidence-based management.
Assessment and Diagnosis of Third-Spacing
Accurate assessment and diagnosis of third-spacing are fundamental aspects of Third Space in Nursing because early recognition can significantly improve patient outcomes. Unlike many medical conditions that can be diagnosed using a single laboratory test or imaging study, third-spacing is primarily identified through a combination of clinical assessment, patient history, laboratory findings, hemodynamic trends, and diagnostic investigations. Nurses play a central role in this process because they are often the first healthcare professionals to recognize subtle changes in a patient’s condition.
One of the challenges in diagnosing third-spacing is that its clinical presentation may resemble other disorders involving abnormal fluid balance, such as dehydration, generalized edema, or congestive heart failure. Therefore, healthcare providers must evaluate the patient’s overall clinical picture rather than relying on a single finding.
A comprehensive assessment should answer several important questions:
Is the patient losing effective intravascular fluid?
Where is the fluid moving?
Is tissue perfusion becoming compromised?
What is the underlying cause of the abnormal fluid shifts?
Has organ dysfunction begun to develop?
Is the patient’s condition improving or deteriorating?
Answering these questions requires systematic evaluation of physical findings, laboratory data, imaging studies, and continuous monitoring.
An effective nursing assessment combines four key components:
Thorough physical examination.
Laboratory evaluation.
Diagnostic imaging and specialized investigations.
Continuous monitoring of fluid status and patient response to treatment.
Physical Assessment
The physical examination provides the earliest clues that third spacing occurs. Because nurses perform frequent bedside assessments, they are often the first to detect progressive changes in fluid volume and circulatory status.
A complete physical assessment should be performed from head to toe while paying particular attention to the cardiovascular, respiratory, renal, gastrointestinal, and integumentary systems.
General Appearance
Begin by observing the patient’s overall appearance.
Important observations include:
Level of consciousness
Anxiety or restlessness
Fatigue
Skin color
Work of breathing
Ability to speak comfortably
Signs of distress
Patients with worsening third-spacing may appear increasingly ill because declining tissue oxygen delivery affects multiple organ systems.
Vital Signs
Vital signs provide valuable information regarding the patient’s hemodynamic status.
Important parameters include:
Blood pressure
Heart rate
Respiratory rate
Temperature
Oxygen saturation
Characteristic findings during significant third-spacing include:
Tachycardia
Progressive hypotension
Tachypnea
Fever if sepsis is present
Reduced oxygen saturation when pulmonary complications develop
Trend analysis is particularly important. A gradual decline in blood pressure accompanied by increasing heart rate often indicates worsening intravascular volume depletion.
Cardiovascular Assessment
The cardiovascular examination focuses on identifying evidence of reduced circulating volume.
Assess for:
Weak peripheral pulses
Delayed capillary refill
Cool extremities
Narrow pulse pressure
Flattened neck veins in hypovolemic patients
Tachycardia
Patients experiencing severe third-spacing frequently compensate for declining circulating volume by increasing cardiac output through a faster heart rate. As compensation fails, hypotension becomes increasingly apparent.
Understanding Fluid Physiology and Body Fluid Compartments
Assessment for Edema
Assessment of edema should extend beyond simply noting its presence.
Evaluate:
Location
Severity
Symmetry
Extent
Progression over time
Common locations include:
Ankles
Lower legs
Hands
Sacrum
Face
Generalized swelling (anasarca)
When appropriate, assess for pitting edema using standardized grading:
Grade
Description
1+
Mild indentation that disappears rapidly
2+
Moderate indentation lasting several seconds
3+
Deep indentation with noticeable swelling
4+
Very deep indentation persisting for several minutes
Increasing edema despite worsening hypotension strongly suggests continued fluid moves from the intravascular compartment into the interstitial space.
Abdominal Assessment
Patients with ascites require careful abdominal evaluation.
Assessment includes:
Abdominal inspection
Measurement of abdominal girth
Palpation for tenderness
Percussion for shifting dullness
Assessment of bowel sounds
Progressive abdominal enlargement may indicate increasing accumulation of fluid within the peritoneal cavity.
Respiratory Assessment
Third-spacing may significantly affect respiratory function.
Assess for:
Increased respiratory rate
Dyspnea
Reduced breath sounds
Crackles
Pleural effusions
Increased work of breathing
Large ascitic collections may also restrict diaphragmatic movement, reducing lung expansion.
Skin Assessment
Skin examination provides additional evidence of changing fluid balance.
Observe for:
Skin temperature
Moisture
Turgor
Color
Tissue integrity
Surgical wound healing
Persistent tissue swelling may impair oxygen delivery and delay wound healing, particularly following major surgery, burns, or trauma.
Renal Assessment
The kidneys are highly sensitive to declining circulation.
Nurses should carefully monitor:
Urine output
Urine color
Urine concentration
Frequency of voiding
An output below 0.5 mL/kg/hour may indicate inadequate renal perfusion and requires prompt evaluation.
Clinical Example
Consider a patient recovering from abdominal surgery.
During the first postoperative day:
Blood pressure falls from 122/78 mmHg to 98/60 mmHg.
Although the patient appears to have excess fluid, the assessment findings suggest progressive third-spacing with declining effective intravascular volume, requiring immediate reassessment and intervention.
Laboratory and Diagnostic Findings
Laboratory investigations help confirm the physiological changes associated with Third Space in Nursing, identify the underlying cause, evaluate organ function, and guide treatment decisions.
No laboratory test alone confirms third-spacing. Instead, diagnosis relies on interpreting laboratory findings within the context of the patient’s clinical presentation.
Complete Blood Count (CBC)
The CBC provides valuable information regarding infection, inflammation, and hemoconcentration.
Possible findings include:
Elevated white blood cell count in infection
Increased hematocrit due to reduced plasma volume
Anemia following trauma or hemorrhage
Serum Electrolytes
Monitoring electrolyte concentrations is essential because abnormal fluid shifts, renal dysfunction, and treatment interventions frequently alter electrolyte balance.
Common abnormalities include:
Hyponatremia
Hypernatremia
Hypokalemia
Hyperkalemia
Hypocalcemia
Electrolyte trends often influence decisions regarding ongoing fluid management.
Albumin and Total Protein
Serum albumin is one of the most important laboratory markers when evaluating patients with third-spacing.
Low albumin levels reduce oncotic pressure, promoting continued movement of fluid into the interstitial tissues.
Hypoalbuminemia commonly occurs in:
Liver disease
Malnutrition
Nephrotic syndrome
Severe burns
Chronic inflammatory disorders
Kidney Function Tests
Renal function should be assessed using:
Serum creatinine
Blood urea nitrogen (BUN)
Estimated glomerular filtration rate
Rising creatinine may indicate worsening renal perfusion or acute kidney injury.
Liver Function Tests
When liver disease is suspected, evaluate:
Alanine aminotransferase (ALT)
Aspartate aminotransferase (AST)
Bilirubin
Albumin
International normalized ratio (INR)
Abnormal function tests help identify cirrhosis or hepatic dysfunction contributing to ascites and reduced albumin synthesis.
Serial lactate measurements are especially valuable in patients with septic shock.
Diagnostic Imaging
Imaging studies help identify where fluid accumulates and evaluate complications.
Common investigations include:
Ultrasound
Useful for detecting:
Ascites
Pleural effusions
Fluid collections
Organ abnormalities
Chest X-ray
A chest x-ray may reveal:
Pleural effusions
Pulmonary edema
Enlarged cardiac silhouette in heart failure
Lung infiltrates associated with pneumonia
Computed Tomography (CT)
CT imaging can identify:
Abdominal inflammation
Pancreatitis
Internal bleeding
Retroperitoneal fluid collections
Abscesses
Echocardiography
Patients with suspected cardiac causes may require echocardiography to assess:
Cardiac function
Ejection fraction
Valve abnormalities
Pericardial effusion
Monitoring Fluid Status
Because third-spacing is a dynamic process, continuous monitoring is just as important as the initial assessment. The patient’s condition may change rapidly, particularly during the acute phase of illness or after treatment begins.
Ongoing assessment allows nurses to determine whether:
Fluid management is effective.
The patient is improving.
Additional interventions are required.
Complications are developing.
Intake and Output Monitoring
Accurate documentation of fluid intake and output remains one of the most important nursing responsibilities.
Monitor:
Oral intake
Intravenous fluids
Blood products
Drain output
Urinary output
Emesis
Gastrointestinal losses
Declining urine output is often one of the earliest indicators of worsening intravascular depletion.
Daily Body Weight
Daily body weight provides one of the most reliable indicators of changing fluid volume.
Whenever possible:
Use the same scale.
Measure at the same time each day.
Use similar clothing.
A rapid weight gain usually indicates increasing fluid retention rather than increased body mass.
Hemodynamic Monitoring
Patients who are critically ill may require invasive monitoring.
Parameters may include:
Central venous pressure
Mean arterial pressure
Cardiac output
Mixed venous oxygen saturation
These measurements help evaluate the effectiveness of resuscitation and guide ongoing therapy.
Frequent Reassessment
Patients with third-spacing require repeated assessment because physiological changes may occur within minutes or hours.
Reassess:
Vital signs
Mental status
Peripheral perfusion
Lung sounds
Edema progression
Abdominal girth
Laboratory values
Response to administered therapies
Evaluating Treatment Response
Successful treatment is suggested by gradual improvement in:
Blood pressure
Heart rate
Tissue perfusion
Mental status
Urine output
Laboratory values
Organ function
During recovery, excess interstitial fluid begins to mobilize and shifts back into the circulation. While this indicates improving vascular integrity, it also requires close observation because rapid fluid redistribution may precipitate pulmonary edema or worsen heart failure, particularly in vulnerable patients.
Ultimately, effective assessment and diagnosis in Third Space in Nursing rely on integrating bedside observations with laboratory and diagnostic findings rather than depending on any single indicator. By recognizing subtle changes in fluid balance, identifying the underlying cause, and continuously monitoring the patient’s response to treatment, nurses can detect deterioration early, guide evidence-based interventions, and significantly reduce the risk of complications associated with third-spacing.
Fluid Management and Treatment of Third Space
Effective fluid management is one of the most challenging aspects of Third Space in Nursing because the primary problem is not simply that the patient has “too little” or “too much” fluid. Instead, the problem lies in where the fluid is located. During third-spacing, fluid moves from the intravascular compartment into the interstitial space or other body cavities, leaving the patient with reduced effective circulating volume despite having an increase in total body extracellular fluid.
This distinction is critical because inappropriate treatment can worsen the patient’s condition. For example, administering excessive intravenous fluids to a patient whose capillary permeability remains severely impaired may simply result in more fluid leaking into the tissues, worsening edema and delaying recovery. Conversely, restricting fluids too early in a patient with severe hypovolemic circulation may further reduce tissue perfusion, increasing the risk of organ failure.
For this reason, successful treatment in Third Space in Nursing always begins with identifying and correcting the underlying cause responsible for abnormal fluid shifts. Whether the condition is caused by sepsis, burns, trauma, heart failure, liver disease, pancreatitis, or another disorder, definitive treatment must address the disease process that initiated the third-spacing.
The primary goals of treatment include:
Restoring adequate intravascular volume
Maintaining tissue perfusion
Supporting oxygen delivery to vital organs
Correcting electrolyte abnormalities
Preventing complications such as hypovolemic shock
Promoting gradual return of interstitial fluid to the circulation
Treating the underlying disease responsible for third-spacing
Treatment strategies are not identical for every patient. Instead, management depends on several important factors, including:
The severity of fluid loss from the circulation
The patient’s hemodynamic status
The degree of capillary permeability
Renal and cardiac function
Laboratory findings
The amount of fluid accumulates within tissues
The patient’s response to previous interventions
A patient with septic shock, for example, requires a very different approach from a patient with cirrhosis and massive ascites, even though both conditions involve third-spacing.
Throughout treatment, nurses must continually evaluate:
Blood pressure
Heart rate
Urine output
Mental status
Oxygenation
Daily body weight
Laboratory values
Evidence of improving or worsening fluid balance
These ongoing assessments guide clinical decisions and help determine whether therapy is successfully restoring effective circulation.
Crystalloid Therapy
Crystalloid solutions are the first-line treatment for restoring intravascular volume in many patients experiencing significant third-spacing. These solutions contain water and small dissolved electrolytes that readily cross capillary membranes and distribute throughout the extracellular fluid compartment.
Because crystalloids are inexpensive, widely available, and supported by strong clinical evidence, they remain the initial fluid of choice during resuscitation for many critically ill patients.
What Are Crystalloid Solutions?
Crystalloid solutions contain water mixed with electrolytes that closely resemble normal plasma composition.
Common examples include:
0.9% Normal saline
Lactated Ringer’s solution
Plasma-Lyte®
Most patients with third-spacing initially receive isotonic crystalloids because these solutions expand circulating volume without causing significant osmotic shifts between the intracellular and extracellular compartments.
Although hypertonic fluids may occasionally be used in selected neurological emergencies, they are not routinely administered for uncomplicated third-spacing because of their specialized indications and potential risks.
How Crystalloids Work
Following intravenous administration, crystalloids increase circulating plasma volume, improving:
Venous return
Stroke volume
Cardiac output
Tissue perfusion
Blood pressure
However, crystalloids do not remain entirely within the vascular compartment.
Approximately one-quarter of an isotonic crystalloid infusion remains intravascular after equilibration, while the remainder distributes into the interstitial compartment. In patients with markedly increased capillary permeability, an even greater proportion may leave the circulation, explaining why repeated fluid administration is sometimes necessary during the early stages of sepsis, burns, or severe trauma.
Clinical Example
A patient with septic shock arrives in the emergency department with:
Blood pressure of 78/46 mmHg
Heart rate of 132 beats/minute
Cool extremities
Poor capillary refill
Minimal urine output
Initial treatment involves rapid administration of isotoniccrystalloid solution to restore intravascular volume and improve tissue perfusion. As blood pressure begins to improve, the nurse continues assessing for signs that additional fluid is needed or that excessive fluid administration may be worsening edema.
Nursing Considerations During Crystalloid Therapy
While administering crystalloids, nurses should monitor for:
Improvement in blood pressure
Increased urine output
Better mental status
Improved skin perfusion
Reduction in serum lactate
Development of pulmonary edema
Worsening peripheral edema
Changes in respiratory status
Frequent reassessment is essential because fluid requirements often change rapidly as third spacing occurs and later resolves.
Albumin, Colloids, and Blood Products
Although crystalloids remain the cornerstone of initial resuscitation, some patients require additional therapies to restore adequate circulating volume or replace specific blood components. These include albumin, colloid solutions, and blood products.
Albumin
Albumin is the most abundant plasma protein and the primary contributor to oncotic pressure. Its main physiological function is to retain water within the intravascular space, opposing the outward force of hydrostatic pressure.
When albumin concentrations fall, less fluid is pulled back into the circulation, allowing continued third-spacing.
Albumin administration may be considered in selected patients, including those with:
Liver cirrhosis and severe ascites
Large-volume paracentesis
Significant hypoalbuminemia
Some critically ill patients after initial crystalloid resuscitation
By increasing plasma oncotic pressure, albumin helps draw fluid from the interstitial space back into the circulation. However, its effectiveness depends on improving capillary integrity. If severe inflammation continues to increase vascular permeability, infused albumin may also leak into surrounding tissues.
For this reason, albumin is generally used selectively rather than routinely for all patients with third-spacing.
Colloid Solutions
Colloid solutions contain larger molecules that remain within the circulation longer than crystalloids.
Historically used colloids include:
Dextran
Hydroxyethyl starch
Gelatin-based solutions
Because these larger molecules increase oncotic pressure, they theoretically maintain intravascular volume more effectively than crystalloids.
However, modern clinical practice has become more selective regarding colloid use. Some synthetic colloids, particularly dextran and certain starch solutions, have been associated with adverse effects such as kidney injury, coagulation abnormalities, and allergic reactions. Consequently, current evidence generally favors balanced crystalloid solutions for initial fluid resuscitation, with albumin reserved for carefully selected clinical situations.
Blood Products
Third-spacing itself does not directly cause blood loss. However, patients experiencing major surgery, traumatic injuries, or gastrointestinal hemorrhage may simultaneously require blood product replacement.
Blood products may include:
Packed red blood cells
Fresh frozen plasma
Platelets
Cryoprecipitate
These therapies serve different purposes.
For example:
Red blood cells improve oxygen-carrying capacity.
Plasma replaces coagulation factors.
Platelets reduce bleeding risk.
Blood transfusion decisions should be based on clinical assessment, laboratory findings, ongoing blood loss, and evidence-based transfusion guidelines rather than the presence of third-spacing alone.
Nursing Responsibilities
During administration of albumin, colloids, or blood products, nurses should:
Verify patient identification carefully.
Monitor vital signs before, during, and after infusion.
Observe for transfusion reactions.
Assess lung sounds regularly.
Monitor urine output.
Evaluate for improvement in tissue perfusion.
Watch for signs of circulatory overload.
Diuretics and Other Treatment Strategies
Although restoring intravascular volume is the immediate priority during acute third-spacing, treatment priorities often change as the patient’s condition improves. Once vascular integrity begins to recover and fluid starts to mobilize and shifts back into the circulation, attention turns toward safely removing excess fluid while maintaining adequate organ perfusion.
Diuretic Therapy
A diuretic promotes excretion of sodium and water through the kidneys.
Commonly used diuretics include:
Furosemide
Bumetanide
Torsemide
Spironolactone (particularly in cirrhotic patients with ascites)
Diuretics should not usually be administered during the early phase of significant third-spacing when patients remain markedly hypovolemic, as premature diuresis can further reduce intravascular volume and worsen tissue perfusion.
Instead, they are generally introduced when:
Hemodynamic stability has been restored.
Capillary leakage is improving.
Excess interstitial fluid begins returning to the circulation.
The patient demonstrates evidence of fluid overload.
Clinical Example
A patient with extensive burns receives aggressive crystalloid resuscitation during the first 24 hours after injury. By the third hospital day, capillary permeability improves, and previously sequestered fluid begins returning to the circulation. The patient’s blood pressure stabilizes, but increasing pulmonary congestion develops. At this stage, carefully monitored diuretic therapy helps eliminate excess fluid while preventing respiratory complications.
Treating the Underlying Cause
The most effective treatment for third-spacing is always correction of the disease process responsible for abnormal fluid shifts.
Examples include:
Underlying Cause
Primary Treatment
Sepsis
Early antibiotics, source control, fluid resuscitation, vasopressors if indicated
Supportive care, pain management, aggressive early fluid resuscitation
Because treatment depends on the underlying cause, simply replacing fluid without addressing the disease process rarely provides lasting improvement.
Ongoing Monitoring During Treatment
Throughout therapy, nurses should continually evaluate the patient’s response.
Key monitoring parameters include:
Blood pressure
Heart rate
Respiratory status
Oxygen saturation
Lung sounds
Urine output
Daily body weight
Serum electrolyte levels
Renal function
Mental status
Progression or resolution of edema and ascites
During recovery, careful monitoring becomes especially important because rapidly increasing intravascular volume may precipitate pulmonary edema, particularly in patients with underlying cardiac dysfunction or impaired renal function.
Key Nursing Considerations
Successful fluid management in Third Space in Nursing requires a dynamic, individualized approach rather than a fixed treatment protocol. Nurses should remember the following principles:
Restore effective intravascular volume before attempting to remove excess fluid.
Use crystalloid solutions as first-line therapy for most patients requiring initial volume resuscitation.
Reserve albumin and other colloid therapies for appropriate clinical indications.
Administer blood products only when clinically indicated.
Introduce diuretic therapy after hemodynamic stability has been achieved and fluid redistribution has begun.
Continuously reassess the patient’s response because treatment needs may change rapidly.
Most importantly, remember that successful management of third-spacing always depends on the underlying cause. Addressing the disease process responsible for abnormal fluid shifts is essential for restoring normal fluid physiology, preventing recurrent third-spacing, and improving long-term patient outcomes.
Nursing Care for Patients with Third-Spacing
Providing comprehensive nursing care is one of the most important aspects of Third Space in Nursing because nurses are responsible for the continuous assessment, implementation of treatment plans, early recognition of complications, and evaluation of patient outcomes. While physicians diagnose the underlying condition and prescribe treatment, nurses remain at the bedside throughout the patient’s illness, making them uniquely positioned to detect subtle clinical changes before they progress into life-threatening emergencies.
Unlike many acute illnesses that require a single intervention, patients experiencing third-spacing often require ongoing multidisciplinary management. Nursing care extends beyond administering intravenous fluids or medications; it involves maintaining fluid balance, preserving tissue perfusion, preventing complications, promoting patient comfort, supporting recovery, and educating patients and their families about the condition.
Because third spacing occurs in a wide variety of clinical situations—including sepsis, burns, trauma, heart failure, liver disease with ascites, pancreatitis, and postoperative recovery—nursing interventions should always be individualized according to the patient’s condition, comorbidities, and response to treatment.
The primary goals of nursing care include:
Restoring adequate intravascular volume
Maintaining organ perfusion
Preventing further fluid shifts
Monitoring for complications
Supporting safe fluid management
Identifying changes in clinical status early
Promoting patient comfort and recovery
Educating patients about treatment and long-term care
These goals require frequent reassessment because the patient’s physiological status can change rapidly during both the acute third-spacing phase and the recovery period when interstitial fluid begins to mobilize and shifts back into the circulation.
Nursing Interventions
Nursing interventions for patients with third-spacing focus on restoring physiological stability while minimizing complications associated with abnormal fluid redistribution. Interventions should always be evidence-based and guided by the patient’s clinical condition rather than by the presence of edema alone.
Perform Comprehensive and Frequent Assessments
Assessment is the foundation of effective nursing care.
Nurses should routinely evaluate:
Vital signs
Level of consciousness
Respiratory status
Skin color and temperature
Peripheral perfusion
Capillary refill
Presence and progression of edema
Abdominal distension associated with ascites
Lung sounds
Pain level
Overall response to treatment
Trend assessment is often more valuable than isolated findings. For example, a gradual decline in blood pressure combined with increasing heart rate and decreasing urine output may indicate worsening intravascular depletion even before severe hypotension develops.
Administer Fluids Safely
Many patients with third-spacing require carefully controlled intravenouscrystalloid therapy to restore intravascular volume.
Nursing responsibilities include:
Verifying prescribed fluids
Confirming infusion rates
Monitoring infusion pumps
Assessing IV access sites
Watching for infiltration or extravasation
Evaluating patient response to fluid administration
Because increased capillary permeability may cause administered fluids to rapidly leave the circulation, nurses must continually assess whether additional fluids improve tissue perfusion or simply worsen interstitial swelling.
Administer Medications Correctly
Medication therapy varies according to the underlying cause.
Common medications may include:
Antibiotics for sepsis
Vasopressors for persistent hypotension
Diuretic therapy after vascular stability has been restored
Albumin replacement when indicated
Pain medications
Antipyretics
Anticoagulants when appropriate
Nurses should understand each medication’s purpose, monitor for adverse effects, and evaluate therapeutic effectiveness.
Promote Adequate Tissue Perfusion
Because reduced circulating volume decreases oxygen delivery, interventions aimed at improving perfusion are essential.
These may include:
Maintaining prescribed blood pressure goals
Administering supplemental oxygen when indicated
Positioning the patient appropriately
Preventing unnecessary interruptions to therapy
Collaborating with the healthcare team regarding worsening hemodynamic status
Prevent Skin Breakdown
Persistent edema places considerable stress on the skin and underlying tissues.
Preventive interventions include:
Frequent repositioning
Pressure-relieving mattresses
Careful skin inspection
Maintaining clean and dry skin
Protecting fragile tissues
Applying prescribed barrier products
Patients with generalized edema are at increased risk for pressure injuries because tissue swelling reduces oxygen delivery and delays healing.
Support Nutritional Status
Adequate nutrition plays an important role in recovery.
Depending on the patient’s condition, nutritional management may include:
High-protein diets when appropriate
Sodium restriction in patients with heart failure or ascites
Monitoring oral intake
Collaborating with dietitians
Monitoring serum albumin
Improved nutritional status supports wound healing and restoration of normal oncotic pressure.
Patient Monitoring and Safety
Continuous monitoring is one of the nurse’s most important responsibilities because third-spacing is highly dynamic. Patients who appear stable during one assessment may deteriorate rapidly as additional fluid leaves the intravascular space or as previously sequestered fluid returns to the circulation.
Monitor Fluid Balance
Accurate intake and output measurement remains essential throughout hospitalization.
Monitor and document:
Oral intake
Intravenous fluids
Blood products
Enteral feeding
Urinary output
Drainage from surgical drains
Vomiting
Diarrhea
Declining urine output often represents one of the earliest indicators of worsening renal perfusion.
Monitor Daily Body Weight
Daily body weight provides valuable information regarding changes in fluid volume.
To improve accuracy:
Use the same scale each day.
Weigh the patient at the same time.
Use similar clothing.
Document trends rather than isolated measurements.
Rapid increases in weight frequently indicate accumulation of fluid rather than increased body mass.
Monitor Respiratory Status
Respiratory assessment should occur frequently because excessive fluid redistribution may impair breathing.
Evaluate:
Respiratory rate
Oxygen saturation
Breath sounds
Work of breathing
Presence of crackles
Development of pleural effusions
Patients recovering from third-spacing require especially close observation because fluid that shifts back into the circulation may contribute to pulmonary edema.
Monitor Laboratory Values
Laboratory trends often provide early evidence of improvement or deterioration.
Common parameters include:
Electrolyte levels
Serum creatinine
Blood urea nitrogen
Hemoglobin
Hematocrit
Serum albumin
Lactate
White blood cell count
Changes should always be interpreted alongside clinical assessment findings.
Maintain Patient Safety
Patients experiencing third-spacing frequently develop weakness, dizziness, and orthostatic hypotension.
Safety interventions include:
Assisting with ambulation
Using fall precautions
Keeping frequently used items within reach
Encouraging patients to request assistance before standing
Monitoring for confusion
Preventing accidental removal of IV lines or monitoring devices
Recognize Clinical Deterioration Early
Nurses should immediately report signs of worsening circulation, including:
Persistent hypotension
Increasing tachycardia
Reduced urine output
Altered mental status
Worsening respiratory distress
Cyanosis
Poor peripheral perfusion
Progressive abdominal distension
Rapidly increasing edema
Early communication with the healthcare team allows timely intervention before severe complications develop.
Clinical Example
A patient recovering from abdominal sepsis initially responds well to fluid resuscitation. Twelve hours later, the nurse notices increasing shortness of breath, crackles on lung auscultation, rising oxygen requirements, and rapid weight gain. Although blood pressure has improved, these findings suggest that previously sequestered interstitial fluid may be returning to the circulation faster than the cardiovascular system can tolerate. Prompt notification of the healthcare provider allows treatment adjustments before respiratory failure develops.
Patient Education
Patient education is an essential component of Third Space in Nursing because many patients continue recovering after discharge and require a clear understanding of their condition, medications, lifestyle modifications, and follow-up care. Effective education also helps reduce hospital readmissions by encouraging early recognition of worsening symptoms and promoting adherence to treatment plans.
Education should be individualized according to the patient’s diagnosis, literacy level, cultural background, and readiness to learn. Family members and caregivers should be included whenever appropriate, particularly for patients with chronic illnesses such as heart failure, liver disease, or kidney disease.
Explain the Condition
Patients should understand that third-spacing means fluid has moved out of the bloodstream into surrounding tissues or body cavities, reducing the amount of fluid available for normal circulation.
Using simple language can improve understanding.
For example:
“Although your body contains extra fluid, much of it is not where it needs to be. Instead of staying inside your blood vessels to circulate oxygen and nutrients, the fluid has moved into your tissues, causing swelling and reducing blood flow to your organs.”
Discuss the Underlying Cause
Education should emphasize that third-spacing is usually a complication of another illness rather than an independent disease.
Depending on the diagnosis, discuss:
Sepsis
Liver disease
Heart failure
Kidney disease
Burns
Trauma
Surgical recovery
Helping patients understand the underlying cause reinforces the importance of ongoing treatment and follow-up care.
Teach Medication Adherence
Patients should receive clear instructions regarding prescribed medications.
Topics may include:
Purpose of each medication
Correct dosing schedule
Possible side effects
When to seek medical advice
Importance of completing antibiotic therapy
Safe use of diuretic medications
Patients taking diuretics should understand the importance of monitoring for dehydration, dizziness, and symptoms of electrolyte imbalance.
Encourage Home Monitoring
Depending on the patient’s condition, home monitoring may include:
Daily body weight
Blood pressure monitoring
Monitoring swelling
Tracking urine output, if instructed
Observing abdominal size in patients with ascites
Patients should understand that rapid weight gain, worsening edema, or increasing abdominal distension should be reported promptly.
Reinforce Dietary Recommendations
Nutrition education should reflect the patient’s specific medical condition.
Examples include:
Sodium restriction for heart failure and cirrhosis
Adequate protein intake when appropriate
Maintaining hydration as directed
Avoiding excessive alcohol consumption in liver disease
Following prescribed renal diets when indicated
Teach Warning Signs That Require Immediate Medical Attention
Patients and caregivers should seek prompt medical evaluation if they experience:
Increasing shortness of breath
Rapid swelling of the legs or abdomen
Severe dizziness or fainting
Reduced urine output
Chest pain
Fever or worsening infection
Confusion
Sudden weight gain over a short period
Persistent hypotension or extreme weakness
Recognizing these warning signs early allows timely intervention and may prevent progression to severe complications such as hypovolemic shock, respiratory failure, or acute kidney injury.
Promoting Long-Term Recovery
Recovery from third-spacing often continues well beyond the acute hospitalization. Encouraging adherence to medications, dietary recommendations, follow-up appointments, and prescribed monitoring helps patients maintain fluid balance and reduce the likelihood of recurrence. Nurses also play an important role in reinforcing lifestyle modifications, addressing patient concerns, and fostering confidence in self-management.
Ultimately, effective nursing care for patients experiencing Third Space in Nursing extends far beyond administering treatments. Through comprehensive assessment, evidence-based interventions, vigilant monitoring, patient-centered education, and collaboration with the multidisciplinary healthcare team, nurses help restore physiological stability, prevent complications, promote recovery, and improve both short- and long-term patient outcomes.
NCLEX Tips and Key Takeaways for Nursing Students
Mastering Third Space in Nursing requires more than memorizing definitions or recognizing isolated symptoms. Success on the NCLEX and in clinical practice depends on understanding the underlying physiology that drives fluid shifts, recognizing early clinical manifestations, prioritizing nursing interventions, and applying sound clinical judgment to patient care scenarios.
Questions about third-spacing frequently appear in nursing examinations because they integrate several fundamental concepts, including fluid balance, cardiovascular physiology, renal function, acid-base balance, and shock. Rather than asking students to simply define third-spacing, many NCLEX-style questions present patient scenarios requiring interpretation of assessment findings, prioritization of interventions, or identification of the most appropriate nursing action.
For example, students may be asked to determine why a patient with generalized edema is hypotensive, identify which assessment finding requires immediate intervention, or choose the most appropriate fluid management strategy for a patient with sepsis.
To answer these questions correctly, it is important to remember one essential concept:
Third-spacing is primarily a problem of fluid redistribution rather than total fluid loss.
Although the body may contain excess extracellular fluid, the patient often becomes functionally hypovolemic because fluid moves from the intravascular compartment into the interstitial space or other body cavities, reducing effective circulating volume.
Understanding this principle makes it easier to interpret patient assessment findings and anticipate appropriate nursing interventions.
The following clinical pearls and NCLEX practice tips summarize the most important concepts every nursing student should remember.
Fluid Management and Treatment of Third Space
Clinical Pearls
The following evidence-based clinical pearls reinforce key principles that apply both in nursing school and in everyday patient care.
1. Third-Spacing Is a Redistribution Problem
One of the most common misconceptions is assuming that patients experiencing third-spacing are simply dehydrated.
In reality:
Total body fluid may be normal or increased.
The problem is that the fluid is no longer inside the circulation.
Effective intravascular volume decreases even while interstitial fluid increases.
This explains why patients may simultaneously exhibit hypotension and generalized edema.
2. Edema Does Not Mean Adequate Circulation
Visible swelling can be misleading.
Patients with severe edema or ascites may actually have poor tissue perfusion because much of their plasma has moved into the third space.
Always assess:
Blood pressure
Heart rate
Mental status
Peripheral perfusion
Urine output
rather than relying solely on visible swelling.
3. Urine Output Is an Early Indicator of Perfusion
One of the earliest indicators of declining kidney perfusion is reduced urine output.
A sustained urine output below approximately 0.5 mL/kg/hour should prompt further assessment, especially when accompanied by:
Tachycardia
Hypotension
Rising creatinine
Altered mental status
4. Treat the Cause, Not Just the Fluid Shift
Successful treatment always focuses on correcting the underlying cause.
Examples include:
Antibiotics for sepsis
Burn resuscitation
Management of liver disease causing ascites
Treatment of heart failure
Surgical management of abdominal pathology
Simply replacing fluid without addressing the disease process will not permanently resolve third-spacing.
5. Frequent Reassessment Is Essential
Patients experiencing third-spacing can deteriorate rapidly.
Nurses should reassess frequently:
Vital signs
Respiratory status
Level of consciousness
Edema progression
Lung sounds
Daily body weight
Laboratory values
Response to treatment
Trend analysis often provides more valuable information than isolated assessment findings.
6. Recovery Can Also Produce Complications
As vascular integrity improves, previously sequestered interstitial fluid begins to mobilize and shifts back into the circulation.
Although this indicates recovery, it may also increase:
Cardiac output
Circulating blood volume
Risk of pulmonary edema
Patients with heart failure or kidney disease require particularly careful monitoring during this phase.
7. Remember the Starling Forces
Many NCLEX questions test understanding of normal physiology.
Remember these principles:
Hydrostatic pressure pushes fluid out of capillaries.
Oncotic pressure, maintained primarily by albumin, pulls fluid back into the circulation.
The lymphatic system returns excess interstitial fluid to the bloodstream.
Disruption of any of these mechanisms may contribute to third spacing occurs.
8. Third-Spacing Is Common in Critical Care
Patients who are critically ill frequently develop third-spacing because many severe illnesses increase capillary permeability.
Common examples include:
Septic shock
Extensive burns
Major trauma
Severe pancreatitis
Major abdominal surgery
Anaphylaxis
Recognizing these high-risk situations allows earlier intervention.
NCLEX Practice Tips
The following strategies can help nursing students answer NCLEX-style questions involving Third Space in Nursing more confidently.
Tip 1: Identify the Underlying Pathophysiology
Before selecting an answer, ask yourself:
Why is the patient developing third-spacing?
Determine whether the question involves:
Increased capillary permeability
Reduced albumin
Elevated hydrostatic pressure
Lymphatic obstruction
Inflammatory disease
Understanding the mechanism usually leads to the correct intervention.
Tip 2: Prioritize Perfusion
The NCLEX emphasizes patient safety.
When multiple answers appear correct, prioritize interventions that restore or preserve:
Airway
Breathing
Circulation
Tissue perfusion
For example, hypotension with declining urine output generally requires more urgent intervention than isolated peripheral edema.
Tip 3: Avoid Treating the Edema Alone
A common examination trap is assuming that every patient with swelling requires immediate diuretic therapy.
Remember:
Patients who remain significantly hypovolemic often require restoration of intravascular volume before diuretics are appropriate.
Always evaluate:
Blood pressure
Perfusion
Kidney function
Overall hemodynamic stability
before considering fluid removal.
Tip 4: Recognize Early Signs of Shock
NCLEX questions often test recognition of early compensation.
Early findings include:
Tachycardia
Mild hypotension
Decreasing urine output
Cool skin
Anxiety
Delayed capillary refill
Do not wait for profound hypotension before recognizing deterioration.
Tip 5: Interpret Assessment Findings Together
Avoid focusing on a single symptom.
Instead, combine assessment findings.
For example:
A patient has:
Generalized edema
Blood pressure of 88/54 mmHg
Heart rate of 124 beats/minute
Poor urine output
The correct interpretation is not fluid overload alone.
Instead, the patient most likely has significant third-spacing with reduced effective circulating volume.
Tip 6: Know Common Causes
Frequently tested causes of third-spacing include:
Sepsis
Burns
Trauma
Liver cirrhosis
Ascites
Pancreatitis
Major surgery
Heart failure
Severe allergic reactions
Recognizing these conditions helps identify patients at increased risk.
Tip 7: Understand Fluid Therapy
Remember these general principles:
Crystalloid solutions are usually the initial fluids for restoring intravascular volume.
Albumin may be indicated in selected patients with hypoalbuminemia or large-volume paracentesis.
Blood products replace blood components rather than simply expanding volume.
Diuretic therapy is generally introduced after adequate perfusion has been restored and excess fluid begins returning to the circulation.
Tip 8: Read Every Question Carefully
Many NCLEX questions contain clues hidden within the patient’s assessment findings.
Pay attention to words such as:
“Most appropriate”
“Priority”
“First”
“Immediate”
“Best response”
“Requires intervention”
These keywords help determine which nursing action should be performed first.
Quick NCLEX Review Checklist
Before your examination, make sure you can confidently answer the following questions:
□ What is third-spacing, and why does it occur?
□ How does fluid moves from the intravascular compartment into the interstitial space?
□ What roles do hydrostatic pressure, oncotic pressure, and albumin play in normal fluid balance?
□ Which conditions commonly cause third-spacing?
□ How do third-spacing and dehydration differ?
□ Why can patients have both edema and hypotension?
□ Which assessment findings suggest worsening tissue perfusion?
□ When are crystalloid, albumin, blood products, and diuretic therapy most appropriate?
□ What complications may develop if third-spacing remains untreated?
□ Which nursing assessments should be prioritized during ongoing fluid management?
Memory Tip for Nursing Students
A simple way to remember the concept of third-spacing is to think of the phrase:
“Fluid is present—but in the wrong place.”
This single concept explains nearly every clinical feature of Third Space in Nursing:
The patient has excess interstitial fluid, resulting in edema or ascites.
The patient has inadequate intravascular volume, leading to hypotension, reduced urine output, and impaired perfusion.
Treatment focuses on restoring effective circulation while addressing the underlying cause responsible for abnormal fluid shifts.
Keeping this principle in mind will help you answer NCLEX questions more accurately and, more importantly, provide safe, evidence-based care in clinical practice. By understanding the pathophysiology, recognizing early warning signs, and applying appropriate nursing interventions, you will be well prepared to assess and manage patients experiencing Third Space in Nursing across a wide range of healthcare settings.
Feeling stressed about writing a detailed nursing paper?
Understanding Third Space in Nursing is essential because third-spacing is far more than a simple fluid imbalance—it is a complex physiological process in which fluid is redistributed from the intravascular space into the interstitial space or other body compartments, leaving the patient with reduced effective circulating volume despite often having an overall increase in body fluid. Appreciating this distinction helps explain why patients can present with seemingly contradictory findings such as generalized edema or ascites alongside hypotension, decreased urine output, and signs of poor tissue perfusion.
Throughout this guide, we explored the normal physiology of body fluid compartments, the forces that regulate fluid movement, and the mechanisms by which third-spacing develops. We also examined the common conditions that trigger abnormal fluid shifts, including sepsis, burns, trauma, liver disease, heart failure, and kidney disorders, emphasizing that third-spacing is a manifestation of an underlying disease rather than a diagnosis in itself. Understanding these mechanisms provides the foundation for accurate assessment, timely intervention, and evidence-based clinical decision-making.
For nurses, recognizing third-spacing early is one of the most valuable clinical skills. Careful assessment of vital signs, fluid balance, urine output, laboratory values, daily weight, and physical findings allows subtle changes in a patient’s condition to be identified before they progress to serious complications such as hypovolemic shock, acute kidney injury, respiratory compromise, or multiple organ dysfunction. Equally important is understanding that effective fluid management requires more than replacing lost volume; it involves restoring adequate intravascular volume, monitoring the patient’s response to therapy, and treating the underlying condition responsible for the abnormal redistribution of fluid.
Ultimately, success in caring for patients with third-spacing depends on combining a strong understanding of pathophysiology with vigilant clinical assessment and thoughtful nursing interventions. Whether preparing for the NCLEX, developing confidence during clinical rotations, or caring for critically ill patients in practice, mastering the concepts of Third Space in Nursing equips nurses to recognize deterioration early, prioritize appropriate interventions, collaborate effectively with the healthcare team, and contribute to safer, higher-quality patient care. By viewing third-spacing as a dynamic process rather than an isolated symptom, nurses are better prepared to make informed clinical decisions that improve outcomes and support recovery across a wide range of healthcare settings.
Frequently Asked Questions
What is 3rd spacing in nursing?
Third spacing is the abnormal movement of fluid from the intravascular space into the interstitial space or other body cavities, where it becomes unavailable for normal circulation. Although the body may still contain the same amount of fluid, the loss of effective circulating volume can lead to hypotension, decreased tissue perfusion, and organ dysfunction. Common causes include sepsis, burns, trauma, major surgery, liver disease, and severe inflammation.
What fluids do you give for third spacing?
Initial treatment typically involves isotonic crystalloid solutions, such as 0.9% normal saline or Lactated Ringer’s, to restore intravascular volume and improve tissue perfusion. Depending on the patient’s condition, albumin, other colloids, or blood products may also be indicated, particularly in patients with severe hypoalbuminemia or blood loss. The choice of fluid depends on the underlying cause, the patient’s hemodynamic status, and ongoing assessment findings.
What is 1st, 2nd, and 3rd space fluid loss?
First-space fluid refers to normal fluid located inside cells (intracellular fluid) and within the blood vessels (intravascular fluid), where it performs normal physiological functions.
Second-space fluid refers to fluid in the interstitial space that normally surrounds the body’s cells and supports nutrient and waste exchange.
Third-space fluid loss occurs when fluid shifts into areas where it is not readily available for circulation, such as the peritoneal cavity (ascites), pleural space, or excessively into interstitial tissues during severe edema. This fluid becomes “trapped,” reducing effective circulating blood volume.
What are the main symptoms of third spacing?
Common signs and symptoms of third-spacing include:
Generalized or localized edema
Ascites (abdominal fluid accumulation)
Hypotension
Tachycardia
Decreased urine output
Rapid weight gain due to fluid accumulation
Cool, pale skin with delayed capillary refill
Weak peripheral pulses
Shortness of breath (if pleural effusion or pulmonary edema develops)
Dizziness, confusion, or altered mental status in severe cases due to reduced tissue perfusion.